ในการสร้าง Custom View ที่สะดวกรวดเร็วที่สุดคือสร้าง Layout Resource ขึ้นมาแล้ว Inflate เข้าไปใน Custom View อีกที เพราะสามารถกำหนดค่าต่าง ๆ ที่เกี่ยวกับ UI ไว้ใน Layout Resource ได้โดยตรง
แต่ถ้าต้องการให้ Custom View ของเราสามารถกำหนดขนาดในตอน Runtime ได้ล่ะ? ยกตัวอย่างเช่น

<com.akexorcist.CustomButton
       android:layout_width="wrap_content"
       android:layout_height="wrap_content"
       app:button_size="small" />
หรืออยากให้กำหนดผ่านโค้ดแบบนี้ได้ด้วย
val button: CustomButton = /* ... */
button.setButtonSize(CustomButton.Size.Medium)
จะเห็นว่าในกรณีแบบนี้ไม่ต้องการให้คนที่นำ Custom View ไปใช้ต้องมานั่งกำหนดขนาดของ View ด้วยค่า dp หรือ px เอง เช่น ต้องการสร้าง UI Component ที่คนในทีมเอาไปใช้ได้เลย จำแค่ว่าขนาดของ Button มีแค่ 3 ขนาด คือ Small, Medium, และ Large
ในตัวอย่างนี้จะให้ความสูงของ CustomButton เปลี่ยนไปตามค่า CustomButton.Size ส่วนความกว้างก็ช่างมันไปก่อนโดยแต่ละขนาดก็จะเตรียมไว้ใน Dimension Resource ไว้เรียบร้อยแล้ว
<!-- res/values/dimens.xml -->
<resources>
    <!-- ... -->
    <dimen name="button_size_small">36dp</dimen>
    <dimen name="button_size_medium">42dp</dimen>
    <dimen name="button_size_large">48dp</dimen>
</resources>

<!-- res/values/attrs.xml -->
<resources>
    <declare-styleable name="CustomButton">
        <attr name="button_size" format="enum">
            <enum name="small" value="0" />
            <enum name="medium" value="1" />
            <enum name="large" value="2" />
        </attr>
    </declare-styleable>
</resources>
ด้วยเงื่อนไขนี้จึงทำให้การกำหนดค่าไว้ใน Layout Resource ตั้งแต่แรกจึงไม่ตอบโจทย์ซักเท่าไร เพราะใน Custom View จะต้องเปลี่ยนความสูงของปุ่มตอน Runtime หรือแบบ Programmatically ได้
// CustomButton.kt
class CustomButton: LinearLayout {
    /* ... */
    private fun getButtonHeightInPixel(size: Size) = context.resources.getDimension(
        when (size) {
            Size.LARGE -> R.dimen.button_size_large
            Size.MEDIUM -> R.dimen.button_size_medium
            else -> R.dimen.button_size_small
        }
    )

    enum class Size(var value: Int) {
        SMALL(value = 0),
        MEDIUM(value = 1),
        LARGE(value = 2);

        companion object {
            fun from(value: Int) = when (value) {
                LARGE.value -> LARGE
                MEDIUM.value -> MEDIUM
                else -> SMALL
            }
        }
    }
}
ในโค้ดตัวอย่างข้างบนเรามี getButtonHeight(size: Size) เตรียมพร้อมไว้แล้ว เราจะเอาไปกำหนดค่าให้กับ Custom View ยังไงล่ะ?
ใช้วิธีที่ไม่ถูกต้องแบบนี้กันอยู่หรือป่าว
เพื่อให้ CustomButton กำหนดความสูงแบบ Programmatically ได้ ก็เลยเพิ่มโค้ดเข้าไปใน CustomButton แบบนี้
// CustomButton.kt
class CustomButton: LinearLayout {
    /* ... */
    private var buttonSize: Size = Size.SMALL

    // Initialization
    private fun setupView(/* ... */) {
        // Inflate custom button's layout
        buttonSize = /* Obtain button size value from custom attributes value in XML */
        post {
            setButtonHeight(buttonSize)
        }
    }

    fun setButtonHeight(size: Size) {
        this.layoutParams = this.layoutParams.apply {
            height = getButtonHeightInPixel(size).toInt()
        }
    }

    fun getButtonHeight(): Size = buttonSize

    private fun getButtonHeightInPixel(size: Size): Float = /* ... */

    enum class Size(var value: Int) { /* ... */ }
}
สร้าง buttonSize เพื่อเก็บ Enum ของ Button Size และตอนที่ Custom View ถูกสร้างขึ้นมาก็จะ Inflate Layout ของ Custom Button และดึงค่าจาก Custom Attribute เพื่อเอาค่า มาเก็บไว้ในbuttonSize นั่นเอง
แต่จุดที่อยากให้สังเกตจริง ๆ คือตอนที่กำหนดความสูงของ Button เพราะจะต้องดึง LayoutParams มากำหนดค่าความสูงใหม่และตอนที่ Custom Button ถูกสร้างขึ้นมาในตอนแรกจะต้องใช้ post ครอบคำสั่ง setButtonHeight เพื่อให้ความสูงถูกกำหนดหลังจากตอนที่ Custom Button ถูกสร้างขึ้นมาเรียบร้อยแล้ว
ทำไมวิธีนี้ถึงไม่ถูกต้อง?
แน่นอนว่าวิธีดังกล่าวอาจจะทำงานได้จริง แต่จะมีปัญหาอยู่ 2 จุดด้วยกัน
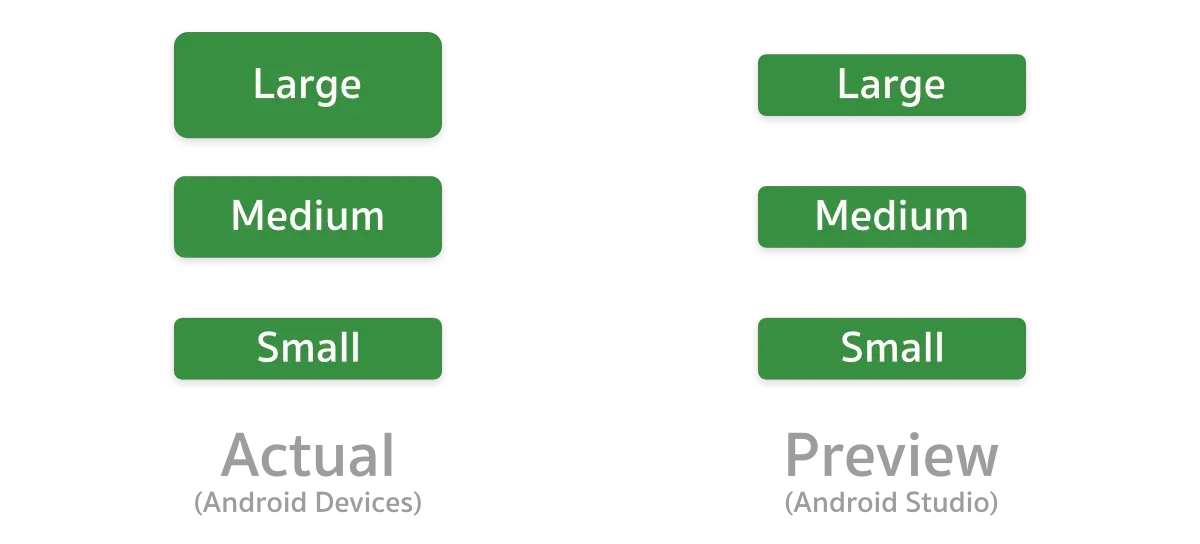
อย่างแรกคือคำสั่ง post ไม่มีผลกับตอน Preview ใน Android Studio ทำให้เวลาแอปทำงานจะแสดงความสูงได้ถูกต้อง แต่ถ้าดูใน Preview จะแสดงเป็นค่าความสูงที่กำหนดไว้ใน Layout Resource ในตอนแรกสุด คนที่เอาไปใช้ก็จะลำบากหน่อย

อย่างที่สองคือตอนที่ CustomButton ถูกสร้างขึ้น จะ Render 2 ครั้ง เพราะการใช้คำสั่ง post คือจะทำงานหลังจากที่ View ถูก Render เสร็จแล้ว ดังนั้นการกำหนดความสูงข้างใน post จะเป็นการ Re-render ไปโดยปริยาย ซึ่งไม่ดีต่อ Performance สำหรับ UI Rendering อย่างแน่นอน

ดังนั้นมาทำให้มันถูกต้องกันเถอะ
กำหนดความสูงไว้ใน onMeasure ตั้งแต่แรก
onMeasure เป็นหนึ่งใน Lifecycle ของ View ที่จะทำหน้าที่คำนวณขนาดของ View ว่าจะใช้พื้นที่เท่าไร, Parernt View ให้พื้นที่มาเท่าไร เพื่อให้ View สามารถแสดงบนพื้นที่ดังกล่าวได้อย่างเหมาะสม และเพื่อให้ความสูงใน Custom View ถูกต้องตามที่ต้องการ จะต้องเปลี่ยนวิธีคำนวณใน onMeasure ใหม่ซะ
เพื่ออธิบายเกี่ยวกับการคำนวณที่ว่านี้ให้น้อยที่สุด ขอให้เพิ่ม Extension Function ตัวนี้ไว้เลยละกัน
fun View.getMeasurement(measureSpec: Int, preferred: Int): Int {
    val specSize = View.MeasureSpec.getSize(measureSpec)
    return when (View.MeasureSpec.getMode(measureSpec)) {
        View.MeasureSpec.EXACTLY -> specSize
        View.MeasureSpec.AT_MOST -> preferred.coerceAtMost(specSize)
        else -> preferred
    }
}
Extension Function ตัวนี้จะเช็คให้ว่า Custom View สามารถแสดงความสูงตามที่เราต้องการได้หรือไม่ ในกรณีที่ Parent View ให้พื้นที่มาเล็กกว่า ก็จะอิงขนาดตามพื้นที่เท่าที่มีให้ แต่ถ้ามีพื้นที่เพียงพอก็จะใช้ขนาดตามที่กำหนดแทน
ดังนั้นแทนที่จะใช้ post และกำหนดความสูงผ่าน LayoutParams ก็ให้เปลี่ยนมา Override คำสั่งของ onMeasure แล้วใช้คำสั่งแบบนี้แทน
// CustomButton.kt
class CustomButton: LinearLayout {
    /* ... */
    private var buttonSize: Size = Size.SMALL

    override fun onMeasure(widthMeasureSpec: Int, heightMeasureSpec: Int) {
        super.onMeasure(widthMeasureSpec, heightMeasureSpec)
        val preferredHeight = getButtonHeightInPixel(this.buttonSize).toInt()
        val actualHeight = getMeasurement(heightMeasureSpec, preferredHeight)
        setMeasuredDimension(measuredWidth, actualHeight)
        measureChildren(widthMeasureSpec, MeasureSpec.makeMeasureSpec(actualHeight, MeasureSpec.EXACTLY))
    }

    private fun setupView(/* ... */) {
        // Inflate custom button's layout
        buttonSize = /* Obtain button size value from custom attributes value in XML */
    }

    private fun getButtonHeightInPixel(size: Size): Float = /* ... */

    enum class Size(var value: Int) { /* ... */ }
}
เพียงเท่านี้ CustomButton ก็จะมีความสูงตามที่ต้องการ โดยที่ Render แค่เพียงครั้งเดียว และสามารถ Preview ใน Android Studio ได้ถูกต้องด้วย
ใช้ requestLayout เมื่อกำหนดค่าผ่านโค้ด
ถ้าต้องการกำหนดค่าผ่าน Programmary ด้วย ก็ให้ใช้วิธีแบบนี้
// CustomButton.kt
class CustomButton: LinearLayout {
    /* ... */
    private var buttonSize: Size = Size.SMALL

    override fun onMeasure(widthMeasureSpec: Int, heightMeasureSpec: Int) { /* ... */ }

    fun setButtonSize(size: Size) {
        this.buttonSize = size
        requestLayout()
    }
}
การใช้คำสั่ง requestLayout จะทำให้ onMeasure ถูกเรียกใหม่อีกครั้ง ส่งผลให้ความสูงของ CustomButton เปลี่ยนตามค่าล่าสุดที่กำหนดไว้ใน buttonSize นั่นเอง
ถ้าอยากให้ Custom View กำหนดได้ทั้งความกว้างและความสูงล่ะ?
จากตัวอย่างที่ผ่านมาเป็นการกำหนดค่าเฉพาะความสูง แต่ถ้าผู้ที่หลงเข้ามาอ่านต้องการสร้าง Custom View ที่กำหนดความกว้างได้ด้วย ก็แค่เพิ่มคำสั่งสำหรับความกว้างเข้าไปใน onMeasure แบบนี้แทน
private var viewSize: Size = /* ... */

override fun onMeasure(widthMeasureSpec: Int, heightMeasureSpec: Int) {
    super.onMeasure(widthMeasureSpec, heightMeasureSpec)
    val preferredWidth = getViewWidthInPixel(viewSize).toInt()
    val preferredHeight = getViewHeightInPixel(viewSize).toInt()
    val actualWidth = getMeasurement(widthMeasureSpec, preferredWidth)
    val actualHeight = getMeasurement(heightMeasureSpec, preferredHeight)
    setMeasuredDimension(actualWidth, actualHeight)
    measureChildren(
        MeasureSpec.makeMeasureSpec(actualWidth, MeasureSpec.EXACTLY)
        MeasureSpec.makeMeasureSpec(actualHeight, MeasureSpec.EXACTLY)
    )
}

private fun getViewWidthInPixel(size: Size): Float = /* ... */

private fun getViewHeightInPixel(size: Size): Float = /* ... */
เพียงเท่านี้ Custom View ก็กำหนดได้ทั้งความกว้างและความสูงแล้ว
