การใช้งานไฟล์ภาพในแอปบนแอนดรอยด์บ่อยครั้งนักพัฒนาก็ต้องทำ Image Resize เพื่อให้ไฟล์ภาพมีขนาดที่เล็กลงเสียก่อน เพราะขนาดไฟล์ภาพที่ใหญ่เกินไปก็อาจจะเกินจำเป็นสำหรับการใช้งานจริง เช่น การอัปโหลดไฟล์ภาพจากแอปของเราขึ้น Web Server ที่จะต้องจำกัดขนาดไฟล์ภาพ
แต่ Operation ใด ๆ ก็ตามที่เกี่ยวกับไฟล์ภาพหรือคลาส Bitmap จะขึ้นชื่ออยู่แล้วในเรื่องของปัญหา Out of Memory (OOM) และใช้เวลาทำคำสั่งนาน ดังนั้นการทำ Image Resize จึงเป็นขั้นตอนที่ต้องใส่ใจกันเป็นพิเศษเสียหน่อย
แต่ก่อนจะพูดถึงวิธีการทำ Image Resize ขอพูดถึงเรื่องอื่นที่สำคัญต่อการทำ Image Resize กันก่อน
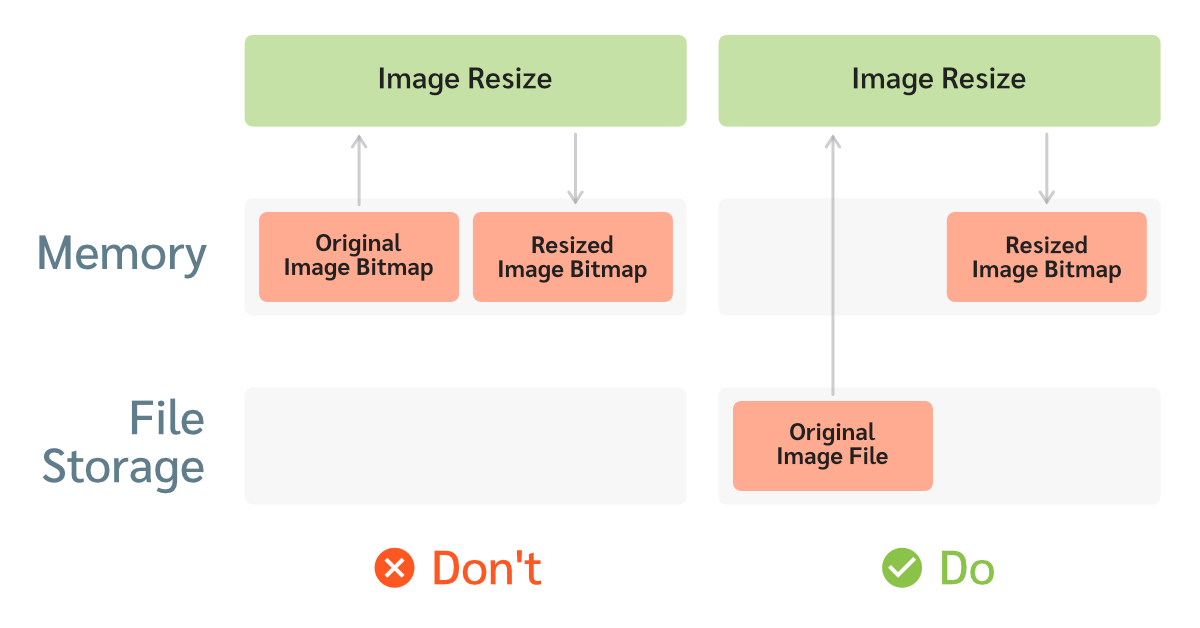
ไฟล์ภาพที่จะทำ Image Resize ควรเก็บไว้ใน File Storage เสมอ
การเก็บข้อมูลภาพไว้ใน Memory แล้ว Resize ทันทีนั้นเป็นวิธีที่ไม่ควรทำ เพราะเสี่ยงต่อการเกิด OOM ระหว่างที่กำลัง Resize เนื่องจากมีช่วงเวลาที่ Memory จะถือข้อมูลของภาพต้นฉบับและภาพหลังจาก Resize ไว้พร้อม ๆ กัน (ก่อนที่จะเคลียร์ข้อมูลของภาพต้นฉบับออกจาก Memory)
ก่อนที่จะทำ Image Resize ควรเริ่มจากเก็บไฟล์ภาพไว้ใน File Storage ของเครื่องก่อน จะเป็น App-specific Directory หรือ External Directory ก็ได้ แล้วค่อยเรียกทำ Image Resize ผ่าน File Path อีกที
กรณีที่เป็นไฟล์ภาพในเครื่องอยู่แล้ว ก็สามารถใช้ File Path ของไฟล์นั้นได้เลย หรืออาจจะ Copy ด้วย FileInputStream/FileOutputStream เพื่อให้ไฟล์มาอยู่ใน App-specific Directory ก่อนก็ได้เช่นกัน
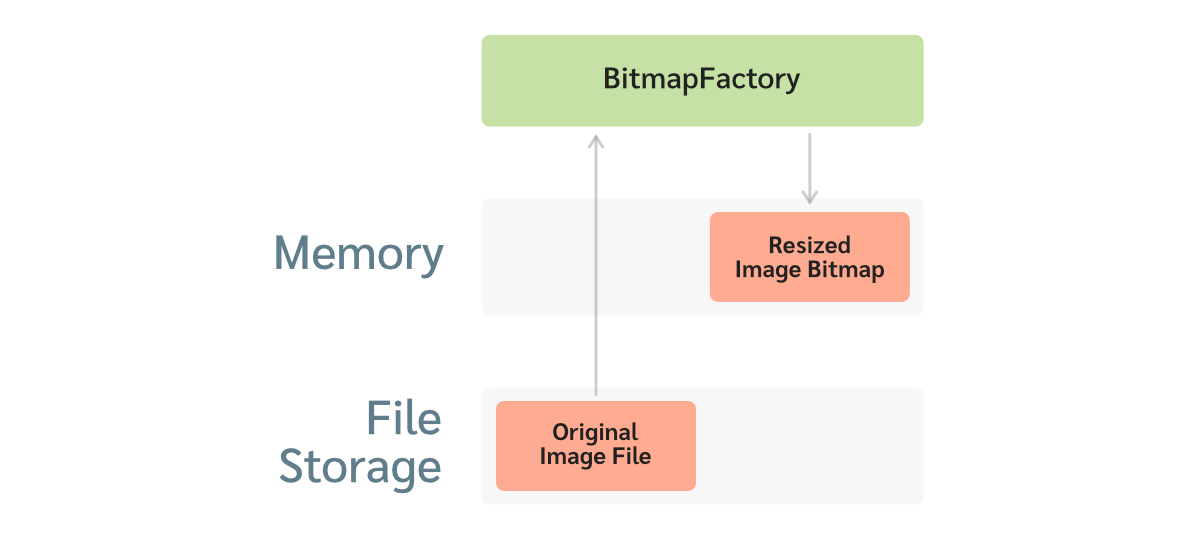
ทำไมต้องเก็บใน File Storage เพราะยังไงก็ต้องใช้ BitmapFactory แปลงเป็น Bitmap อยู่ดี
มาถึงจุดนี้ผู้ที่หลงเข้ามาอ่านน่าจะมีคำถามกับวิธีที่เจ้าของบล็อกแนะนำ เพราะว่าสุดท้ายเราก็ต้องใช้ BitmapFactory เพื่อแปลงไฟล์ภาพให้อยู่ในรูปของ Bitmap อยู่ดี แล้วจะเก็บลง File Storage ทำไมให้เสียเวลา
นั่นก็เพราะว่าเราจะทำ Image Resize ตอนที่ BitmapFactory แปลงไฟล์ภาพให้กลายเป็น Bitmap ยังไงล่ะ!
ด้วยความสามารถของ BitmapFactory ทำให้นักพัฒนาสามารถกำหนดค่า Sample Size กับ Density เพื่อกำหนดขนาดของ Bitmap ที่ต้องการได้เลย และเจ้าของบล็อกก็จะใช้วิธีนี้ในการทำ Image Resize นั่นเอง
Sample Size และ Density ใน BitmapFactory
สำหรับการใช้ Sample Size ใน BitmapFactory นั้นมีพูดถึงใน Documentation ของ Android Developers อยู่แล้ว


โดย Sample Size จะมีค่าเป็น 2 ยกกำลัง X เพื่อนำไปหารกับขนาดภาพเพื่อให้ใกล้เคียงกับขนาดที่ต้องการอีกที ซึ่งจะมีปัญหาว่าในบางครั้งได้ขนาดภาพออกมาห่างไกลจากที่ต้องการมาเกินไปเสียหน่อย
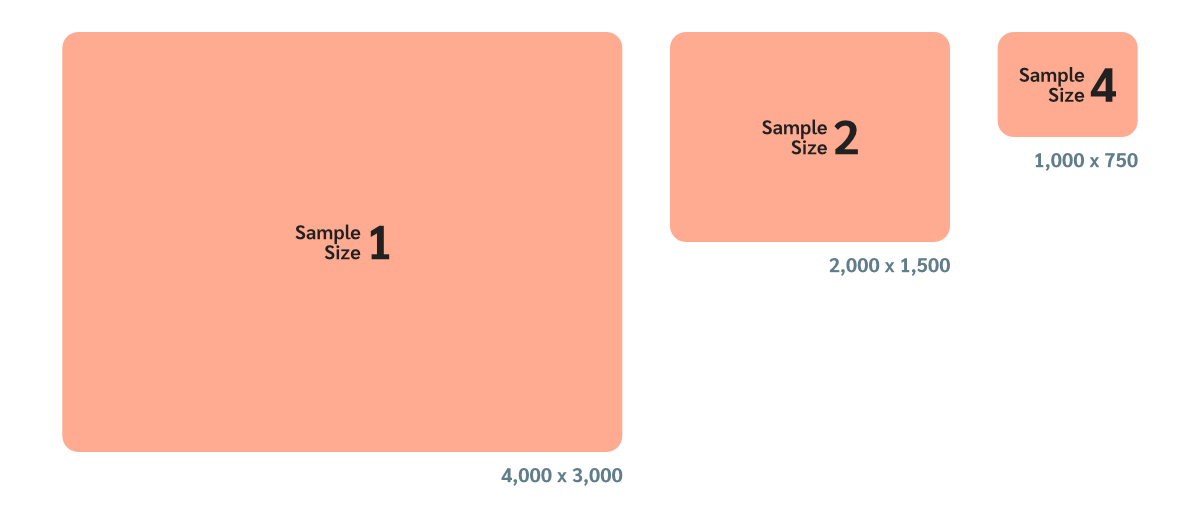
ยกตัวอย่างเช่น ภาพต้นฉบับมีขนาด 4,000 x 3,000 px และต้องการ Resize ให้เหลือแค่ 1,500 x 1,125 px แต่การใช้ Sample Size จะได้ผลลัพธ์เป็นภาพขนาด 2,000 x 1,500 px แทน เพราะว่าเป็นขนาดที่ใกล้เคียงที่สุดกับที่ต้องการ จึงต้องมีการกำหนดค่า Density เพิ่ม เพื่อให้ BitmapFactory คำนวณขนาดออกมาตรงกับที่ต้องการ
คำสั่งสำหรับ Image Resize ที่จะอธิบายต่อจากนี้เป็นแบบ Fill ซึ่งจะพูดถึงเรื่องนี้ในภายหลัง
สำหรับการคำนวณหา Sample Size เบื้องต้นจะมีคำสั่งที่คุ้นเคยกันแบบนี้
fun calculateInSampleSize(
    options: BitmapFactory.Options,
    reqWidth: Int,
    reqHeight: Int
): Int {
    val (width: Int, height: Int) = options.run { outWidth to outHeight }
    var inSampleSize = 1
    if (height > reqHeight || width > reqWidth) {
        val halfHeight: Int = height / 2
        val halfWidth: Int = width / 2
        while (halfHeight / inSampleSize >= reqHeight && halfWidth / inSampleSize >= reqWidth) {
            inSampleSize *= 2
        }
    }
    return inSampleSize
}
และเวลาสร้าง BitmapFactory.Options ก็จะกำหนด Sample Size เข้าไปแบบนี้
fun createBitmapFactoryOptions(path: String, preferredWidth: Int, preferredHeight: Int): BitmapFactory.Options {
    return BitmapFactory.Options().apply {
        inJustDecodeBounds = true
        BitmapFactory.decodeFile(path, this)
        inSampleSize = calculateInSampleSize(this, preferredWidth, preferredHeight)
        inJustDecodeBounds = false
    }
}pathคือ Path ของไฟล์ภาพใน File StoragepreferredWidth,preferredHeightคือความกว้างและความสูงของภาพที่ต้องการ
แต่เพื่อให้ได้ขนาดที่ออกมาตรงกับที่ต้องการจริง ๆ จะต้องกำหนดค่า inDensity และ inTargetDensity เพิ่มเข้าไปด้วยแบบนี้
fun createBitmapFactoryOptions(path: String, preferredWidth: Int, preferredHeight: Int): BitmapFactory.Options {
    return BitmapFactory.Options().apply {
        inJustDecodeBounds = true
        BitmapFactory.decodeFile(path, this)
        inSampleSize = calculateInSampleSize(this, preferredSize, preferredSize)
        inJustDecodeBounds = false
        val outRatio = outWidth.toFloat() / outHeight.toFloat()
        val reqRatio = preferredWidth.toFloat() / preferredHeight.toFloat()
        if (outRatio > reqRatio) {
            inDensity = outWidth
            inTargetDensity = preferredWidth * inSampleSize
        } else if (outRatio <= reqRatio) {
            inDensity = outHeight
            inTargetDensity = preferredHeight * inSampleSize
        }
    }
}
โดยจะมีการคำนวณหา Image Ratio ทั้งขนาดภาพของดั้งเดิม (outRatio) กับขนาดภาพที่ต้องการ (reqRatio) ด้วย เพราะในบางครั้งเราอาจจะกำหนดขนาดภาพที่ต้องการเป็นแบบแนวนอน แต่ภาพตันฉบับเป็นภาพแนวตั้ง จึงมีวิธีการคำนวณแยกกัน
จากนั้นก็นำ BitmapFactory.Options ไปใช้งานได้เลย
val path: String = /* ... */
val preferredSize: Int = /* ... */
val options = createBitmapFactoryOptions(path, preferredSize)
val resizedBitmap = BitmapFactory.decodeFile(path, options)
Image Resize แบบ Fill และ Crop
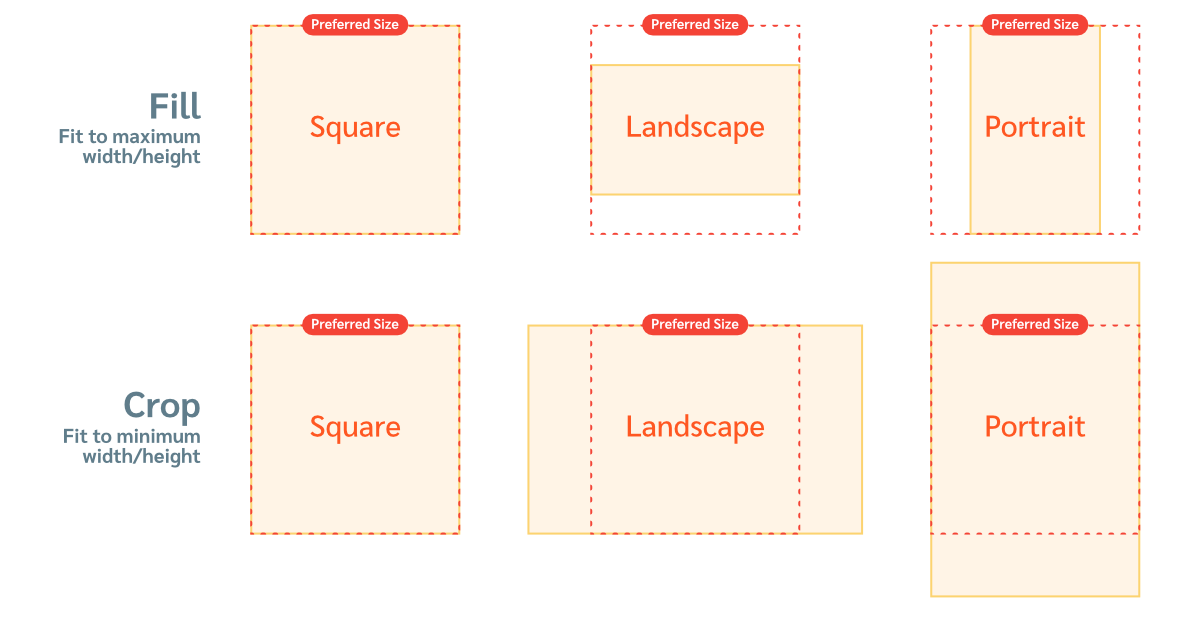
ในการทำ Image Resize นั้น ผลลัพธ์ที่ได้จะมีอยู่ 2 แบบเดียวกันคือ Fill กับ Crop โดยที่
- Fill : Resize โดยอ้างอิงจากด้านที่ยาวที่สุดของภาพ และด้านที่สั้นกว่าจะถูกปรับตาม Ratio ของภาพ
- Crop : Resize โดยอ้างอิงจากด้านที่สั้นที่สุดของภาพ และด้านที่ยาวกว่าจะถูกปรับตาม Ratio ของภาพ
ซึ่งทั้ง 2 แบบจะมีวิธีการคำนวณที่แตกต่างกัน
fun createBitmapFactoryOptions(path: String, preferredWidth: Int, preferredHeight: Int): BitmapFactory.Options {
    return BitmapFactory.Options().apply {
        inJustDecodeBounds = true
        BitmapFactory.decodeFile(path, this)
        inSampleSize = calculateInSampleSize(this, preferredSize, preferredSize)
        inJustDecodeBounds = false
        val outRatio = outWidth.toFloat() / outHeight.toFloat()
        val reqRatio = preferredWidth.toFloat() / preferredHeight.toFloat()
        if (outRatio > reqRatio) {
            inDensity = outWidth
            inTargetDensity = preferredWidth * inSampleSize
        } else if (outRatio <= reqRatio) {
            inDensity = outHeight
            inTargetDensity = preferredHeight * inSampleSize
        }
    }
}fun createBitmapFactoryOptions(path: String, preferredWidth: Int, preferredHeight: Int): BitmapFactory.Options {
return BitmapFactory.Options().apply {
inJustDecodeBounds = true
BitmapFactory.decodeFile(path, this)
inSampleSize = calculateInSampleSize(this, preferredSize, preferredSize)
inJustDecodeBounds = false
val outRatio = outWidth.toFloat() / outHeight.toFloat()
val reqRatio = preferredWidth.toFloat() / preferredHeight.toFloat()
if (outRatio > reqRatio) {
inDensity = outHeight
inTargetDensity = preferredHeight * inSampleSize
} else if (outRatio <= reqRatio) {
inDensity = outWidth
inTargetDensity = preferredWidth * inSampleSize
}
}
}โดยจุดแตกต่างของ Fill และ Corp คือการใช้ความกว้างหรือความสูงในการคำนวณค่า inDensity และ inTargetDensity ที่คำนวณสลับกันนั่นเอง
ดังนั้นอยากจะได้ Image Resize แบบไหนก็เลือกใช้งานให้เหมาะสม
ถ้าไม่ต้องการให้ Resize ถ้าไฟล์ภาพเล็กกว่าที่กำหนดไว้
บางครั้งผู้ที่หลงเข้ามาอ่านอาจจะต้องการ Resize เฉพาะไฟล์ภาพที่ใหญ่กว่าเท่านั้น ในกรณีที่ภาพมีขนาดเล็กอยู่แล้วก็ไม่ต้องการ Resize
ในกรณีนี้สามารถเพิ่มเงื่อนไขในการกำหนดค่า inDensity และ inTargetDensity แค่เฉพาะตอนที่ภาพมีขนาดใหญ่กว่าได้เลย
fun createBitmapFactoryOptions(path: String, preferredSize: Int): BitmapFactory.Options {
    return BitmapFactory.Options().apply {
        /* ... */
        if (preferredWidth <= outWidth && preferredHeight <= outHeight) {
            val outRatio = outWidth.toFloat() / outHeight.toFloat()
            val reqRatio = preferredWidth.toFloat() / preferredHeight.toFloat()
            if (outRatio > reqRatio) {
                inDensity = outWidth
                inTargetDensity = preferredWidth * inSampleSize
            } else if (outRatio <= reqRatio) {
                inDensity = outHeight
                inTargetDensity = preferredHeight * inSampleSize
            }
        }
    }
}fun createBitmapFactoryOptions(path: String, preferredSize: Int): BitmapFactory.Options {
return BitmapFactory.Options().apply {
/* ... */
if (preferredWidth <= outWidth && preferredHeight <= outHeight) {
val outRatio = outWidth.toFloat() / outHeight.toFloat()
val reqRatio = preferredWidth.toFloat() / preferredHeight.toFloat()
if (outRatio > reqRatio) {
inDensity = outHeight
inTargetDensity = preferredHeight * inSampleSize
} else if (outRatio <= reqRatio) {
inDensity = outWidth
inTargetDensity = preferredWidth * inSampleSize
}
}
}
}ทดสอบประสิทธิภาพ
ลองทดสอบการทำ Image Resize ด้วยวิธีดังกล่าวบน Google Pixel 3 (Android 12) เพื่อดูจากระยะเวลาที่ใช้ตั้งแต่ตอนสร้าง BitmapFactory.Option ไปจนถึงตอนใช้คำสั่ง BitmapFactory.decode(...)
โดยใช้ภาพทั้งหมด 3 แบบคือ ภาพแนวนอน (Landscape), ภาพแนวตั้ง (Portrait) และภาพสี่เหลี่ยมด้านเท่า (Square) ส่วน Pixel Format จะใช้เป็น ARGB 8888 ซึ่งเป็น Default Pixel Format (4 Byte ต่อ 1 Pixel)
ได้ผลลัพธ์ออกมาดังนี้
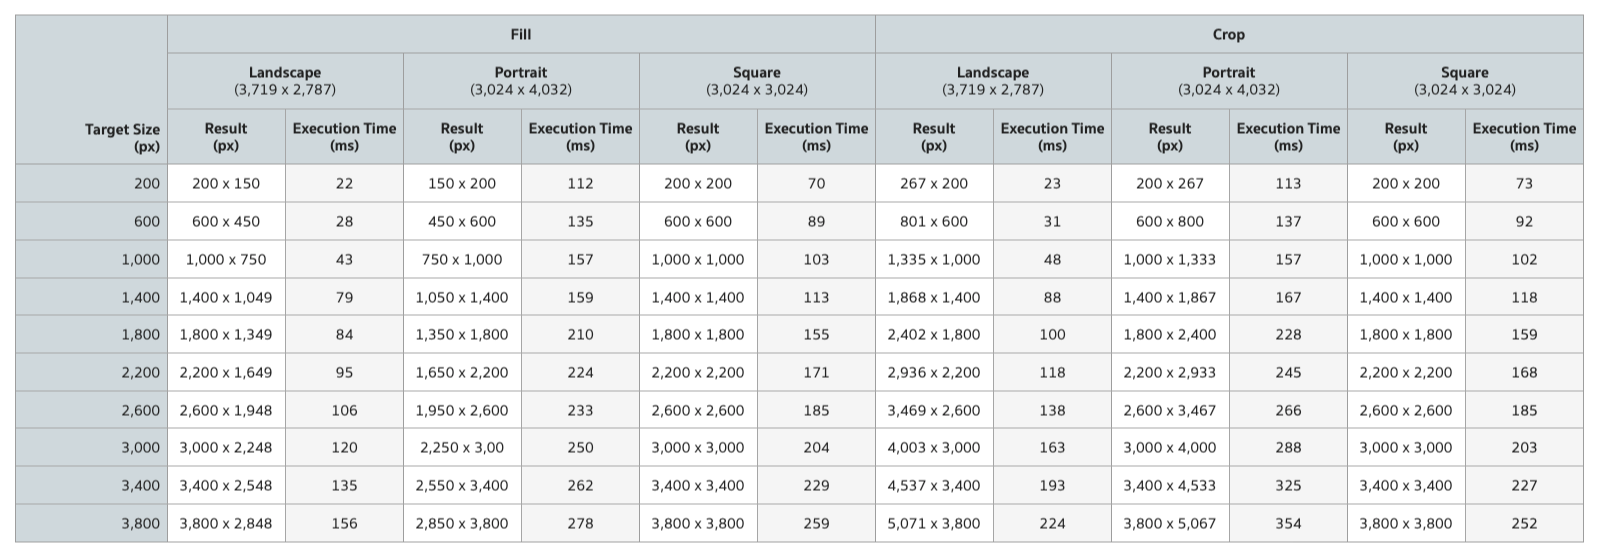
จะเห็นว่าภาพขนาด 1,000 px ใช้เวลาในการ Resize นานสุดแค่เพียง 157 ms เท่านั้น ส่วน Memory ที่ใช้นั้นจะขึ้นอยู่กับ Bitmap ที่ได้ในตอนสุดท้ายรวมกับ Operation ที่เกิดขึ้นตอน Decode ของ BitmapFactory นั่นเอง
ผู้ที่หลงเข้ามาอ่านคนใดอยากดูวิธีที่ใช้ในการทดสอบ ก็สามารถเข้าไปดูกันได้ที่ GitHub นี้เลย
 akexorcist