อยู่ในระหว่างการปรับปรุง

จากเดิมที่เจ้าของบล็อกพูดถึงเรื่อง Indicator สำหรับ View Pager โดยใช้ไลบรารีของ Jake Wharton ไปแล้ว คราวนี้เจ้าของบล็อกขอพูดถึงไลบรารีที่น่าสนใจสำหรับการทำ Indicator อีกหนึ่งตัวที่มีชื่อว่า Circle Indicator ของ Ongakuer [GitHub] ที่สามารถ Custom Indicator เพิ่มเติมได้
บทความในซีรีย์เดียวกัน
- มารู้จักกับ Fragment กันเถอะ~
- เริ่มต้นง่ายๆกับ Fragment แบบพื้นฐาน
- ว่าด้วยเรื่องการสร้าง Fragment จาก Constructor ที่ถูกต้อง
- รู้จักกับ FragmentTransaction สำหรับการแสดง Fragment [ตอนที่ 1]
- รู้จักกับ FragmentTransaction สำหรับการแสดง Fragment [ตอนที่ 2]
- Lifecycle ของ Fragment (Fragment Lifecycle)
- วิธีการรับส่งข้อมูลของ Fragment
- มาทำ View Pager กันเถิดพี่น้อง~ [ตอนที่ 1]
- มาทำ View Pager กันเถิดพี่น้อง~ [ตอนที่ 2]
- เพิ่มลูกเล่นให้กับ View Pager ด้วย Page Transformer
โดยไลบรารีตัวนี้มีจุดเด่นตรงที่สามารถกำหนด Animator ให้กับ Indicator ได้ เมื่อ View Pager เกิดการเปลี่ยน Fragment
จะเห็นว่า Indicator จะมี Transition เมื่อเปลี่ยน Fragment โดย Indicator ของตำแหน่งเก่าก็จะหดเล็กลง ส่วน Indicator ของปัจจุบันก็จะขยายใหญ่ขึ้น ซึ่งตรงนี้จะใช้ Object Animator ในการกำหนด Transition ดังกล่าว ถ้าผู้ที่หลงเข้ามาอ่านคนใดยังไม่รู้จักก็ไปศึกษาก่อนได้ที่ มาทำความรู้จักกับ Object Animator กันดีกว่า~!
โดยวีดีโอตัวอย่างที่เห็นนี้เป็น Animator พื้นฐานที่ไลราบรีมีไว้ให้ใช้งานทันที และสามารถสร้างเพื่อใช้งานได้ตามใจชอบด้วยเช่นกัน (เจ๋งตรงนี้แหละ)
ก่อนอื่นเลยให้ Import เจ้า Circle Indicator เข้ามายังโปรเจคที่จะเรียกใช้งานซะ
วิธีการ Import Library บน Android Studio
ถ้าใช้ Gradle สามารถดาวน์โหลดผ่าน Remote Dependencies ได้เลย
compile 'com.nineoldandroids:library:2.4.+' compile 'me.relex:circleindicator:1.0.0@aar'สำหรับการใช้งานเบื้องต้นนั้นจะเหมือนกับ ViewPagerIndicator เป๊ะๆ แต่ว่ามีคำสั่งเพิ่มเติมเข้ามาอีกหน่อย ถ้างั้นขอยกตัวอย่างการใช้งานพื้นฐานก่อนนะ
<?xml version="1.0" encoding="utf-8"?> <RelativeLayout xmlns:android="http://schemas.android.com/apk/res/android" xmlns:tools="http://schemas.android.com/tools" android:layout_width="match_parent" android:layout_height="match_parent" tools:context="${relativePackage}.${activityClass}" > <android.support.v4.view.ViewPager android:id="@+id/pager" android:layout_width="match_parent" android:layout_height="match_parent" android:orientation="vertical" /> <me.relex.circleindicator.CircleIndicator android:id="@+id/indicator" android:layout_width="match_parent" android:layout_height="30dp" /> </RelativeLayout>สำหรับ CircleIndicator จะต้องมีการกำหนดความสูง ซึ่งแนะนำให้กำหนดประมาณ 30–40dp
ส่วนการทำงานของโค๊ดก็จะเหมือนกัน แต่จะใช้คลาส CircleIndicator แทน
ViewPager pager = (ViewPager) findViewById(R.id.pager); pager.setAdapter(adapter); CircleIndicator indicator = (CircleIndicator) findViewById(R.id.indicator); indicator.setViewPager(pager);ก็จะได้ Indicator ออกมาเหมือนกับวีดีโอตัวอย่างในตอนแรกนั่นเอง
และสำหรับการ Custom Indicator ให้ทำใน Layout XML นั้นๆเลย โดยจะมี Attribute เฉพาะดังนี้
* app:ci_width ความกว้างของ Indicator แต่ละตัว
* app:ci_height ความสูงของ Indicator แต่ละตัว
* app:ci_margin ระยะ Margin ระหว่าง Indicator แต่ละตัว
* app:ci_animator Animator ที่จะให้กระทำเมื่อเปลี่ยน Indicator
* app:ci_drawable ภาพของ Indicator
ดังนั้นการกำหนดใน Layout XML ก็จะออกมาเป็นแบบนี้
<?xml version="1.0" encoding="utf-8"?> <RelativeLayout xmlns:android="http://schemas.android.com/apk/res/android" xmlns:tools="http://schemas.android.com/tools" xmlns:app="http://schemas.android.com/apk/res-auto" android:layout_width="match_parent" android:layout_height="match_parent" tools:context="${relativePackage}.${activityClass}" > <android.support.v4.view.ViewPager android:id="@+id/pager" android:layout_width="match_parent" android:layout_height="match_parent" android:orientation="vertical" /> <me.relex.circleindicator.CircleIndicator android:id="@+id/indicator" android:layout_width="match_parent" android:layout_height="30dp" app:ci_width="20dp" app:ci_height="4dp" app:ci_margin="6dp" /> </RelativeLayout>จะเห็นว่าเจ้าของบล็อกกำหนด Indicator กว้าง 20dp สูง 4dp และอยู่ห่างกัน 6dp เมื่อลองทดสอบแอพฯดูก็จะได้แบบนี้
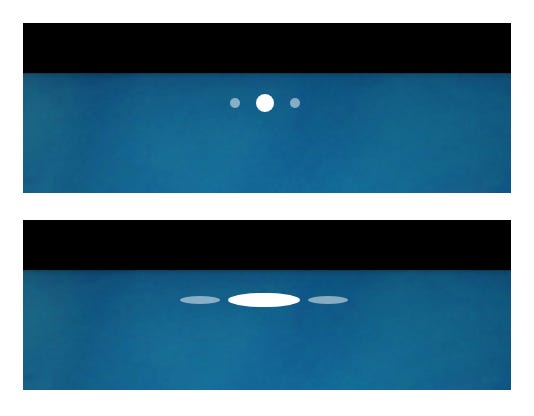
ลองใส่ภาพเข้าไปแทน โดยที่เก็บไฟล์ภาพไว้ที่ drawable ตามปกติ

ภาพตัวอย่างขอใส่พื้นหลังสีเทานะ เพราะวงกลมตรงกลางเป็นสีขาว เดี๋ยวมันจะกลืนไปกับพื้นหลังของบทความนี้ แต่ของจริงพื้นหลังโปร่งใสนะ
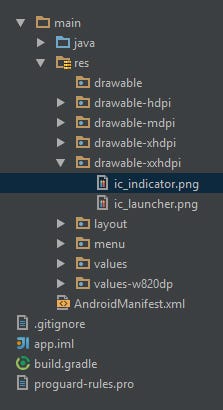
โดยภาพนี้ตั้งชื่อไฟล์ว่า ic_indicator.png แล้วเก็บไว้ใน drawable
กลับมาที่ Layout XML ก็ต้องเพิ่มใหม่เป็นดังนี้
<?xml version="1.0" encoding="utf-8"?> <RelativeLayout xmlns:android="http://schemas.android.com/apk/res/android" xmlns:tools="http://schemas.android.com/tools" xmlns:app="http://schemas.android.com/apk/res-auto" android:layout_width="match_parent" android:layout_height="match_parent" tools:context="${relativePackage}.${activityClass}" > <android.support.v4.view.ViewPager android:id="@+id/pager" android:layout_width="match_parent" android:layout_height="match_parent" android:orientation="vertical" /> <me.relex.circleindicator.CircleIndicator android:id="@+id/indicator" android:layout_width="match_parent" android:layout_height="40dp" app:ci_width="20dp" app:ci_height="20dp" app:ci_margin="10dp" app:ci_drawable="@drawable/ic_indicator" /> </RelativeLayout>พอลองทดสอบดูก็จะได้ Indicator เป็นรูปที่ทำไว้นั่นเอง
อ๊ะๆ ความสนุกยังไม่จบลงเพียงเท่านี้ เพราะยังเหลือ Animator ให้เล่นอีกนะ
เจ้าของบล็อกลองสร้าง Animator ขึ้นมาดังนี้
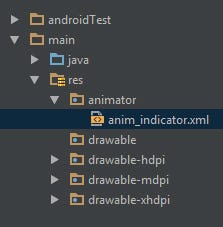
<?xml version="1.0" encoding="utf-8"?> <set xmlns:android="http://schemas.android.com/apk/res/android" android:ordering="together"> <objectAnimator android:propertyName="alpha" android:duration="@android:integer/config_shortAnimTime" android:valueType="floatType" android:valueFrom="0.2" android:valueTo="1.0"/> <objectAnimator android:propertyName="scaleX" android:duration="@android:integer/config_shortAnimTime" android:valueType="floatType" android:valueFrom="1" android:valueTo="1.5"/> <objectAnimator android:propertyName="scaleY" android:duration="@android:integer/config_shortAnimTime" android:valueType="floatType" android:valueFrom="1" android:valueTo="1.5"/> <objectAnimator android:propertyName="rotation" android:duration="@android:integer/config_shortAnimTime" android:valueType="floatType" android:valueFrom="0" android:valueTo="90"/> </set>จะเห็นว่ามีการกำหนด Object Animator ทั้งหมด 4 ชุดด้วยกัน
* Alpha ให้ปรับความโปร่งใสของวัตถุจาก 0.2 ไปเป็น 1.0
* Scale X ปรับความกว้างของวัตถุจาก 1 เท่าไปเป็น 1.5 เท่า
* Scale Y ปรับความสูงของวัตถุจาก 1 เท่าไปเป็น 1.5 เท่า
* Rotation หมุนวัตถุจาก 0 องศาไปที่ 90 องศา
แล้วเอามากำหนดใน Layout XML ให้กับ Circle Indicator ดังนี้
<?xml version="1.0" encoding="utf-8"?> <RelativeLayout xmlns:android="http://schemas.android.com/apk/res/android" xmlns:tools="http://schemas.android.com/tools" xmlns:app="http://schemas.android.com/apk/res-auto" android:layout_width="match_parent" android:layout_height="match_parent" tools:context="${relativePackage}.${activityClass}" > <android.support.v4.view.ViewPager android:id="@+id/pager" android:layout_width="match_parent" android:layout_height="match_parent" android:orientation="vertical" /> <me.relex.circleindicator.CircleIndicator android:id="@+id/indicator" android:layout_width="match_parent" android:layout_height="40dp" app:ci_width="20dp" app:ci_height="20dp" app:ci_margin="10dp" app:ci_drawable="@drawable/ic_indicator" app:ci_animator="@animator/anim_indicator" /> </RelativeLayout>เมื่อลองทดสอบดูก็จะเห็นว่า Indicator มี Animation ตามที่เจ้าของบล็อกสร้างขึ้นมา
อ้าว!? กำหนดแต่ Animator ตอนที่ Indicator ไม่ถูกเลือก >> ถูกเลือก เท่านั้นนี่? แล้วตอนที่ Indicator ถูกเลือก >> ไม่ถูกเลือก ไปกำหนดตรงไหนหรือ?
สำหรับกรณีดังกล่าวไลบรารีตัวนี้จะใช้วิธี Reverse Animator ให้โดยอัติโนมัติ ดังนั้นไม่ต้องมานั่งกำหนดเพิ่มเติมให้วุ่นวาย และก็หมายความว่าไม่สามารถกำหนดแตกต่างไปจาก Animator ตัวนั้นๆด้วยเช่นกัน (แต่ก็ไม่จำเป็นนั่นแหละ)
และสำหรับภาพ Indicator ที่ใช้ อย่าลืมว่าสามารถเอา Shape มาทำได้เหมือนกันนะ ดังนั้นลองสร้าง Shape ขึ้นมาเลย
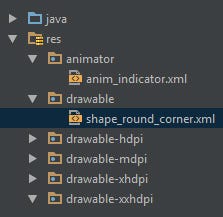
เป็น Shape สี่เหลี่ยมที่มีมุมมน 30dp และใช้สีขาว
ขอแก้ไข Animator ให้เข้ากับ Shape ตัวนี้เสียหน่อย โดยให้ Indicator ปรับความโปร่งใสและหมุน 90 องศา
<?xml version="1.0" encoding="utf-8"?> <set xmlns:android="http://schemas.android.com/apk/res/android" android:ordering="together"> <objectAnimator android:propertyName="alpha" android:duration="@android:integer/config_shortAnimTime" android:valueType="floatType" android:valueFrom="0.2" android:valueTo="1.0"/> <objectAnimator android:propertyName="rotation" android:duration="@android:integer/config_shortAnimTime" android:valueType="floatType" android:valueFrom="0" android:valueTo="90"/> </set>ที่สำคัญอย่าลืมแก้ไข Drawable ที่อยู่ใน Layout XML ด้วย
<?xml version="1.0" encoding="utf-8"?> <RelativeLayout xmlns:android="http://schemas.android.com/apk/res/android" xmlns:tools="http://schemas.android.com/tools" xmlns:app="http://schemas.android.com/apk/res-auto" android:layout_width="match_parent" android:layout_height="match_parent" android:background="#f2f2f2" tools:context="${relativePackage}.${activityClass}" > <android.support.v4.view.ViewPager android:id="@+id/pager" android:layout_width="match_parent" android:layout_height="match_parent" android:orientation="vertical" /> <me.relex.circleindicator.CircleIndicator android:id="@+id/indicator" android:layout_width="match_parent" android:layout_height="40dp" app:ci_width="15dp" app:ci_height="5dp" app:ci_margin="5dp" app:ci_drawable="@drawable/shape_round_corner" app:ci_animator="@animator/anim_indicator"/> </RelativeLayout>โดยเจ้าของบล็อกได้กำหนดให้ Indicator ยาว 15dp สูง 5dp และห่างกัน 5dp ด้วย จะได้ Indicator ที่มีลักษณะเป็นแท่งยาวปลายมน
มาดูผลลัพธ์กันเลย~!
ซึ่งเจ้าของบล็อกก็คิดว่า Shape เหมาะแก่การทำ Indicator มากกว่า Drawable เสียอีก เพราะ Indicator ที่ดีไม่จำเป็นต้องภาพสวยเวอร์ แต่มองแล้วรู้ว่าเป็น Indicator โดยที่ไม่ไปรบกวน Content ที่อยู่บน Fragment
จงอย่าลืมหน้าที่ของ Indicator ว่ามันมีไว้ทำอะไร จำเป็นต้องสวยเพื่อดึงดูดสายตาหรือป่าว?
ที่เหลือก็อยู่ที่ผู้ที่หลงเข้ามาอ่านแล้วล่ะว่าจะทำ Indicator ให้ออกมามีลักษณะแบบไหน แต่ถ้าเน้นใช้ง่ายและดูเหมาะสมก็คงเป็นแบบเริ่มต้นที่ไลบรารีเค้าทำไว้ให้แล้วนั่นแหละ