
ในปัจจุบันที่ Android Architecture Components ถูกนำมาใช้งานอย่างแพร่หลาย จึงทำให้คลาส ViewModel กลายเป็นหนึ่งในหัวใจสำคัญที่ขับเคลื่อนการทำงานของแอปควบคู่ไปกับ Component อื่นๆบน Presentation Layer อย่าง Activity หรือ Domain Layer อย่าง Use Case
โดยหน้าที่ส่วนใหญ่ของ ViewModel จะเป็นการตัดสินใจเกี่ยวกับ UI Logic เป็นหลัก จึงทำให้บ่อยครั้ง ViewModel ที่ใช้งานในแต่ละ Activity หรือ Fragment มีการทำงานบางส่วนที่เหมือนกัน
ยกตัวอย่างเช่น การแสดง Loading Progress ที่จะแสดงผลตอนที่กำลังโหลดข้อมูลจาก Web Server เป็นต้น

เดิมทีนักพัฒนาจะควบคุมการแสดงหรือซ่อนของ Loading Progress นี้บน Activity หรือ Fragment โดยตรง แต่เมื่อการตัดสินใจเกือบทั้งหมดอยู่บน ViewModel จึงไม่พ้นที่จะต้องให้ ViewModel เป็นตัวกำหนดว่าจะให้แสดงหรือซ่อน Loading Progress ด้วย
แน่นอนว่าการแสดงผลของ Loading Progress ก็จะใช้วิธีส่งเป็น Event ผ่าน LiveData แบบนี้
// Main.kt
class MainViewModel : ViewModel() {
    private val _loadingState = MutableLiveData<SingleEvent<Boolean>>()
    val loadingState: LiveData<SingleEvent<Boolean>> = _loadingState

    override fun showLoading() {
        _loadingState.postValue(SingleEvent(true))
    }

    override fun hideLoading() {
        _loadingState.postValue(SingleEvent(false))
    }

    // Fetch new data from web server
    fun fetchData(userId: String) {
        showLoading()
        // Call use case to get the new data
        hideLoading()
    }
}
SingleEvent คืออะไรน่ะ? (เพิ่มเติม)
เนื้อหานี้ไม่ได้เกี่ยวข้องกับบทความโดยตรง เป็นการอธิบายเพิ่มเติมสำหรับผู้ที่หลงเข้ามาอ่านที่ยังไม่รู้จัก Pattern นี้
Single Event เป็นคลาสที่สร้างเพิ่มขึ้นมาเพื่อให้ Event ที่ส่งผ่าน LiveData นั้นเป็นแบบ Single ที่จะเคลียร์ข้อมูลทิ้งให้ทันทีเมื่อ Activity หรือ Fragment ปลายทางทำการดึงข้อมูลไปใช้งาน
// SingleEvent.kt
open class SingleEvent<out T>(private val content: T) {
    var isConsumed = false
        private set // Allow external read but not write

    fun consume(): T? {
        return if (isConsumed) {
            null
        } else {
            isConsumed = true
            content
        }
    }

    fun peek(): T = content

    override fun equals(other: Any?): Boolean {
        if (this === other) return true
        if (javaClass != other?.javaClass) return false

        other as SingleEvent<*>

        if (content != other.content) return false
        if (isConsumed != other.isConsumed) return false

        return true
    }

    override fun hashCode(): Int {
        var result = content?.hashCode() ?: 0
        result = 31 * result + isConsumed.hashCode()
        return result
    }
}
ในการดึงข้อมูลผ่าน SingleEvent จะใช้คำสั่ง consume() ที่จะได้ข้อมูลออกมาพร้อมกับเคลียร์ข้อมูลที่ LiveData เก็บไว้ในทันที
โดยจะใช้งานควบคู่กับ SingleEventObserver เพื่อให้ Observer เรียก consume() ให้โดยอัตโนมัติ
// SingleEventObserver.kt
class SingleEventObserver<T>(private val onEventUnconsumedContent: (T) -> Unit) : Observer<SingleEvent<T>> {
    override fun onChanged(event: SingleEvent<T>?) {
        event?.consume()?.run(onEventUnconsumedContent)
    }
}
ทำให้การเรียกใช้งานออกมาคล้ายกับ Observer แบบปกติ
val lifecycleOwner: LifecycleOwner = /* ... */
val viewModel: MainViewModel = /* ... */
viewModel.loadingState.observe(lifecycleOwner, SingleEventObserver { state ->
    // Do something
})
ซึ่งค่าที่ได้จะถูกส่งมาแค่ครั้งเดียวเท่านั้น เมื่อเกิด State Changes หรือสั่งให้ Observe ใหม่ ก็จะไม่ส่งค่ามาให้แล้ว ซึ่งจะต่างจาก Observer แบบปกติที่ส่งค่ามาให้ตลอดเพราะค่ายังคงอยู่ใน LiveData
เมื่อ ViewModel หลายๆตัวจะต้องมี Logic บางอย่างที่เหมือนกัน
จะเห็นว่าใน MainViewModel มีคำสั่ง showLoading() และ hideLoading() เพื่อแสดง Loading Progress ให้ผู้ใช้รู้ว่ากำลังดาวน์โหลดข้อมูลจาก Web Server อยู่
ซึ่งแน่นอนว่า ViewModel แทบทุกตัวในแอปของนักพัฒนาส่วนใหญ่ก็จะเป็นลักษณะแบบนี้เช่นกัน และในการทำงานจริงก็อาจจะต้องเจอการทำงานที่ซับซ้อนกว่านี้ และต้องเรียกใช้งานหลายๆที่เหมือนกัน ทำให้มีการหยิบ Interface Delegation เข้ามาใช้เพื่อช่วยแก้ปัญหานี้
โดยเริ่มจากสร้าง Interface ขึ้นมาก่อน
// LoadingStateViewModel.kt
interface LoadingStateViewModel {
    val loadingState: LiveData<SingleEvent<Boolean>>

    fun showLoading()
    fun hideLoading()
}
ซึ่งข้างในนี้ก็จะมีทั้ง loadingState, showLoading() และ hideLoading()
จากนั้นก็เอา LoadingStateViewModel ไปสร้างเป็น ViewModel ขึ้นมาและใส่คำสั่งที่ต้องการให้เรียบร้อย
// DefaultLoadingStateViewModel.kt
class DefaultLoadingStateViewModel : ViewModel(), LoadingStateViewModel {
    private val _loadingState = MutableLiveData<SingleEvent<Boolean>>()
    override val loadingState: LiveData<SingleEvent<Boolean>> = _loadingState

    override fun showLoading() {
        _loadingState.postValue(SingleEvent(true))
    }

    override fun hideLoading() {
        _loadingState.postValue(SingleEvent(false))
    }
}
เพียงเท่านี้ ViewModel ตัวนี้ก็พร้อมนำไปใช้งานใน ViewModel ตัวอื่นๆตามที่ต้องการแล้ว
การนำไปใช้งานกับ ViewModel ตัวอื่นๆ
จาก LoadingStateViewModel (Interface) และ DefaultLoadingStateViewModel (Class) ที่เจ้าของบล็อกได้สร้างขึ้นมาก่อนหน้านี้ จะเป็น ViewModel ที่ทำหน้าที่จัดการกับ Event ในการแสดง Progress Loading โดยเฉพาะ
ดังนั้นถ้า MainViewModel ต้องการใช้คำสั่งสำหรับ Progress Loading ก็ให้เพิ่ม LoadingStateViewModel เข้าไปแบบนี้ได้เลย
// MainViewModel.kt
class MainViewModel : ViewModel(), LoadingStateViewModel by DefaultLoadingStateViewModel() {
    /* ... */
}
โดยจะใช้ Interface Delegation เพื่อให้คำสั่งของ LoadingStateViewModel (Interface) ทำงานตามที่กำหนดไว้ใน DefaultLoadingStateViewModel (Class)
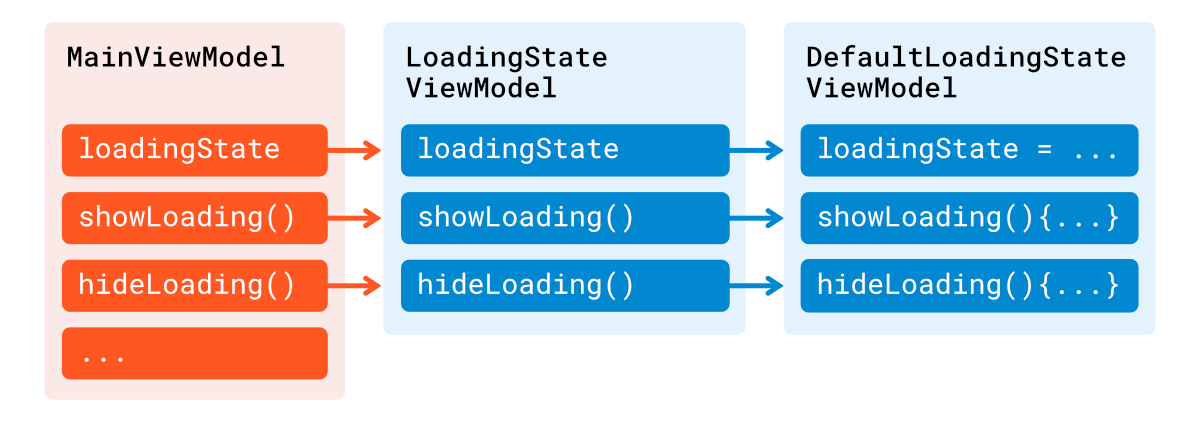
เพียงเท่านี้ข้างใน MainViewModel ก็สามารถเรียกใช้คำสั่งที่อยู่ใน DefaultStateViewModel ได้แล้ว
// MainViewModel.kt
class MainViewModel : ViewModel(), LoadingStateViewModel by DefaultLoadingStateViewModel() {
    fun fetchData(userId: String) {
        showLoading()
        // Call use case to get the new data
        hideLoading()
    }
    /* ... */
}
ในขณะเดียวกัน ฝั่ง Activity หรือ Fragment ก็สามารถ Observe ค่าจาก loadingState ได้เหมือนเดิมได้เลย ไม่ต้องทำอะไรเพิ่ม (เป็นที่มาว่าทำไมถึงใส่ loadingState ไว้ใน LoadingStateViewModel ตั้งแต่แรก)
val lifecycleOwner: LifecycleOwner = /* ... */
val viewModel: MainViewModel = /* ... */
viewModel.loadingState.observe(lifecycleOwner, SingleEventObserver { state ->
    // Do something
})
อย่าลืมทำเป็น Testable ViewModel เพื่อสุขภาพโค้ดที่ดี
เหตุผลอย่างนึงที่เจ้าของบล็อกใช้ Interface Delegation เพื่อสร้าง Reusable ViewModel ก็เพราะว่าเพื่อให้ง่ายต่อการแก้ไขและเขียนเทสนั่นเอง
แต่ทว่าโค้ดที่ใช้อยู่ในตอนนี้ยังไม่สะดวกสำหรับการเขียนเทสซักเท่าไร
// MainViewModel.kt
class MainViewModel : ViewModel(), LoadingStateViewModel by DefaultLoadingStateViewModel() {
    fun fetchData(userId: String) {
        showLoading()
        // Call use case to get the new data
        hideLoading()
    }
    /* ... */
}
เพราะ MainViewModel กับ DefaultLoadingStateViewModel จะถูกสร้างขึ้นมาพร้อมๆกันเสมอ ทำให้ MainViewModel ยึดติดกับ DefaultLoadingStateViewModel มากเกินไป ซึ่งไม่ใช่แนวทางที่ดีสำหรับการเขียน Unit Test ซักเท่าไร
และการสร้าง DefaultLoadingStateViewModel ด้วยวิธีนี้ก็ไม่ใช่การสร้างด้วย ViewModel Factory จึงทำให้การทำงานไม่สัมพันธ์กับ Lifecycle ของ Activity / Fragment ด้วย
และเพื่อให้คลาสทั้ง 2 แยกออกจากกันอย่างอิสระ ก็ควรจะกำหนดให้ LoadingStateViewModel ถูกส่งเข้ามาจาก Constructor ของ MainViewModel แทนที่จะสร้างจากข้างในโดยตรง
// MainViewModel.kt
class MainViewModel(
    loadingStateViewModel: LoadingStateViewModel
) : ViewModel(),
    LoadingStateViewModel by loadingStateViewModel {
    fun fetchData(userId: String) {
        showLoading()
        // Call use case to get the new data
        hideLoading()
    }
    /* ... */
}
จะเห็นว่าใน Constructor ของ MainViewModel มี loadingStateViewModel เพื่อให้โยนคลาสใดๆเข้ามาเพื่อใช้ใน LoadingStateViewModel by loadingStateViewModel ได้
val loadingStateViewModel: LoadingStateViewModel = DefaultLoadingStateViewMode()
val mainViewModel = MainViewModel(loadingStateViewModel)
แนะนำให้ใช้ Dependency Injection อย่าง Hilt, Dagger 2 หรือ Koin เพื่อความสะดวกในการใช้งาน
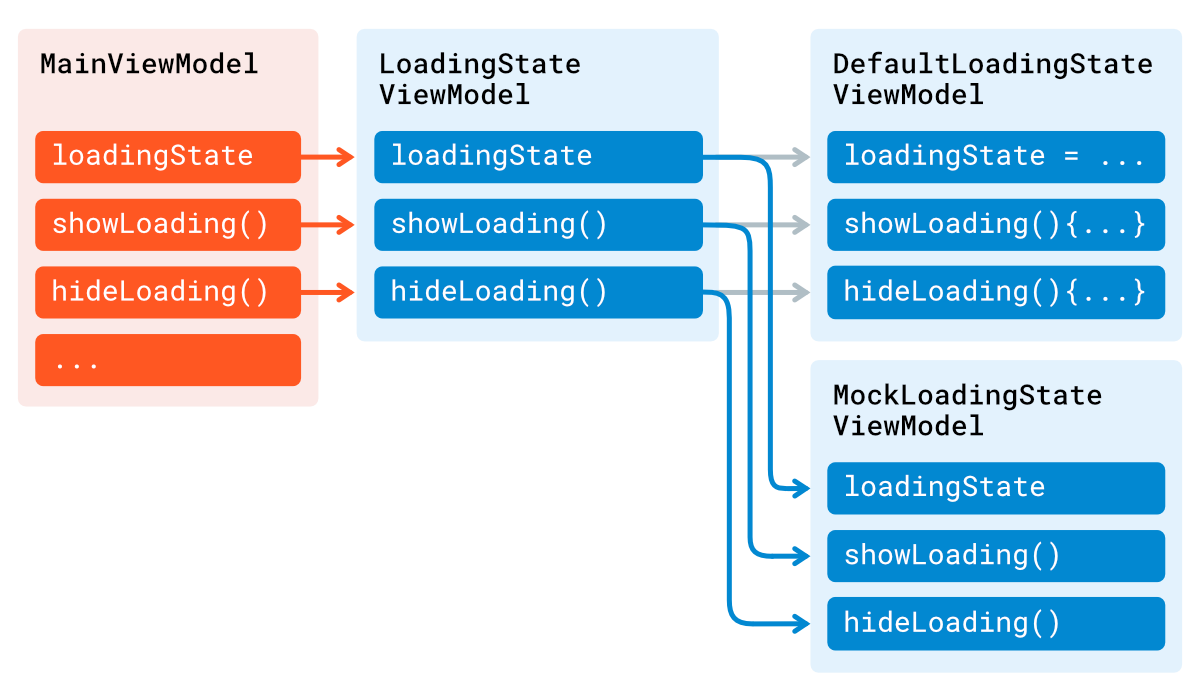
ด้วยวิธีนี้จึงทำให้นักพัฒนาสามารถสร้าง LoadingStateViewModel ด้วยการ Mock เพื่อใช้กับ MainViewModel เวลาเขียนเทสได้
// MainViewModelTest.kt
class MainViewModelTest {
    private lateinit var mockLoadingStateViewModel: LoadingStateViewModel
    private lateinit var mainViewModel: MainViewModel

    @Before
    fun setup() {
        mockLoadingStateViewModel = Mockito.mock(LoadingStateViewModel::class.java)
        mainViewModel = MainViewModel(mockLoadingStateViewModel)
    }

    @Test
    fun shouldFetchDataCorrectlyWithSuccessResult() {
        // Given
        val userId = "12345"

        // When
        mainViewModel.fetchData(userId)

        // Then
        Mockito.verify(mockLoadingStateViewModel, Mockito.times(1)).showLoading()
        // Verify that data fetching has called
        Mockito.verify(mockLoadingStateViewModel, Mockito.times(1)).hideLoading()
    }
}
ในบทความนี้จะใช้ Mockito สำหรับการ Mock
จะเห็นว่าการเขียนเทสใน MainViewModel ก็จะเน้นไปที่คำสั่งต่างๆที่เรียกใช้งานใน MainViewModel เท่านั้น ไม่ต้องสนใจว่าการเรียกคำสั่ง showLoading() และ hideLoading() ทำงานได้ถูกต้องหรือไม่ เพราะไม่ใช่การทำงานที่ MainViewModel จะต้องสนใจ
ในขณะเดียวกันก็สามารถเขียนเทสแยกสำหรับ DefaultLoadingStateViewModel เพื่อทดสอบการทำงานของ showLoading() และ hideLoading() ได้เช่นกัน
// DefaultLoadingStateViewModel.kt
class DefaultLoadingStateViewModelTest {
    private lateinit var viewModel: DefaultLoadingStateViewModel

    @Rule
    @JvmField
    val instantExecutorRule = InstantTaskExecutorRule()

    @Before
    fun setup() {
        viewModel = DefaultLoadingStateViewModel()
    }

    @Test
    fun `Should emit loading state as true when showLoading() was called`() {
        // Given
        // When
        viewModel.showLoading()

        // Then
        val result: Boolean? = viewModel.loadingState.getOrAwaitValue().consume()
        Assert.assertEquals(true, result)
    }

    @Test
    fun `Should emit loading state as false when hideLoading() was called`() {
        // Given
        // When
        viewModel.hideLoading()

        // Then
        val result: Boolean? = viewModel.loadingState.getOrAwaitValue().consume()
        Assert.assertEquals(false, result)
    }
}InstantTaskExecutorRuleมาจากandroidx.arch.core:core-testinggetOrAwaitValue()เป็น Extension Function สำหรับเพื่อใช้เทสกับ LiveData
เพียงเท่านี้ก็จะได้ออกมาเป็น Reusable + Testable ViewModel เพื่อนำไปใช้งานแล้ว
ข้อควรระวัง
อย่างที่บอกไปในตอนแรกว่าการสร้าง ViewModel จาก Interface Delegation โดยตรงไม่ใช่วิธีที่ถูกซักเท่าไร
// MainViewModel.kt
class MainViewModel : ViewModel(), LoadingStateViewModel by DefaultLoadingStateViewModel() {
    /* ... */
}
ด้วยเหตุผลที่ว่า ViewModel ควรถูกสร้างจาก ViewModel Factory เพื่อให้ Lifecycle ของ ViewModel สัมพันธ์กับ Lifecycle ของ Activity / Fragment
ทำให้การสร้าง ViewModel โดยตรงแบบนี้จึงไม่ใช่วิธีที่ถูกซักเท่าไร ถึงแม้ว่าตอนใช้งานจริงอาจจะทำงานได้ไม่มีปัญหา แต่ถ้าเป็นการทำงานที่มีการใช้ viewModeScope หรือ onClear ก็อาจจะมีปัญหาได้
ดังนั้นการโยนเข้ามาผ่าน Constructor จึงเหมาะกว่า เพราะเราสามารถสร้าง ViewModel ตัวนี้ผ่าน ViewModel Factory ก่อน แล้วค่อยโยนเข้ามาในภายหลัง
// MainViewModel.kt
class MainViewModel(
    private val loadingStateViewModel: LoadingStateViewModel
) : ViewModel(), LoadingStateViewModel by loadingStateViewModel {
    /* ... */
}
และถ้าใช้ Dependency Injection ก็ควรคำนึงถึงประเด็นนี้ด้วยเช่นกัน
สรุป
เป็นเรื่องปกติที่จะมีคำสั่งบางอย่างที่ถูกเรียกใช้งานใน ViewModel หลายๆตัว ทางที่ดีก็ควรจะย้ายคำสั่งเหล่านี้ไปสร้างเป็น ViewModel แยกออกมาอีกตัว เพื่อทำเป็น Reusable ViewModel โดยใช้ประโยชน์จาก Interface Delegation เพื่อให้ ViewModel ตัวอื่นๆสามารถเรียกใช้งานได้สะดวก
ถึงแม้ว่านักพัฒนาสามารถใช้วิธีอื่นๆในการสร้าง Reusable ViewModel ได้เช่นกัน แต่การใช้ Interface Delegation นั้นจะเหมาะกับการใช้งานในรูปแบบนี้มาก เพราะว่า
- ลดความสัมพันธ์ (Decoupling) ระหว่าง Reusable ViewModel กับ ViewModel ที่จะเรียกไปใช้งาน
- สามารถแก้ไขหรือเพิ่มการทำงานในภายหลังได้ง่าย เช่น ถ้า ViewModel ที่ต้องใช้ LoadingStateViewModel แต่จำเป็นต้องใช้ที่ไม่เหมือนกับใน DefaultLoadingStateViewModel ก็สามารถสร้างขึ้นมาเป็นคลาสตัวใหม่ได้เลย
- ใช้กับ Dependency Injection ที่มีอยู่ในโปรเจคได้เลย
- เขียนเทสเพื่อทดสอบการทำงานของ ViewModel แต่ละตัวให้แยกออกจากกันได้ง่าย
ทั้งนี้นักพัฒนาสามารถสร้าง Reusable ViewModel หลายๆตัวได้ แต่ทางที่ดีก็ควรจะออกแบบและกำหนดหน้าที่ของ ViewModel ตัวนั้นๆให้เหมาะสมกับการนำไปใช้งานด้วยนะ