
หลังจากที่ได้รู้เกี่ยวกับการทำงานในรูปแบบต่างๆของ Service แล้ว คราวนี้เจ้าของบล็อกจะพามาดูกันว่าเวลาเขียนโค้ดเพื่อสร้าง Service ซักตัวหนึ่งจะต้องทำอะไรบ้าง โดยบทความนี้จะมาสร้าง Foreground Service กันนะ ส่วน Background Service จะขอไว้พูดทีหลังสุด เพราะมีเรื่อง Background Service Limitation เข้ามาเกี่ยวข้องด้วย
บทความในซีรีย์เดียวกัน
- เรื่องต่าง ๆ ที่ควรรู้เกี่ยวกับการใช้งาน Service
- พื้นฐานของ Service
- Lifecycle ของ Service
- การเรียกใช้งาน Service และ Intent Service
- มาสร้าง Foreground Service กันเถอะ [Now Reading]
- มาสร้าง Bound Service กันเถอะ
- JobIntentService จาก Android Jetpack
อย่างที่เคยเล่าไปแล้วว่า Foreground Service เป็น Service ที่เกิดขึ้นมาเพื่อทำงานนานๆและมีการแสดงการทำงานให้ผู้ใช้เห็นผ่าน Notification ของเครื่องด้วย ซึ่งจะเหมาะกับการทำ Service จำพวก Mulsic Player หรือ Upload/Download Progress
จะสร้าง Foreground Service ต้องทำยังไงบ้าง
รูปแบบคำสั่งจะคล้ายๆกับ Background Service เลย ที่เพิ่มเติมเข้ามาก็คือต้องผูก Service เข้ากับ Notification เท่านั้นเอง และจะใช้กับคลาส Service หรือคลาส Intent Service ก็ได้
และที่สำคัญการใช้งาน Foreground Service ใน Android 9 Pie (API 28) ขึ้นไป จะต้องประกาศ Permission ของ Foreground Service ไว้ด้วย
<uses-permission android:name="android.permission.FOREGROUND_SERVICE" />นี่คือตัวอย่างการสร้าง Foreground Service แบบเรียบง่ายที่สุด
// AwesomeForegroundService.kt

import android.app.Service
import android.content.Intent
import android.os.IBinder
import androidx.core.app.NotificationCompat

class AwesomeForegroundService : Service() {
    override fun onBind(intent: Intent?): IBinder? {
        return null
    }

    override fun onStartCommand(intent: Intent?, flags: Int, startId: Int): Int {
        start(startId)
        // Do something
        return START_STICKY
    }

    fun start(id: Int) {
        val notification = NotificationCompat.Builder(this, "file_downloader")
                .setContentTitle("Download in progress")
                .setContentText("Progress : 50%")
                .setSmallIcon(R.mipmap.ic_launcher)
                .setTicker("Download started")
                .build()
        startForeground(id, notification)
    }
}
เพียงแค่สร้าง Notification ขึ้นมาแล้วใช้คำสั่ง startForeground(...) เพื่อทำให้ Service กลายเป็น Foreground Service เท่านั้นเอง
ในกรณีที่อยากให้เรียกคำสั่งแค่ครั้งเดียวก็สามารถย้ายไปเรียกใน onCreate() ก็ได้ ขึ้นอยู่กับรูปแบบการทำงานที่ผู้ที่หลงเข้ามาอ่านต้องการ ไม่ได้มีรูปแบบตายตัว
// AwesomeForegroundService.kt
import android.app.Service
import android.content.Intent
import android.os.IBinder
import androidx.core.app.NotificationCompat

class AwesomeForegroundService : Service() {
    companion object {
        val NOTIFICATION_ID = 123
    }

    override fun onBind(intent: Intent?): IBinder? {
        return null
    }

    override fun onCreate() {
        start()
    }

    override fun onStartCommand(intent: Intent?, flags: Int, startId: Int): Int {
        // Do something
        return START_STICKY
    }

    fun start() {
        val notification = NotificationCompat.Builder(this, "file_downloader")
                .setContentTitle("Download in progress")
                .setContentText("Progress : 50%")
                .setSmallIcon(R.mipmap.ic_launcher)
                .setTicker("Download started")
                .build()
        startForeground(NOTIFICATION_ID, notification)
    }
}
อยากให้สร้าง Notification ขึ้นมาทุกครั้งที่เรียกใช้งานก็ให้ประกาศไว้ใน onStartCommand(...) แต่ถ้าอยากให้แสดงเป็น Notification ตัวเดียวกันก็ให้ประกาศไว้ใน onCreate() แทน
โดย Notification ที่สร้างขึ้นมาจาก Foreground Service จะแสดงให้เห็นตลอดเวลาและผู้ใช้ไม่สามารถลบทิ้งได้จนกว่า Service ตัวนั้นจะหยุดทำงาน

ส่วนการสั่งให้ Foreground Service หยุดทำงานก็เหมือนกับของ Background Service เลย ถ้าอยากจะให้ Component ที่เรียกใช้งานเป็นตัวสั่งหยุดก็ใช้คำสั่ง stopService(...) แต่ถ้าอยากจะสั่งหยุดจากในตัว Foreground Service เองก็ให้ใช้ stopSelf() หรือ stopSelf(startId: Int)
เพิ่มความสมจริงเข้าไปอีกนิดนึง
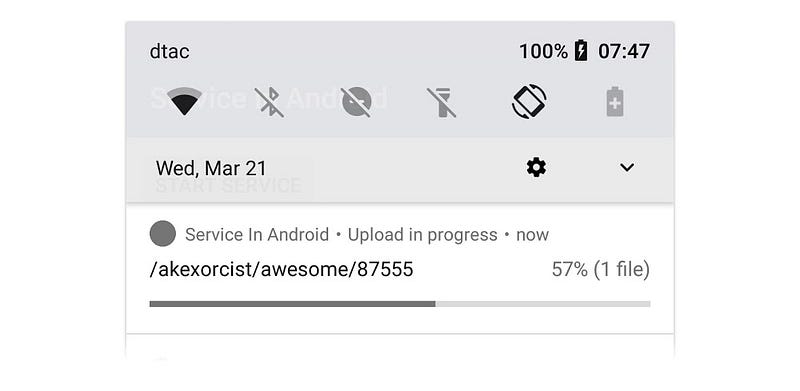
ทีนี้มาลองสร้าง Foreground Service ที่ต้องเอาไปใช้งานจริงๆดูบ้าง ขอเป็น Service ที่ใช้ตอนอัปโหลดข้อมูลขึ้น Web Service ดีกว่า โดยมีการทำงานดังนี้
- แสดง Progress ในการอัปโหลดข้อมูล
- รองรับ Progress หลายตัวพร้อมกันโดยแสดงข้อมูลให้เห็นบน Notification
- ตัดโค้ดส่วนอัปโหลดออก โฟกัสเฉพาะโค้ดของ Foreground Service
- การอัปโหลดข้อมูลจะเป็นการอัปโหลดตามลำดับที่เรียก Service (เป็นแบบ Queue)
สำหรับโค้ดอัปโหลดข้อมูลขอสมมติขึ้นมาว่าเรียกใช้งานแบบนี้
Uploader.upload(filePath, object : Uploader.Callback {
    override fun onProgress(progress: Int) {
        // Update Progress
    }

    override fun onComplete(isSuccessful: Boolean) {
        // Complete
    }
})
ไม่ต้องไปสนใจเนอะว่าคลาส Uploader มันทำงานยังไง สนแค่ว่าส่ง onProgress(progress: Int) กลับมาถ้ากำลังอัปโหลดอยู่ และเมื่อเสร็จแล้วก็จะส่ง onComplete(isSuccessful: Boolean) มาบอกให้ด้วย
โดย Foreground Service ที่จะสร้างขึ้นมาจะใช้เป็น Intent Service เพราะอยากให้ข้อมูลถูกอัปโหลดตามคิว ซึ่งการใช้ Intent Service จะช่วยให้เจ้าของบล็อกจัดการเรื่องนี้ได้ง่ายขึ้น
// AwesomeForegroundService.kt
import android.app.IntentService

class AwesomeForegroundService : IntentService("FileUploaderService") {
    ...
}
และสิ่งที่ผู้ที่หลงเข้ามาอ่านต้องจัดการให้ดีเมื่อใช้งาน Foreground Service ก็คือการแสดงผลของ Notification ซึ่งในตัวอย่างนี้จะต้องแสดง Progress ตอนที่กำลังอัปโหลดข้อมูลอยู่ และแจ้งเตือนอีกครั้งเมื่ออัปโหลดข้อมูลครบทุกตัว

// AwesomeForegroundService.kt
import android.app.Notification
import android.app.NotificationChannel
import android.app.NotificationManager
import android.content.Context
import android.os.Build
import androidx.annotation.RequiresApi
import androidx.core.app.NotificationCompat
...

class AwesomeForegroundService : IntentService("FileUploaderService") {
    companion object {
        ...
        private const val NOTIFICATION_ID_PROGRESS = 25
        private const val NOTIFICATION_ID_SUCCESSFUL = 26
        private const val NOTIFICATION_CHANNEL_PROGRESS = "progress"
        private const val NOTIFICATION_NAME_PROGRESS = "Progress"
    }
    ...
    @RequiresApi(Build.VERSION_CODES.O)
    private fun createNotificationChannel() {
        val channel = NotificationChannel(NOTIFICATION_CHANNEL_PROGRESS, NOTIFICATION_NAME_PROGRESS, NotificationManager.IMPORTANCE_HIGH).apply {
            enableVibration(true)
            enableLights(true)
        }
        getNotificationManager().createNotificationChannel(channel)
    }

    private fun prepareUploadProgress() {
        val notification = createProgressNotification("", "", 0)
        startForeground(NOTIFICATION_ID_PROGRESS, notification)
    }

    private fun updateUploadProgress(progress: Int, filePath: String) {
        val notification = createProgressNotification("", "", 0)
        startForeground(NOTIFICATION_ID_PROGRESS, notification)
    }

    private fun createProgressNotification(contentTitle: String, contentText: String, progress: Int): Notification {
        return NotificationCompat.Builder(this, NOTIFICATION_CHANNEL_PROGRESS).apply {
            setSubText(getString(R.string.upload_in_progress))
            setContentTitle(contentTitle)
            setContentText(contentText)
            setSmallIcon(R.mipmap.ic_launcher)
            setTicker(getString(R.string.upload_started))
            setProgress(100, progress, false)
            setOnlyAlertOnce(true)
            setDefaults(NotificationCompat.DEFAULT_ALL)
            priority = NotificationCompat.PRIORITY_HIGH
        }.build()
    }

    private fun showUploadSuccessful() {
        val notification = NotificationCompat.Builder(this, NOTIFICATION_CHANNEL_PROGRESS).apply {
            setContentTitle(getString(R.string.upload_successful))
            setSmallIcon(R.mipmap.ic_launcher)
            setTicker(getString(R.string.upload_successful))
            setDefaults(NotificationCompat.DEFAULT_ALL)
            setAutoCancel(true)
            priority = NotificationCompat.PRIORITY_HIGH
        }.build()
        getNotificationManager().notify(NOTIFICATION_ID_SUCCESSFUL, notification)
    }

    private fun clearUploadSuccessful() {
        getNotificationManager().cancel(NOTIFICATION_ID_SUCCESSFUL)
    }

    private fun getNotificationManager(): NotificationManager {
        return getSystemService(Context.NOTIFICATION_SERVICE) as NotificationManager
    }
}
เพื่อให้รองรับกับ Android 8.0 Oreo ก็เลยต้องเตรียม Notification Channel ไว้ด้วย (โถ่ว ชีวิต) และมีการแยก Notification ระหว่าง Progress กับตอนอัปโหลดข้อมูลเสร็จ รวมไปถึงการสั่งเคลียร์ Notification ตอนอัปโหลดข้อมูลเสร็จ (เผื่อว่ามีการเรียก Service ตัวนี้ใหม่อีกครั้ง)
โดยคำสั่ง createNotificationChannel(), clearUploadSuccessful() และ prepareUploadProgress() จะถูกเรียกในตอน onCreate() เพื่อเตรียม Notification ให้พร้อมก่อนที่จะเริ่มอัปโหลดข้อมูล (เพราะเริ่มอัปโหลดข้อมูลทันทีที่ Service ถูกสร้างขึ้นมา)
ส่วน showUploadSuccessful() จะแสดงตอน onDestroy() เพราะ Service จะถูกทำลายทันทีที่อัปโหลดข้อมูลครบทุกไฟล์แล้ว ซึ่งขอสมมติว่าสำเร็จตลอดละกันเนอะ
// AwesomeForgroundService.kt
import android.app.IntentService
import android.app.Notification
import android.app.NotificationManager
import android.os.Build
import androidx.annotation.RequiresApi
...

class AwesomeForegroundService : IntentService("FileUploaderService") {
    ...
    override fun onCreate() {
        super.onCreate()
        if (Build.VERSION.SDK_INT >= Build.VERSION_CODES.O) {
            createNotificationChannel()
        }
        clearUploadSuccessful()
        prepareUploadProgress()
    }

    override fun onDestroy() {
        super.onDestroy()
        showUploadSuccessful()
    }

    @RequiresApi(Build.VERSION_CODES.O)
    private fun createNotificationChannel() { ... }

    private fun prepareUploadProgress() { ... }

    private fun updateUploadProgress(progress: Int, filePath: String) { ... }

    private fun createProgressNotification(contentTitle: String, contentText: String, progress: Int): Notification { ... }

    private fun showUploadSuccessful() { ... }

    private fun clearUploadSuccessful() { ... }

    private fun getNotificationManager(): NotificationManager { ... }
}
แล้ว updateUploadProgress(...) ล่ะ? เดี๋ยวใช้แสดง Progress ตอนอัปโหลดข้อมูลนั่นเอง
โอเค เจ้าของบล็อกจัดการกับ Notification เรียบร้อยละ ทีนี้มาโฟกัสใน Method ของ Service กัน
ปัญหาหลักน่าจะอยู่ตรงที่ทำยังไงให้แสดงจำนวนไฟล์ที่กำลังอัปโหลดอยู่บน Notification ได้ล่ะ? เบื้องต้นคือ Path ของไฟล์ที่จะอัปโหลดจะถูกส่งเข้ามาที่ onStartCommand(intent: Inten, flags: Int, startId: Int) โดยโยนข้อมูลเข้ามาผ่าน Intent
// AwesomeForegroundService.kt

import android.app.IntentService
import android.content.Intent
...

class AwesomeForegroundService : IntentService("FileUploaderService") {
    companion object {
        const val EXTRA_FILE_PATH = "file_path"
        ...
    }
    ...
    override fun onHandleIntent(intent: Intent?) {
        val filePath = intent?.getStringExtra(EXTRA_FILE_PATH)
        ...
    }
    ...
}
ดังนั้นเจ้าของบล็อกจึงใช้วิธีเก็บ filePath ไว้ใน ArrayList ที่ประกาศไว้เป็น Global Variable ซะ จะได้เช็คทีหลังได้ว่ามีจำนวนเท่าไร
// AwesomeForegroundService.kt

import android.app.IntentService
import android.content.Intent
...

class AwesomeForegroundService : IntentService("FileUploaderService") {
    companion object {
        const val EXTRA_FILE_PATH = "file_path"
        ...
    }

    private val filePathList: ArrayList<String> = ArrayList()

    override fun onHandleIntent(intent: Intent?) {
        val filePath = intent?.getStringExtra(EXTRA_FILE_PATH)
        ...
    }

    override fun onStartCommand(intent: Intent?: flags: Int, startId: Int): Int {
        val filePath = intent?.getStringExtra(EXTRA_FILE_PATH)
        filePath?.let {
            filePathList.add(filePath)
        }
    }

    ...
}
ถึงจุดนี้อาจจะสงสัยว่า ไม่ทำใน onHandlleIntent(intent: Intent?) ล่ะ โค้ดจะได้ไม่ซ้ำซ้อน นั่นก็เพราะว่า onStartCommand(...) จะทำงานทันทีที่มีการเรียก Service แต่ว่า onHandleIntent(...) จะทำงานเป็น Queue ซึ่งต้องรอตัวแรกทำงานเสร็จก่อนถึงจะทำงานตัวต่อไป ซึ่งถ้าใช้ onHandleIntent(...) ในการนับจำนวนไฟล์ที่ต้องอัปโหลด ก็จะได้ค่าเป็น 1 ตลอด
และพออัปโหลดข้อมูลแต่ละไฟล์เสร็จก็ไปลบออกจาก ArrayList ทีละตัวด้วย
// AwesomeForegroundService.kt
import android.app.IntentService
import android.content.Intent
...

class AwesomeForegroundService : IntentService("FileUploaderService") {
    companion object {
        const val EXTRA_FILE_PATH = "file_path"
        ...
    }

    private val filePathList: ArrayList<String> = ArrayList()

    override fun onHandleIntent(intent: Intent?) {
        val filePath = intent?.getStringExtra(EXTRA_FILE_PATH)
        filePath?.let {
            uploadFileToWebServer(filePath)
        }
    }

    override fun onStartCommand(intent: Intent?, flags: Int, startId: Int): Int {
        val filePath = intent?.getStringExtra(EXTRA_FILE_PATH)
        filePath?.let {
            filePathList.add(filePath)
        }
    }

    private fun uploadFileToWebServer(filePath: String) {
        Uploader.upload(filePath, object : Uploader.Callback {
            override fun onProgress(progress: Int) {
                updateUploadProgress(progress, filePath)
            }

            override fun onComplete(isSuccessful: Boolean) {
                filePathList.remove(filePath)
            }
        })
    }
    ...
}
เพียงเท่านี้ก็จะได้ Foreground Service ที่ทำหน้าที่อัปโหลดข้อมูลขึ้น Web Service แล้ววววว อยากจะอัปโหลดข้อมูลเมื่อไรก็แค่โยน Path ของไฟล์นั้นๆมา แล้วเดี๋ยว Foreground Service ตัวนี้จะจัดการทยอยอัปโหลดให้เองเลย เย้เย
// MainActivity.ky

import android.content.Intent
import android.support.v7.app.AppCompatActivity
...

class MainActivity : AppCompatActivity() {
    ...
    private fun uploadFile(filePath: String) {
        val intent = Intent(this, AwesomeBackgroundService::class.java)
        intent.putExtra(AwesomeBackgroundService.EXTRA_FILE_PATH, filePath)
        startService(intent)
    }
}
และถ้าอยากให้ Foreground Service ตัวนี้อัปโหลดข้อมูลหลายๆไฟล์พร้อมๆกันก็ให้เปลี่ยนไปเป็นคลาส Service แล้วเขียน Background Thread เองตามบทความในตอนที่ 3 ได้เลยจ้า
สรุป
Foreground Service ถือว่าเป็น Service ที่เหมาะจะใช้ในหลายๆงานเลยล่ะ ด้วยความที่ตัวมันผูกกับ UI (Notification นั่นแหละ) จึงทำให้มันมีอายุยืนยาวมากๆเมื่อเทียบกับ Background Service ซึ่งมีผลกับฟีเจอร์ใน Android 8.0 Oreo ด้วยนะ เพราะว่า Foreground Service ถูกยกเว้นจาก Background Service Limitation ที่เอะอะก็จะปิด Background Service ตลอดเวลา ส่วนหนึ่งก็เพราะว่าตัวมันเป็น Service ที่แสดงให้ผู้ใช้เห็นได้ทันที ทำให้ผู้ใช้ไม่ต้องกังวลว่าจะมี Service อะไรแอบทำงานอยู่หรือป่าว (ยังไงก็โชว์หราอยู่บน Notification) จึงทำให้ผู้ใช้จัดการกับ Foreground Service ได้ง่าย (กดปิดได้ง่ายกว่า Background Service นั่นเอง)
ส่วน Notification ที่ต้องทำงานคู่กับ Foreground Service ก็สามารถเนรมิตรรูปร่างหน้าตาได้เต็มที่เท่าที่ Notification ตัวหนึ่งจะทำงานได้นะ ไม่ได้มีข้อจำกัดใดๆในการสร้าง แต่ก็พยายามจัดการกับโค้ดของ Notification ใน Foreground Service ดีๆล่ะ โค้ดจะได้ไม่รกมาก
เมื่อใดก็ตามที่ผู้ที่หลงเข้ามาอ่านอยากจะสร้าง Service ซักตัวให้ทำงานนานๆ Foreground Service ถือว่าเป็นหนึ่งในทางเลือกที่ดีต่ออนาคต ถึงแม้ว่าจะต้องแสดง Notification ให้ผู้ใช้เห็นก็ตาม แต่ก็ยังดีกว่าเสียเวลาจัดการไม่ให้ Background Service หยุดทำงาน โดยเฉพาะอย่างยิ่งในแอนดรอยด์เวอร์ชันใหม่ๆ