ถึงแม้ว่าจะเรียกว่า Slot API ก็ตาม แต่ก็ไม่ได้หมายถึง API ที่มีให้เรียกใช้งานใน Jetpack Compose หรอกนะ เพราะ Slot API เป็น Compose Pattern ที่จะช่วยให้นักพัฒนาสามารถสร้าง Reusable Composable ให้นำไปใช้งานได้สะดวกมากขึ้น
บทความในชุดเดียวกัน
- Stateless & Stateful Composable
- State Hoisting
- Slot API [Now Reading]
- Shape
- UI Preview
- Composition Local
- Adoption Strategy
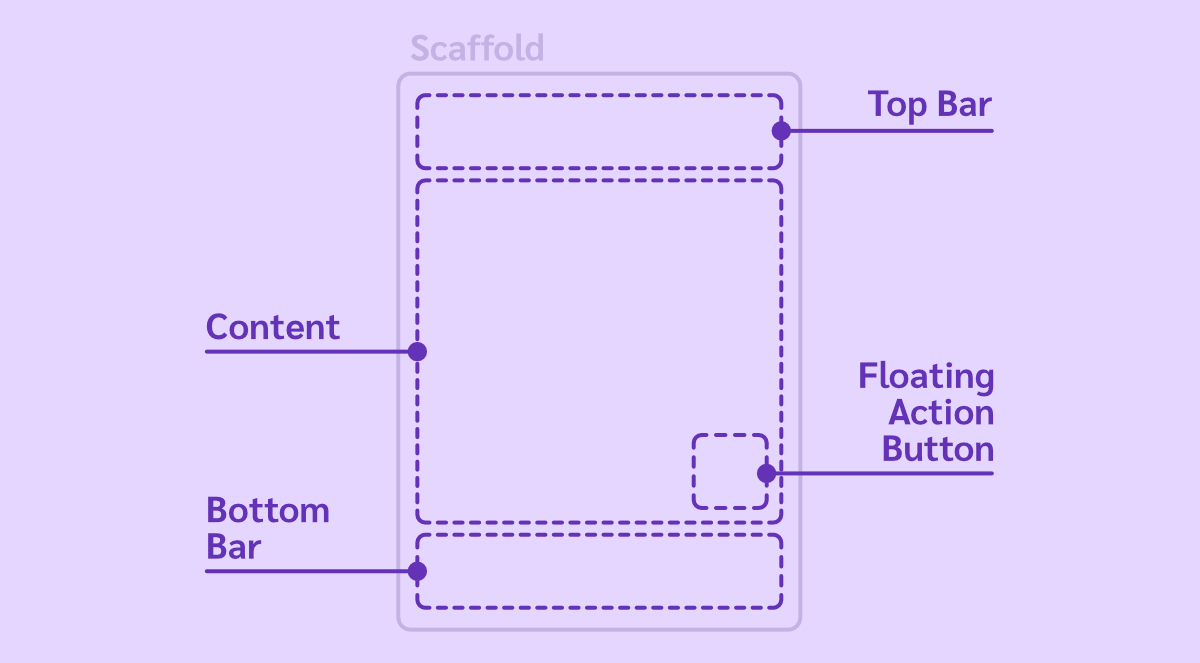
Slot API เป็นการสร้าง UI Template ที่จะมีการจัด Layout เตรียมไว้ล่วงหน้า ส่วนตรงไหนจะเป็น UI อะไรก็ให้ Composable ที่เรียกใช้งานเป็นคนกำหนดเอง

โดยหนึ่งใน Composable ที่ใช้ Pattern นี้ก็คือ Scaffold ที่อยู่ใน Material Components นั่นเอง
Scaffold(
    topBar = { /* Top Bar */ },
    bottomBar = { /* Bottom Bar */ },
    floatingActionButton = { /* FAB */ },
) {
    /* Content */
}
เราจะเรียก Composable แบบนี้ว่า Slot-based Layout
ข้อดีของ Composable แบบนี้คือเอาไปใช้ได้หลากหลายรูปแบบ ไม่จำเป็นต้องกำหนด UI ให้ครบทุกส่วน เช่น บางหน้ามีแค่ Top Bar และ Content ก็เพิ่ม Composable เข้าไปเฉพาะตรงส่วนนั้น ๆ ก็พอ ส่วนที่เหลือก็จะถูกซ่อนออกไปจากหน้าจอโดยอัตโนมัติ
Scaffold(
    topBar = { TopAppBar(title = { Text("Sleeping For Less") }) },
) {
    Box(modifier = Modifier.padding(16.dp)) {
        /* ... */
    }
}
และด้วย Pattern ดังกล่าว นักพัฒนาจึงสามารถนำมาใช้กับการออกแบบ Composable ในบางตัวที่มีรูปแบบการจัดวาง Layout ที่เหมือนกันและมีการเรียกใช้งานในหลาย ๆ ที่ได้เช่นกัน
ยกตัวอย่างเช่น เจ้าของบล็อกมี UI ที่แสดงข้อมูลเป็นแบบ Heading ที่มีหน้าตาแบบนี้

จากภาพตัวอย่าง UI จะเห็นว่าเราสามารถสร้าง Composable ที่ทำหน้าที่เป็น Slot-based Layout ขึ้นมาเพื่อประยุกต์ใช้กับ UI ทั้งหมดนี้ได้
สร้าง Slot-based Layout ด้วย Basic Compose Layout
ในกรณีที่ต้องการสร้าง Slot-based Layout ด้วยวิธีง่าย ๆ ไม่ซับซ้อน ก็สามารถใช้ Basic Compose Layout อย่าง Box, Row, และ Column โดยตรงได้เลย
@Composable
fun TopBar(
    modifier: Modifier = Modifier,
    leading: @Composable RowScope.() -> Unit = {},
    trailing: @Composable RowScope.() -> Unit = {},
    content: @Composable BoxScope.() -> Unit,
) {
    Row(
        modifier = modifier
            .fillMaxWidth()
            .padding(8.dp),
        verticalAlignment = Alignment.CenterVertically,
    ) {
        leading()
        Box(modifier = Modifier.weight(1f)) {
            content()
        }
        trailing()
    }
}
หัวใจสำคัญในการสร้าง Composable ที่สามารถรับ Composable ใด ๆ เข้ามาแสดงผลข้างในได้ ก็คือส่วนที่เป็น Content ควรประกาศเป็น Parameter ตัวสุดท้ายเสมอ เพื่อให้ใช้ร่วมกับ Trailing Lambda ของ Kotlin ได้สะดวก
// Without trailing lambda
TopBar(
    leading = { /* Leading */ },
    trailing = { /* Trailing */ },
    content = { /* Content */ },
)

// With trailing lambda
TopBar(
    leading = { /* Leading */ },
    trailing = { /* Trailing */ },
) {
    /* Content Composable */
}
สร้าง Slot-based Layout ด้วย Subcompose Layout
วิธีก่อนหน้านี้จะเป็นการสร้าง Slot-based Layout ด้วย Basic Compose Layout ที่ไม่ได้ทำอะไรมากนัก แล้วปล่อยให้ทุกอย่างทำงานไปตามปกติ
ซึ่ง Scaffold ใน Material Components จะไม่ได้ใช้วิธีแบบนั้น แต่จะใช้ Subcompose Layout เพื่อทำการคำนวณขนาดของ Child Composable ทั้งหมดก่อน แล้วค่อยวาง Child Composable แต่ละตัวตามตำแหน่งที่ต้องการในทีเดียวเลย
และนักพัฒนาก็สามารถสร้าง Slot-based Layout ที่ใช้ Subcompose Layout ได้เช่นกัน
@Composable
fun TopBar(
    modifier: Modifier = Modifier,
    leading: @Composable () -> Unit = {},
    trailing: @Composable () -> Unit = {},
    content: @Composable (PaddingValues) -> Unit,
) {
    SubcomposeLayout(modifier = modifier) { constraints ->
        val layoutWidth = constraints.maxWidth
        val layoutHeight = constraints.maxHeight

        val looseConstraints = constraints.copy(minWidth = 0, minHeight = 0)

        layout(layoutWidth, layoutHeight) {
            val leadingPlaceables = subcompose(TopBarContent.Leading, leading).map {
                it.measure(looseConstraints)
            }
            val leadingWidth = leadingPlaceables.maxByOrNull { it.width }?.width ?: 0

            val trailingPlaceables = subcompose(TopBarContent.Trailing, trailing).map {
                it.measure(looseConstraints)
            }
            val trailingWidth = trailingPlaceables.maxByOrNull { it.width }?.width ?: 0

            val bodyContentPlaceables = subcompose(TopBarContent.Content) {
                val innerPadding = PaddingValues(
                    top = 0.dp,
                    bottom = 0.dp,
                    start = if (leadingPlaceables.isEmpty()) {
                        0.dp
                    } else {
                        leadingWidth.toDp()
                    },
                    end = if (trailingPlaceables.isEmpty()) {
                        0.dp
                    } else {
                        trailingWidth.toDp()
                    },
                )
                content(innerPadding)
            }.map { it.measure(looseConstraints) }

            bodyContentPlaceables.forEach {
                it.place(0, 0)
            }
            leadingPlaceables.forEach {
                it.place(0, 0)
            }
            trailingPlaceables.forEach {
                it.place(layoutWidth - trailingWidth, 0)
            }
        }
    }
}

private enum class TopBarContent { Leading, Trailing, Content }
จะเห็นว่าการใช้ Subcompose Layout จะต้องคำนวณหาตำแหน่งที่จะวาง Child Composable แต่ละตัวเองทั้งหมด และจากตัวอย่างก็จะให้ Composable สำหรับส่วนที่เป็น Content รับค่า Padding ไปกำหนดเองในภายหลัง
ทำให้การใช้งาน Slot-based Layout ที่สร้างด้วย Subcompose Layout เป็นแบบนี้แทน
TopBar(
    leading = { /* Leading */ },
    trailing = { /* Trailing */ },
) { padding ->
    Box(modifier = Modifier.padding(padding) {
        /* Content */
    }
}
สร้าง Slot-based Layout ด้วยวิธีแบบไหนดีกว่ากัน?
ไม่ว่าจะสร้าง Slot-based Layout ด้วยวิธีแบบไหน ทั้งคู่ก็สามารถนำไปสร้าง UI ได้ตามที่ต้องการเหมือนกัน และ Rendering Performance ของทั้ง 2 วิธีก็แทบจะไม่ต่างกัน
เพราะสิ่งที่ส่งผลต่อ Rendering Performance มากกว่า ก็คือ Composable ที่มีการ Recomposition บ่อยเกินจำเป็น
และจุดที่แตกต่างกันจริง ๆ นอกจากวิธีการเขียนโค้ดแล้ว ก็จะเป็นเรื่องของ UI Component Tree ที่ได้ผลลัพธ์แตกต่างกัน (แต่แสดงผลเหมือนกัน)
ยกตัวอย่างเช่น UI ที่มีหน้าตาแบบนี้

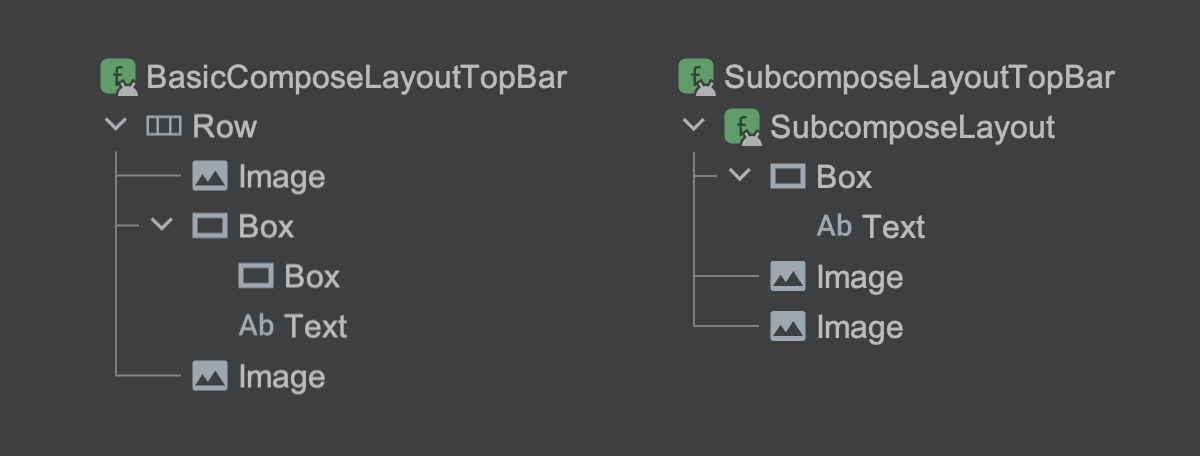
ถ้าลองใช้ Slot-based Layout ที่สร้างขึ้นด้วยทั้ง 2 วิธีที่อธิบายไปก่อนหน้านี้ ก็จะเห็น Component Tree ที่แตกต่างกันแบบนี้

จะเห็นว่า Basic Compose Layout มี Component Tree ที่จำนวน Composable และระดับการซ้อนกัน (Nested) มากกว่า ในขณะที่ Subcompose Layout จะ Flatten กว่าอย่างเห็นได้ชัด และ Child Component จะไม่ได้เรียงตามลำดับ เพราะทั้งหมดถูกนำมาคำนวณและจัดวางพร้อม ๆ กัน
สรุป
การสร้าง Slot-based Layout เพื่อนำไปใช้งานซ้ำภายในแอปถือว่าเป็น Best Practice ที่นักพัฒนาควรทำเสมอเมื่อใช้ Jetpack Compose เพราะการสร้าง Slot-based Layout นั้นสามารถทำได้ง่ายและมักจะเป็น Stateless Composable จึงทำให้นักพัฒนาสามารถโฟกัสแค่การสร้าง UI ได้เลย
และเมื่อสร้างขึ้นมาใช้เองแล้ว ก็อย่าลืมเรียกใช้งานบ่อย ๆ ล่ะ
