อยู่ในระหว่างการปรับปรุงเนื้อหา
วันนี้ขอเบรกด้วยเรื่องพื้นฐานจำเป็นสำหรับการพัฒนาแอพแอนดรอยด์เสียหน่อย เพราะเจ้าของบล็อกเจอผู้ที่หลงเข้ามาอ่านที่ใช้งาน Class และ Listener เป็นแต่กลับสร้างเองไม่ค่อยเป็นกันเยอะพอสมควร ก็เลยทำบทความง่ายๆยกตัวอย่างการสร้าง Class และ Listener เอาไว้ใช้งานกันเองดีกว่า
บทความทั้งหมดในซีรีย์เดียวกัน
มาเริ่มกันเถอะ
Class และ Listener นั้นคืออะไรในบทความนี้ไม่มีอธิบายนะครับ โปรด Google หาด้วยตัวเอง เนื่องจากเป็นพื้นฐานอย่างหนึ่งที่หาศึกษาได้ทั่วๆไป
และตัวอย่างในบทความนี้จะอิงสถานการณ์จากการใช้งานบนแอนดรอยด์ซะหน่อย จะได้เห็นภาพกันง่ายขึ้น โดยจะเอาไอเดียมาจากตัวอย่างในบทความเรื่อง การสร้าง Custom Dialog
เพิ่มเติม — เนื้อหาในบทความนี้จะพิเศษหน่อย เพราะอยากจะให้ออกมาในลักษณะของ Android Code & Design Style คือนอกจากจะมีเรื่อง Class กับ Listener ที่เป็นพื้นฐานแล้ว ยังมีลักษณะการใช้งานที่อิงบนแอนดรอยด์จริงๆ และการออกแบบเพื่อใช้งานบนแอนดรอยด์จริงๆ จะได้เป็น Guideline สำหรับนำไปประยุกต์ต่อเองได้
สมมติว่าเจ้าของบล็อกเกิดอยากได้ Dialog แบบนี้
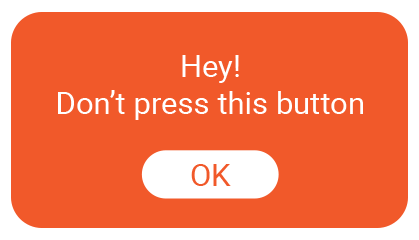
เอาไว้ทำเป็น Alert Dialog ของตัวเอง เวลาอยากจะให้แสดง Alert Dialog ก็จะให้แสดง Dialog แบบนี้แทน ดังนั้นลองสร้าง Custom Dialog แบบที่ต้องการก่อน
หมายเหตุ — เนื่องจากเป็นบทความพื้นฐานแต่เกี่ยวข้องกับโค๊ดแอนดรอยด์ ดังนั้นเจ้าของบล็อกขอ Follow ตามรูปแบบของแอนดรอยด์ที่ควรเขียนนะครับ อาจจะยาวไปหน่อย
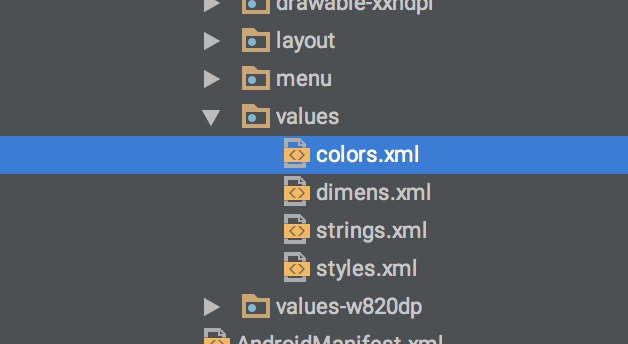
ก่อนอื่นเตรียมสีที่ต้องใช้ก่อน โดยสร้าง Value XML ขึ้นมาสำหรับเก็บค่าสี โดยกำหนดชื่อว่า colors.xml (ไม่บังคับชื่อ แต่ชื่อนี้จะทำให้จำได้ง่าย)
โดยสีที่ใช้จะมีแค่สีส้มกับสีขาว
<?xml version="1.0" encoding="utf-8"?> <resources> <color name="orange">#f1592a</color> <color name="white">#ffffff</color> </resources>และเนื่องจากพื้นหลังของ Dialog และปุ่ม OK เจ้าของบล็อกจะใช้เป็น Shape Drawable โดยจะมีการกำหนด Radius ของมุมทั้งสองอัน

ซึ่งตรงนี้เจ้าของบล็อกสามารถกำหนดค่าลงไปตรงๆเลยก็ได้ แต่เพื่อความเหมาะสมขอเก็บไว้ใน dimens.xml แทนดีกว่า

เมื่อพร้อมแล้ว ต่อไปก็สร้าง Shape Drawable ให้กับพื้นหลังของ Dialog เป็นอย่างแรกสุด
<?xml version="1.0" encoding="utf-8"?> <shape xmlns:android="https://schemas.android.com/apk/res/android" android:shape="rectangle" > <solid android:color="@color/orange" /> <corners android:radius="@dimen/dialog_bg_radius" /> </shape>ตามด้วย Shape Drawable ของปุ่ม OK
shape_dialog_button_bg.xml
<?xml version="1.0" encoding="utf-8"?> <shape xmlns:android="https://schemas.android.com/apk/res/android" android:shape="rectangle" > <solid android:color="@color/white" /> <corners android:radius="@dimen/dialog_button_radius" /> </shape>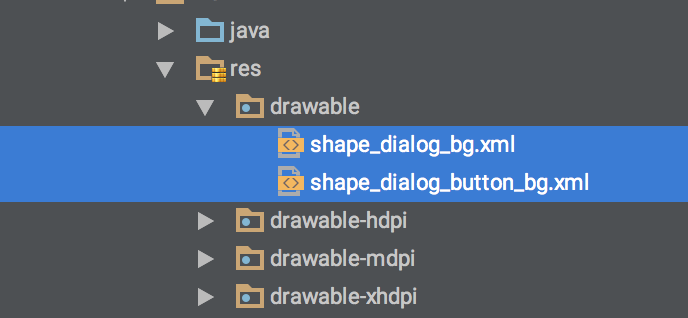
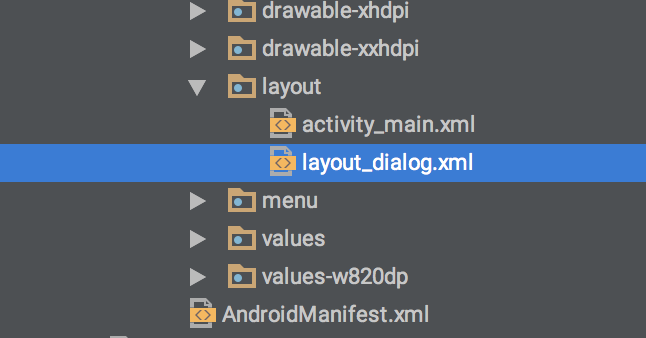
เมื่อ Shape Drawable พร้อมแล้ว ก็สร้าง Layout สำหรับ Dialog ขึ้นมาซะ โดยเจ้าของบล็อกขอตั้งชื่อไฟล์ว่า layout_dialog
ส่วนโค๊ดข้างในก็จะออกแบบตามที่สมมติไว้ในตอนแรกเลย สิ่งที่ต้องดูต่อคือ “ขนาดของตัวอักษร”
โดยเจ้าของบล็อกกำหนดขนาดเป็น 18sp

ดังนั้นให้กลับไปที่ dimens.xml ซะ แล้วกำหนด Value สำหรับขนาดตัวอักษรเพิ่มเข้าไป
<resources> <dimen name="dialog_bg_radius">20dp</dimen> <dimen name="dialog_button_radius">100dp</dimen> <dimen name="dialog_text_size">18sp</dimen> </resources>ต่อมาคือ “ข้อความที่แสดง” ให้เปิด strings.xml ขึ้นมาเพื่อเก็บข้อความที่ต้องการใช้แสดง (เนื่องจากเป็นข้อความตายตัว จึงขอเก็บไว้ในนี้เลย) โดยกำหนดชื่อไว้ว่า do_not_press กับ ok
<?xml version="1.0" encoding="utf-8"?> <resources> <string name="app_name">CustomDialogClass</string> <string name="hello_world">Hello world!</string> <string name="action_settings">Settings</string> <string name="do_not_press">Hey!\nDon\'t press this button</string> <string name="ok">OK</string> </resources>จากนั้นก็จัด Layout ใน layout_dialog.xml ซะ โดยให้ TextView มี ID เป็น tv_message ส่วน Button มี ID เป็น button_ok
<?xml version="1.0" encoding="utf-8"?> <LinearLayout xmlns:android="https://schemas.android.com/apk/res/android" android:layout_width="wrap_content" android:layout_height="wrap_content" android:background="@drawable/shape_dialog_bg" android:gravity="center" android:orientation="vertical"> <TextView android:id="@+id/tv_message" android:layout_width="wrap_content" android:layout_height="wrap_content" android:layout_gravity="center_horizontal" android:gravity="center" android:text="@string/do_not_press" android:textSize="@dimen/dialog_text_size" android:textColor="@color/white"/> <Button android:id="@+id/button_ok" android:layout_width="wrap_content" android:layout_height="wrap_content" android:layout_gravity="center_horizontal" android:background="@drawable/shape_dialog_button_bg" android:text="@string/ok" android:textSize="@dimen/dialog_text_size" android:textColor="@color/orange"/> </LinearLayout>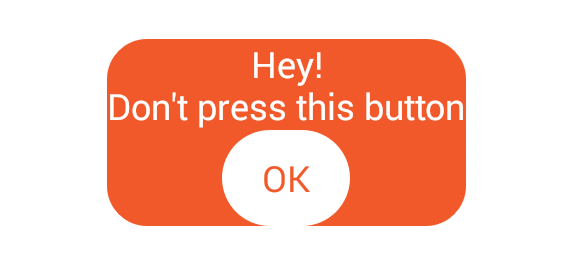
เอ….รู้สึกเหมือนจะหายใจไม่ออกแฮะ ใส่ Padding กับ Margin เข้าไปซักหน่อยดีกว่า…
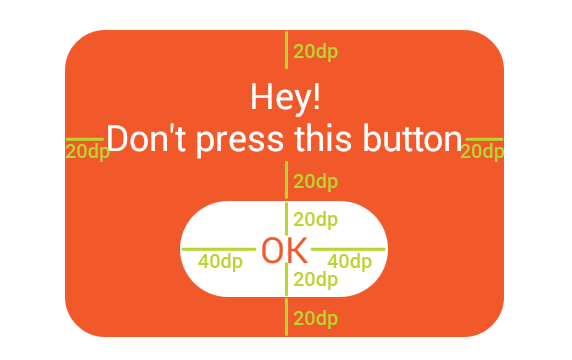
ดังนั้นกลับไปที่ dimens.xml แล้วเพิ่มค่าสำหรับ Padding ซะ
<resources> <dimen name="dialog_bg_radius">20dp</dimen> <dimen name="dialog_button_radius">100dp</dimen> <dimen name="dialog_padding">20dp</dimen> <dimen name="dialog_button_padding_vertical">20dp</dimen> <dimen name="dialog_button_padding_horizontal">40dp</dimen> <dimen name="dialog_text_size">18sp</dimen> </resources>แล้วเพิ่ม Padding กับ Margin เข้าไป
<?xml version="1.0" encoding="utf-8"?> <LinearLayout xmlns:android="http://schemas.android.com/apk/res/android" android:layout_width="wrap_content" android:layout_height="wrap_content" android:background="@drawable/shape_dialog_bg" android:gravity="center" android:orientation="vertical" android:padding="@dimen/dialog_padding"> <TextView android:id="@+id/tv_message" android:layout_width="wrap_content" android:layout_height="wrap_content" android:layout_gravity="center_horizontal" android:layout_marginBottom="@dimen/dialog_padding" android:gravity="center" android:text="@string/do_not_press" android:textColor="@color/white" android:textSize="@dimen/dialog_text_size" /> <Button android:id="@+id/button_ok" android:layout_width="wrap_content" android:layout_height="wrap_content" android:layout_gravity="center_horizontal" android:background="@drawable/shape_dialog_button_bg" android:text="@string/ok" android:textColor="@color/orange" android:textSize="@dimen/dialog_text_size" /> </LinearLayout>โดยที่ Padding ของ Button ให้เพิ่มเข้าไปที่ shape_dialog_bg.xml เพราะว่าเวลาเรียกใช้ shape ดังกล่าวจะได้ไม่ต้องมานั่งกำหนด Padding ทุกๆครั้ง
<?xml version="1.0" encoding="utf-8"?> <shape xmlns:android="http://schemas.android.com/apk/res/android" android:shape="rectangle"> <solid android:color="@color/white" /> <corners android:radius="@dimen/dialog_button_radius" /> <padding android:left="@dimen/dialog_button_padding_horizontal" android:right="@dimen/dialog_button_padding_horizontal" android:top="@dimen/dialog_button_padding_vertical" android:bottom="@dimen/dialog_button_padding_vertical" /> </shape>เพียงเท่านี้ก็จะได้ออกมาคล้ายๆกับที่ร่างแบบไว้ในตอนแรกแล้ว
เมื่อ Dialog พร้อมแล้ว สิ่งที่ขาดไม่ได้อีกอย่างคือ Layout หลักของแอพนั่นเอง ซึ่งเจ้าของบล็อกรู้สึขี้เกียจแล้ว ดังนั้นขอเอา Resource ที่ใช้ใน Dialog นี่แหละมา Reuse แทน จะได้ประหยัด Resource (แถ)
โดยเอา Button วางไว้ตรงกลางหน้าจอเนี่ยแหละ แล้วกำหนดให้มีชื่อ ID ว่า button_alert

<LinearLayout xmlns:android="http://schemas.android.com/apk/res/android" android:layout_width="match_parent" android:layout_height="match_parent" android:background="@color/orange" android:gravity="center" android:orientation="vertical"> <Button android:id="@+id/button_alert" android:layout_width="wrap_content" android:layout_height="wrap_content" android:background="@drawable/shape_dialog_button_bg" android:text="@string/ok" android:textColor="@color/orange" android:textSize="@dimen/dialog_text_size" /> </LinearLayout>และถ้าสังเกตดีๆจะเห็นว่าชื่อ Resource เริ่มไม่เหมาะสมแล้ว เช่น dialog_text_size ที่เจ้าของบล็อกเอามาใช้ใน activity_main.xml ด้วยซะงั้น ดังนั้นเพื่อความเหมาะสม “ควรเปลี่ยนเป็นชื่อที่เข้าใจง่ายกว่านี้”
ดังนั้นเจ้าของบล็อกจึงเปลี่ยนชื่อ Resource จาก
* shape_dialog_button_bg.xml >> shape_button_bg.xml
<?xml version="1.0" encoding="utf-8"?> <resources> <dimen name="dialog_button_radius">100dp</dimen> <dimen name="dialog_bg_radius">20dp</dimen> <dimen name="dialog_padding">20dp</dimen> <dimen name="dialog_button_padding_vertical">20dp</dimen> <dimen name="dialog_button_padding_horizontal">40dp</dimen> <dimen name="text_size">18sp</dimen> </resources>กลับไปแก้ไฟล์ที่เรียกใช้ Resource ทั้งสองตัวนี้ให้เรียบร้อยด้วยนะ เพราะเปลี่ยนชื่อแล้ว โดยจะมี layout_dialog.xml กับ activity_main.xml ที่ต้องแก้ไข
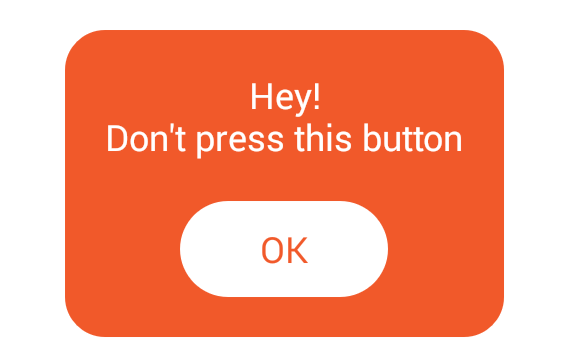
<?xml version="1.0" encoding="utf-8"?> <LinearLayout xmlns:android="http://schemas.android.com/apk/res/android" android:layout_width="wrap_content" android:layout_height="wrap_content" android:background="@drawable/shape_dialog_bg" android:gravity="center" android:orientation="vertical" android:padding="@dimen/dialog_padding"> <TextView android:id="@+id/tv_message" android:layout_width="wrap_content" android:layout_height="wrap_content" android:layout_gravity="center_horizontal" android:layout_marginBottom="@dimen/dialog_padding" android:gravity="center" android:text="@string/do_not_press" android:textColor="@color/white" android:textSize="@dimen/text_size" /> <Button android:id="@+id/button_ok" android:layout_width="wrap_content" android:layout_height="wrap_content" android:layout_gravity="center_horizontal" android:background="@drawable/shape_button_bg" android:text="@string/ok" android:textColor="@color/orange" android:textSize="@dimen/text_size" /> </LinearLayout><LinearLayout xmlns:android="http://schemas.android.com/apk/res/android" android:layout_width="match_parent" android:layout_height="match_parent" android:background="@color/orange" android:gravity="center" android:orientation="vertical"> <Button android:id="@+id/button_alert" android:layout_width="wrap_content" android:layout_height="wrap_content" android:background="@drawable/shape_button_bg" android:text="@string/ok" android:textColor="@color/orange" android:textSize="@dimen/text_size" /> </LinearLayout>เอ…รู้สึกว่าเจ้าของบล็อกลืมทำ Selector ให้กับปุ่มแฮะ ดังนั้นเวลากดที่ปุ่ม ปุ่มก็จะไม่มีการ Interactive ให้เห็น เพราะฉะนั้นขอใส่ Selector ให้ปุ่มหน่อยดีกว่า
เริ่มจากเปิดไฟล์ colors.xml ขึ้นมา แล้วเพิ่มสีเทานิดๆ
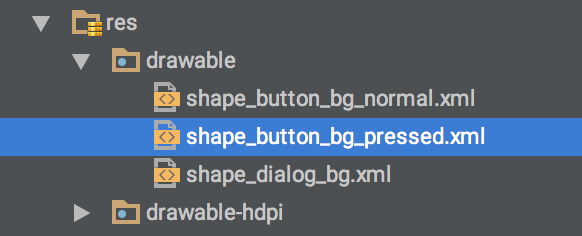
<?xml version="1.0" encoding="utf-8"?> <resources> <color name="orange">#f1592a</color> <color name="white">#ffffff</color> <color name="gray">#999999</color> </resources>เปลี่ยนชื่อ shape_button_bg.xml เป็น shape_button_bg_normal.xml

จากนั้นก็สร้าง Shape Drawable ขึ้นมาใหม่อีกตัวชื่อว่า shape_button_bg_pressed.xml โดยที่โค๊ดข้างในเหมือนกับ shape_button_bg_normal.xml แต่ว่าใช้เป็นสีเทาแทน (Copy มาแล้วแก้โค๊ดข้างในก็ได้)
<?xml version="1.0" encoding="utf-8"?> <shape xmlns:android="http://schemas.android.com/apk/res/android" android:shape="rectangle"> <solid android:color="@color/gray" /> <corners android:radius="@dimen/dialog_button_radius" /> <padding android:left="@dimen/dialog_button_padding_horizontal" android:right="@dimen/dialog_button_padding_horizontal" android:top="@dimen/dialog_button_padding_vertical" android:bottom="@dimen/dialog_button_padding_vertical" /> </shape>จากนั้นสร้าง Selector ขึ้นมา โดยเจ้าของบล็อกจะกำหนดให้ชื่อว่า selector_button.xml
<?xml version="1.0" encoding="utf-8"?> <selector xmlns:android="http://schemas.android.com/apk/res/android"> <item android:state_pressed="true" android:drawable="@drawable/shape_button_bg_pressed" /> <item android:drawable="@drawable/shape_button_bg_normal" /> </selector>จากนั้นก็เอา Selector ไปกำหนดที่ Button แทน Shape Drawable ซะ
<LinearLayout xmlns:android="http://schemas.android.com/apk/res/android" android:layout_width="match_parent" android:layout_height="match_parent" android:background="@color/orange" android:gravity="center" android:orientation="vertical"> <Button android:id="@+id/button_alert" android:layout_width="wrap_content" android:layout_height="wrap_content" android:background="@drawable/selector_button" android:text="@string/ok" android:textColor="@color/orange" android:textSize="@dimen/text_size" /> </LinearLayout><?xml version="1.0" encoding="utf-8"?> <LinearLayout xmlns:android="http://schemas.android.com/apk/res/android" android:layout_width="wrap_content" android:layout_height="wrap_content" android:background="@drawable/shape_dialog_bg" android:gravity="center" android:orientation="vertical" android:padding="@dimen/dialog_padding"> <TextView android:id="@+id/tv_message" android:layout_width="wrap_content" android:layout_height="wrap_content" android:layout_gravity="center_horizontal" android:layout_marginBottom="@dimen/dialog_padding" android:gravity="center" android:text="@string/do_not_press" android:textColor="@color/white" android:textSize="@dimen/text_size" /> <Button android:id="@+id/button_ok" android:layout_width="wrap_content" android:layout_height="wrap_content" android:layout_gravity="center_horizontal" android:background="@drawable/selector_button" android:text="@string/ok" android:textColor="@color/orange" android:textSize="@dimen/text_size" /> </LinearLayout>เท่านี้ Button ก็จะดูมีชีวิตชีวาขึ้นมาหน่อยแล้ว เวลาที่ไม่ได้กดปุ่มจะเป็นสีขาว และเมื่อกดปุ่มก็จะเป็นสีเทา
เอาล่ะ!! Layout พร้อมแล้ว มาต่อกันที่โค๊ดเลยนะ
อ๊ะๆ อย่ารีบๆ เพราะรู้สึกบทความเริ่มจะยาวแล้ว ดังนั้นขอแยกออกไปเป็นสามตอนนะจ๊ะ