Instrumented Test เป็นอีกรูปแบบหนึ่งของการเขียนเทสบนแอนดรอยด์ที่ช่วยให้นักพัฒนาสามารถเขียน Integration Test หรือ UI Test เพื่อทดสอบการทำงานของ Android Component ได้ โดยเป็นเทสที่จะต้องทำงานบนอุปกรณ์แอนดรอยด์ เพราะต้องใช้ Android Runtime ซึ่งต่างจาก Unit Test ที่ใช้แค่ JVM ก็เพียงพอแล้ว
บทความที่เกี่ยวข้อง
- เรื่องที่ควรรู้เกี่ยวกับการเขียนเทสบนแอนดรอยด์
- Unit Test กับ Instrumented Test บน Android Studio ต่างกันอย่างไร
- มาเขียน Unit Test บน Android Studio กัน
- มาเขียน Instrumented Test บน Android Studio กัน [Now Reading]
- Context กับ Target Context ใน Instrumented Test ไม่เหมือนกันนะ
- UI Test บน Android ของทุกคนอาจจะไม่เหมือนกันเสมอไป
- การส่ง Test Double ด้วย Koin ในคลาส Application เพื่อทำ UI Test
Instrumented Test บน Android Studio
การเขียน Instrumented Test ให้กับโปรเจคบนแอนดรอยด์นั้นจะต้องทำผ่าน Flavor ที่ชื่อว่า androidTest โดยจะอยู่ใน <module>/src/androidTest (ส่วนโค้ดทั่วไปจะอยู่ใน <module>/src/main)
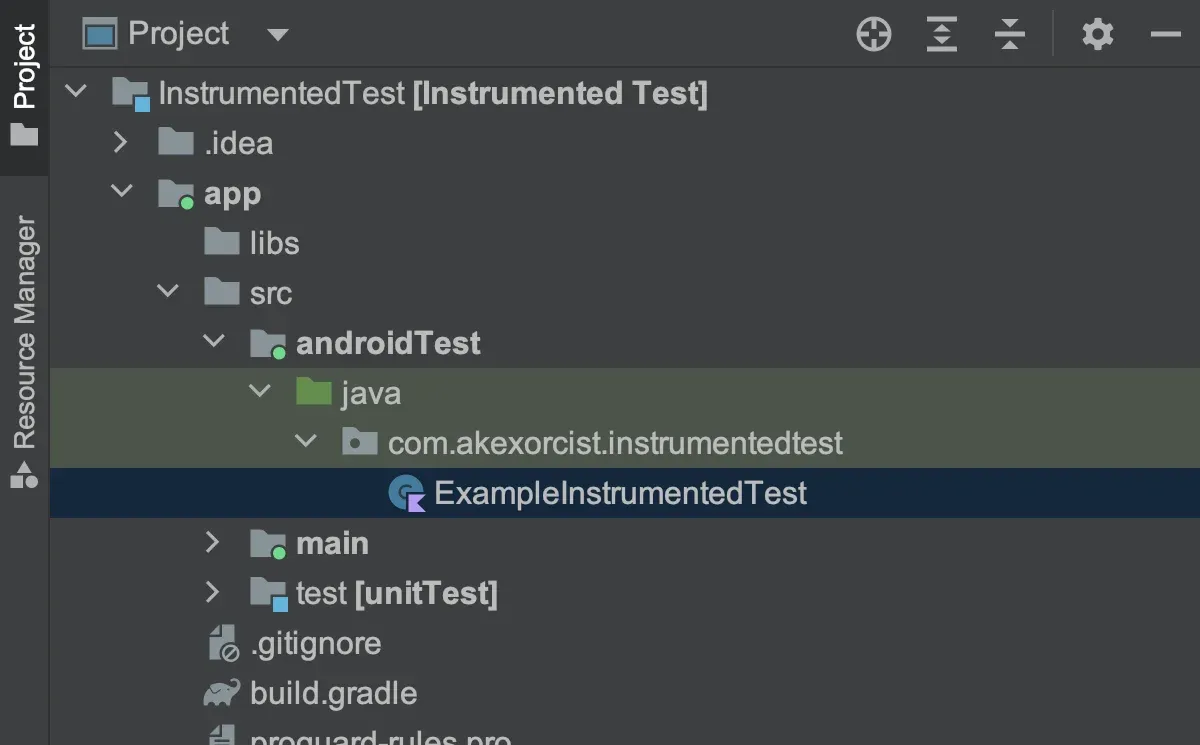
ถ้าในหน้าต่าง Project เลือกแสดงผลแบบ Android ก็จะเห็นว่า Directory ของ androidTest ถูก Highlight ด้วยสีเขียว เพื่อบอกให้รู้ว่าเป็น Flavor สำหรับการเขียนเทสนั่นเอง
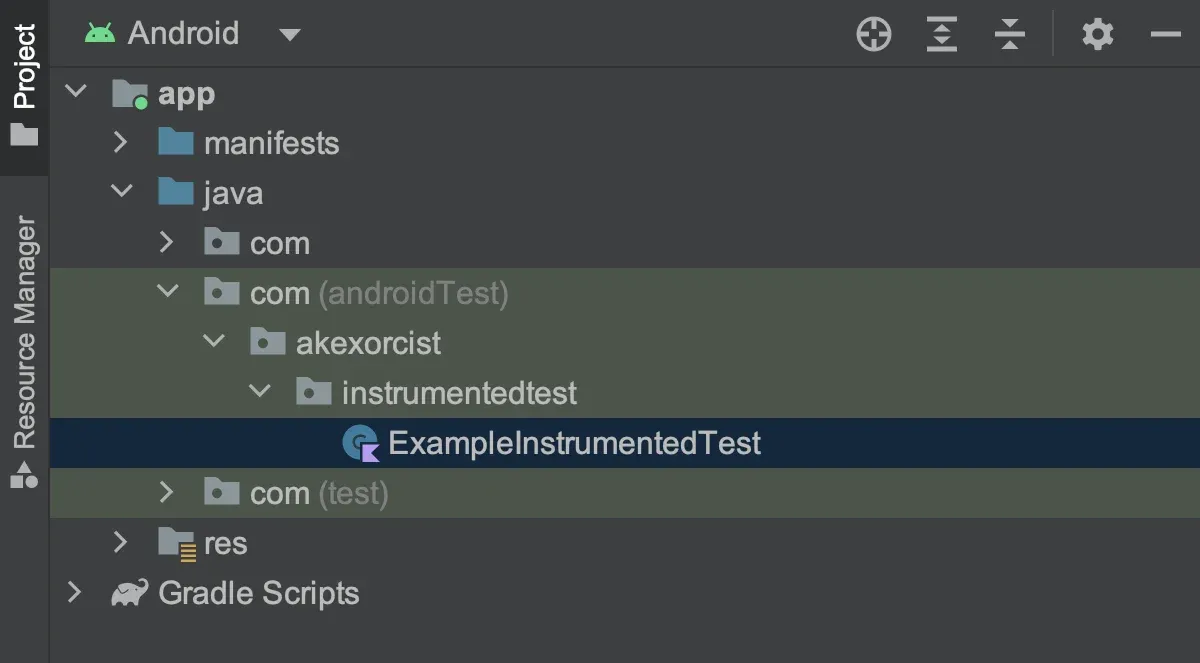
และบน Android Studio จะสร้างไฟล์ตัวอย่างสำหรับการเขียน Instrumented Test เมื่อสร้างโปรเจคขึ้นมาใหม่ให้ทุกครั้ง โดยจะตั้งไฟล์ที่ชื่อว่า ExampleInstrumentedTest สามารถลบทิ้งและสร้างใหม่ได้ตามใจชอบ
รูปแบบในการทำงานของ Instrumented Test บน Android Studio
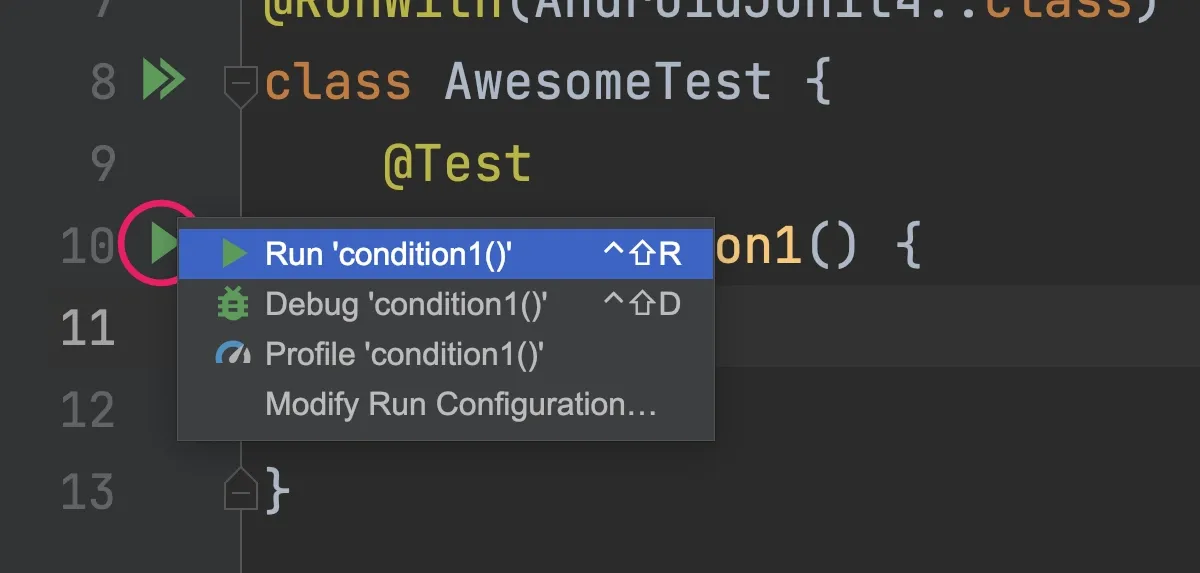
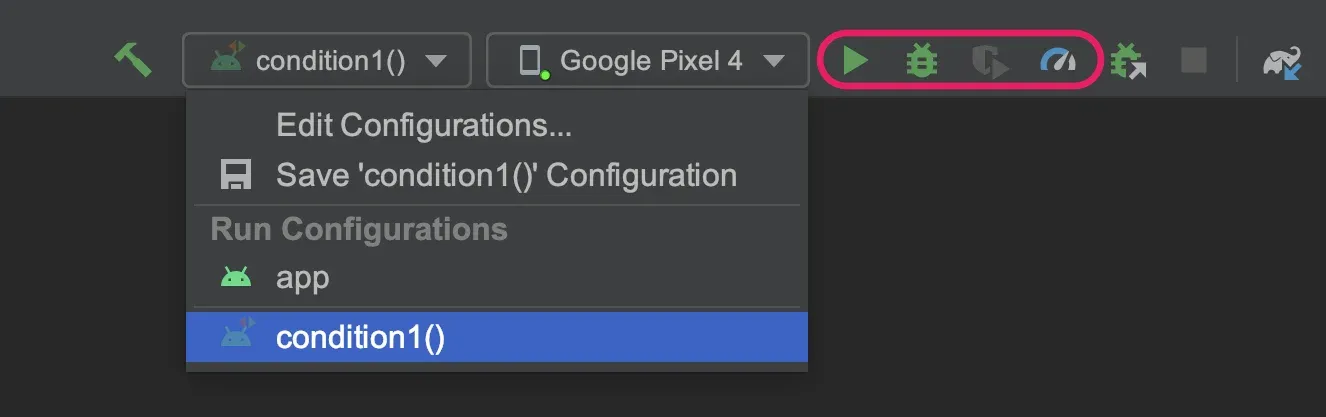
เวลานักพัฒนากดสั่งให้โค้ดสำหรับ Instrumented Test เริ่มทำงานหรือที่เรียกกันว่ารันเทส บน Android Studio จะมีให้เลือกทั้งหมด 3 แบบด้วยกัน
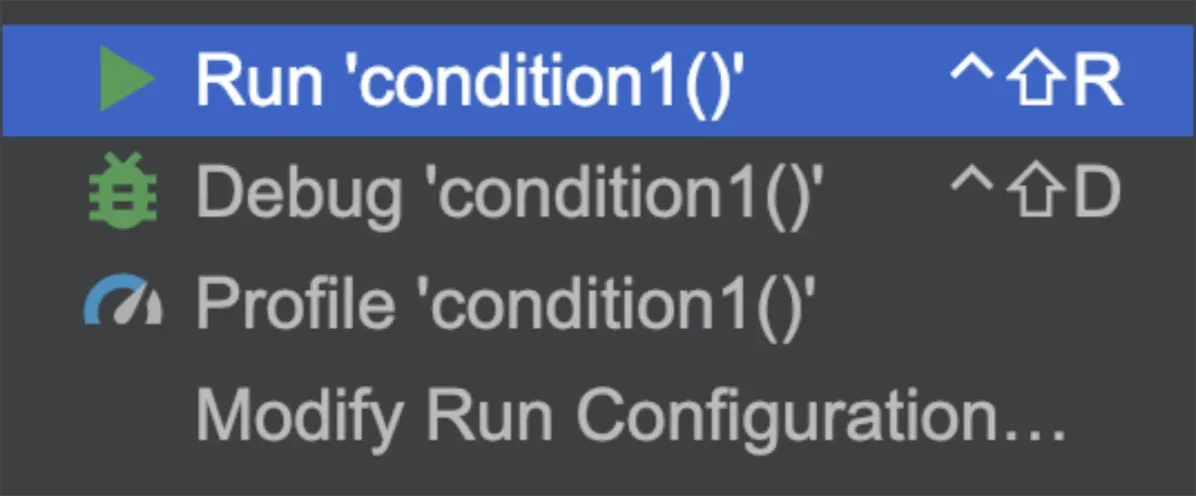
Run '<test_name>'เป็นการรันเทสแบบปกติ เพื่อดูว่าทำงานถูกต้องหรือไม่ และแสดงผลลัพธ์ในตอนท้ายDebug '<test_name>'เป็นการรันเทสแบบเปิด Debugger ด้วย เพื่อช่วยให้นักพัฒนาสามารถวิเคราะห์ปัญหาได้ง่ายในเวลาที่โค้ดสำหรับ Instrumented Test เกิดข้อผิดพลาดProfile '<test_name>'เป็นการรันเทสแบบเปิด Profiler ควบคู่ไปด้วย เพื่อใช้ดูการทำงานของตัวเครื่องระหว่าง Instrumented Test กำลังทำงาน
และนอกจากนี้ยังกำหนดรูปแบบในการรันเทสด้วยตัวเองผ่านเมนู Modify Run Configuration... ได้อีกด้วยนะ
การสั่งให้โค้ดทำการรันเทสบน Android Studio
บน Android Studio จะมีหลายวิธีเพื่อสั่งให้เทสเริ่มทำงาน โดยขึ้นอยู่กับว่านักพัฒนาต้องการสั่งให้โค้ดส่วนไหนบ้างที่จะรันเทส
รันเทสเพียงแค่ตัวเดียว
กรณีที่ต้องการรันเทสแค่เพียง Test Case เดียว สามารถกดที่เครื่องหมายที่อยู่ข้างหน้า Test Function นั้น ๆ ได้เลย
รันเทสทั้งหมดที่อยู่ในคลาส
ถ้ากดเครื่องหมายที่อยู่ข้างหน้า Test Class แทน Test Function จะเป็นการรันเทสทั้งหมดที่อยู่ในคลาสนั้น ๆ แทน
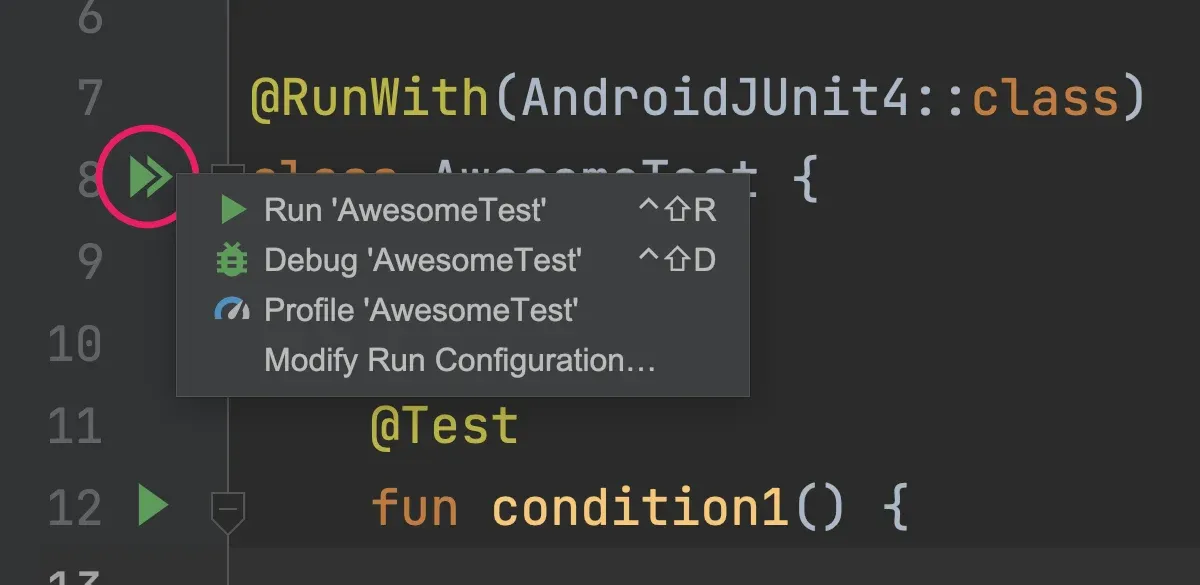
สำหรับการเขียน Instrumented Test จะต้องเขียน 1 คลาสต่อ 1 ไฟล์เท่านั้น ถ้ามีมากกว่า 1 คลาสจะรันเทสเฉพาะคลาสแรกสุดที่อยู่ในไฟล์เท่านั้น
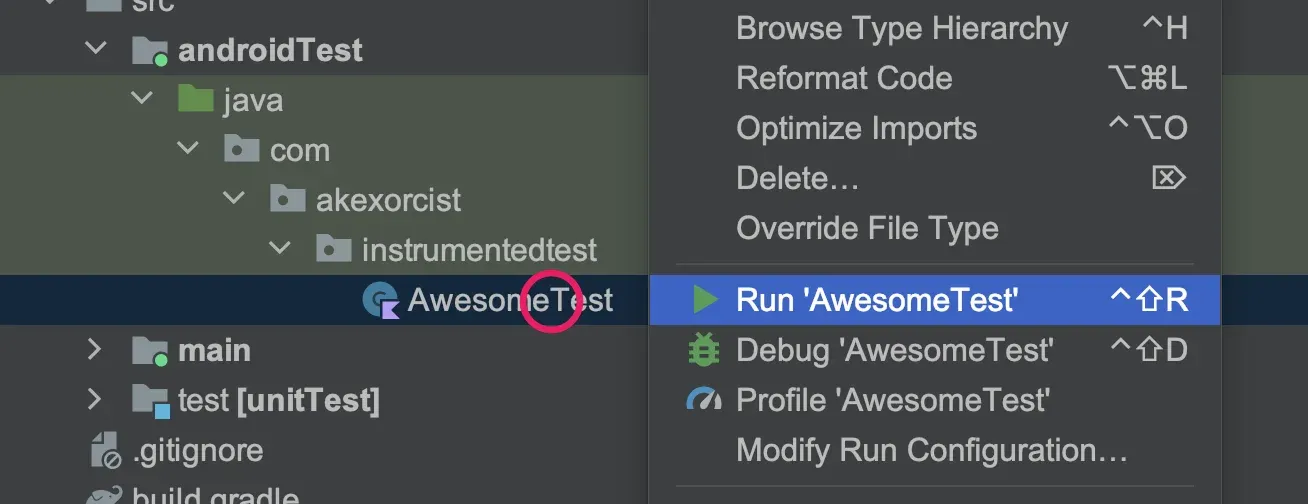
รันเทสทั้งหมดที่อยู่ในไฟล์
ถ้าคลิกขวาที่ไฟล์ในหน้าต่าง Project จะสามารถสั่งให้รันเทสทั้งหมดที่อยู่ในไฟล์นั้น ๆ ได้ทันที
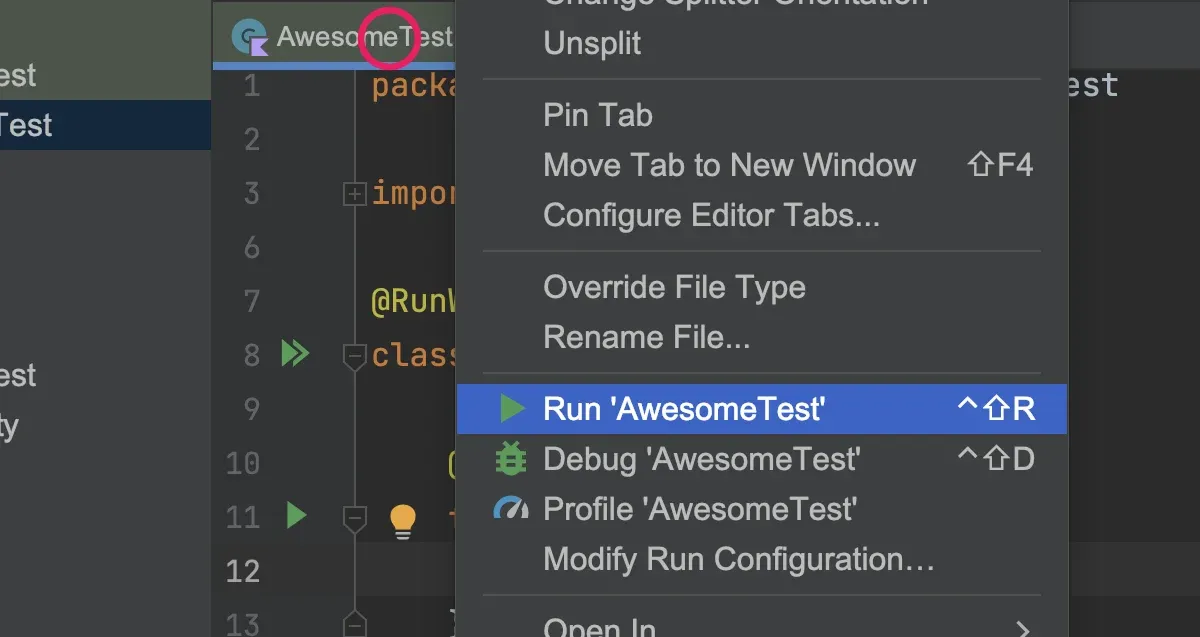
และถ้าเปิดไฟล์อยู่ก็สามารถคลิกขวาที่แถบข้างบนของไฟล์นั้น ๆ เพื่อสั่งรันเทสได้เช่นกัน
รันเทสที่เคยรันไปแล้วก่อนหน้านี้
ทุกครั้งที่นักพัฒนากดรันเทสใด ๆ ก็ตาม Android Studio จะสร้างเป็น Run Configuration ไว้ให้เสมอ ดังนั้นนักพัฒนาจึงสามารถกดเลือกจากหน้าต่าง Run Configuration ข้างบนแล้วกดปุ่ม Run เหมือนกับการรันแอปตามปกติได้เลย (สามารถเลือกเป็น Debug หรือ Profile จากปุ่มที่อยู่ข้าง ๆ ได้เหมือนกัน)
หลังจากรันเทสใด ๆ แล้ว ถ้าต้องการรันแอปเพื่อทดสอบตามปกติ ก็อย่าลืมเลือกใน Run Configuration เพื่อให้รันแอปแทนด้วยนะ
เขียนเทสแบบไหนที่ควรใช้ Instrumented Test
ถึงแม้ว่า Unit Test จะมี Robolectric เพื่อช่วยให้นักพัฒนาสามารถเขียนเทสหลาย ๆ อย่างเป็น Unit Test ที่ใช้ระยะเวลาทำงานน้อยกว่า Instrumented Test ได้ แต่บางอย่างก็ควรทำใน Instrumented Test เพื่อให้การเทสสามารถทำงานได้ถูกต้อง โดยเฉพาะการเขียนเทสเพื่อทดสอบการทำงานที่เกี่ยวข้องกับ UIอย่างเช่น UI Test หรือ Screenshot Test
แต่ถ้าเป็น Non-UI ก็แนะนำให้ใช้ Unit Test มากกว่า เพราะในปัจจุบันทีมแอนดรอยด์ก็ได้สร้าง Library อย่าง AndroidX Test เพื่อให้นักพัฒนาเขียนเทสได้ง่ายขึ้น ทำให้ในปัจจุบันเราสามารถเขียนเทสเพื่อทดสอบ Activity Lifecycle ด้วย Unit Test ได้แล้ว
Test Runner สำหรับ Instrumented Test
บนแอนดรอยด์นั้นจะแนะนำให้ใช้ Test Runner เป็น AndroidJUnit4 โดยกำหนดด้วย Annotation ที่ชื่อว่า @RunWith ไว้ข้างบน Test Class แบบนี้
import androidx.test.ext.junit.runners.AndroidJUnit4
import org.junit.runner.RunWith

@RunWith(AndroidJUnit4::class)
class AwesomeTest {
    /* ... */
}
นอกจากนี้ AndroidJUnit4 สามารถใช้ได้ทั้งใน Unit Test และ Instrumented Test โดยที่
- Unit Test จะใช้ Test Runner ของ Robolectric
- Instrumented Test จะใช้ Test Runner ของ JUnit 4 ที่ทำงานบน Android Runtime ได้
APK ที่ได้จาก Instrumented Test
ก่อนที่ Instrumented Test ทำงาน Android Studio จะสร้างไฟล์ APK ขึ้นมา 2 ตัว ตัวแรกเป็นของแอปเหมือนปกติ (เรียกว่า "App APK") และอีกตัวสำหรับ Instrumented Test (เรียกกันว่า "Test APK") โดย APK ทั้งสองตัวจะถูกติดตั้งลงในอุปกรณ์แอนดรอยด์และทำงานร่วมกัน

Test APK จะมี Package Name เหมือนกับ App APK แต่จะเพิ่ม Suffix ต่อท้ายเป็น .test ยกตัวอย่างเช่น
- App APK :
com.akexorcist.sleepingforless - Test APK :
com.akexorcist.sleepingforless.test
Package Name ของ Test APK จะไม่ได้มีนัยยะสำคัญอะไรมากนัก แต่นักพัฒนาก็สามารถแก้ไขผ่าน build.gradle ได้ตามใจชอบ
android {
    /* ... */
    defaultConfig {
        // App APK
        applicationId "com.akexorcist.sleepingforless"

        // Test APK
        testApplicationId 'com.akexorcist.sleepingforless.instrumented.test'
        /* ... */
    }
}
Library พื้นฐานสำหรับการเริ่มต้นเขียน Instrumented Test
เวลาสร้างโปรเจคข้ึนมาใหม่ Android Studio จะเพิ่ม Library สำหรับ Instrumented Test มาให้ประมาณนึงแล้ว แต่เพื่อให้เริ่มต้นเขียนได้ง่ายขึ้น ขอแนะนำให้เพิ่ม Library ของ AndroidX Test เหล่านี้เข้าไปด้วย
androidTestImplementation 'androidx.test:core-ktx:<latest_version>'
androidTestImplementation 'androidx.test:rules:<latest_version>'
androidTestImplementation 'androidx.test.ext:junit-ktx:<latest_version>'
androidTestImplementation 'androidx.fragment:fragment-testing:<latest_version>'
โดยโค้ดที่จะพูดถึงในบทความนี้ก็จะมีคำสั่งที่มาจาก Library เหล่านี้เช่นกัน
Context กับ Instrumented Test
ใน Instrumented Test สามารถเรียก Context ใช้เหมือนกัน แต่วิธีเรียก Context มาใช้จะมีอยู่ 2 วิธีด้วยกันและจะได้ Context คนละแบบกัน
val testContext: Context = InstrumentationRegistry.getInstrumentation().context

val appContext: Context = InstrumentationRegistry.getInstrumentation().targetContext
อย่างที่บอกในตอนแรกว่าการทำงานของ Instrumented Test จะเป็นแอป 2 ตัวที่ทำงานร่วมกัน จึงทำให้การเรียก Context มาใช้ จะต้องเลือกให้ถูกว่าจะใช้ Context ของแอปตัวไหน เพราะตัวนึงเป็นของ Test APK และอีกตัวของ App APK
สามารถอ่านเพิ่มเติมได้ที่ Context กับ Target Context ใน Instrumented Test ไม่เหมือนกันนะ
 Akexorcist
Launch Activity ใน Instrumented Test
ในการกำหนด Activity ที่จะให้ทำงานใน Instrumented Test มีอยู่ 2 วิธีด้วยกัน
วิธีแรก Launch Activity ด้วย Test Rule
ใช้ Test Rule ที่ชื่อว่า ActivityScenarioRule ซึ่งจะกำหนดไว้ภายในคลาสเลย ทำให้ Activity ถูกสร้างขึ้นมาและทำงานก่อนที่จะเข้า Test Method
@RunWith(AndroidJUnit4::class)
class MainActivityTest {
    @get:Rule
    var activityScenarioRule = activityScenarioRule<MainActivity>()
    /* ... */
}
ถ้าต้องการส่ง Intent Extra เข้าไปด้วยก็ให้ส่งเข้าไปแบบนี้แทน
@RunWith(AndroidJUnit4::class)
class MainActivityTest {
    private val appContext = InstrumentationRegistry.getInstrumentation().targetContext

    private val intent = Intent(appContext, MainActivity::class.java).apply {
        /* ... */
    }

    @get:Rule
    var activityScenarioRule = activityScenarioRule<MainActivity>(intent)
    /* ... */
}
วิธีที่สอง Launch Activity ใน Test Method
ใช้ launchActivity(...) ใน Test Method ทำให้ Activity ถูกสร้างขึ้นเมื่อเรียกคำสั่งดังกล่าวใน Test Method
@RunWith(AndroidJUnit4::class)
class MainActivityTest {
    @Test
    fun condition1() {
        launchActivity<MainActivity>().use { scenario: ActivityScenario<MainActivity> ->
            /* ... */
        }
    }
}
ในกรณีที่ต้องการส่ง Intent Extra ไปด้วย ก็สามารถส่งเข้าไปใน Method แบบนี้ได้เลย
@RunWith(AndroidJUnit4::class)
class MainActivityTest {
    private val appContext = InstrumentationRegistry.getInstrumentation().targetContext

    @Test
    fun condition1() {
        val intent = Intent(appContext, MainActivity::class.java).apply {
            /* ... */
        }
        launchActivity<MainActivity>(intent).use { scenario: ActivityScenario<MainActivity> ->
            /* ... */
        }
    }
}
Launch Fragment ใน Instrumented Test
สำหรับ Fragment จะมีคำสั่งอยู่ด้วยกัน 2 แบบ ขึ้นอยู่กับว่าต้องการเขียนเทสใน Fragment แบบไหน
การเทส Fragment ที่เกี่ยวกับ UI
ให้ใช้ launchFragmentInContainer
@RunWith(AndroidJUnit4::class)
class HomeFragmentTest {
    @Test
    fun condition1() {
        launchFragmentInContainer<HomeFragment>().use { scenario: FragmentScenario<HomeFragment> ->
            /* ... */
        }
    }
}
ถ้าต้องการส่ง Fragment Argument ด้วย ก็สามารถโยน Bundle เข้าไปแบบนี้ได้เลย
@RunWith(AndroidJUnit4::class)
class HomeFragmentTest {
    @Test
    fun condition1() {
        val args = bundleOf(
            /* ... */
        )
        launchFragmentInContainer<HomeFragment>(args).use { scenario: FragmentScenario<HomeFragment> ->
            /* ... */
        }
    }
}
การเทส Fragment ที่ไม่เกี่ยวกับ UI
ให้ใช้ launchFragment
@RunWith(AndroidJUnit4::class)
class HomeFragmentTest {
    @Test
    fun condition1() {
        launchFragment<HomeFragment>().use { scenario: FragmentScenario<HomeFragment> ->
            /* ... */
        }
    }
}
และถ้าต้องการส่ง Fragment Argument ด้วย ให้โยน Bundle เข้าไปแบบนี้แทน
@RunWith(AndroidJUnit4::class)
class HomeFragmentTest {
    @Test
    fun condition1() {
        val args = bundleOf(
            /* ... */
        )
        launchFragment<HomeFragment>(args).use { scenario: FragmentScenario<HomeFragment> ->
            /* ... */
        }
    }
}
Launch Service ใน Instrumented Test
สำหรับการเทสการทำงานของ Service ให้ใช้ ServiceTestRule เพื่อสร้าง Service ที่ต้องการขึ้นมาจาก Intent แบบนี้
// RemoteConfigService.kt
class RemoteConfigService : Service() {
    private val binder = LocalBinder()

    override fun onBind(intent: Intent?): IBinder = binder

    inner class LocalBinder : Binder() {
        fun getService(): RemoteConfigService = this@RemoteConfigService
    }
    /* ... */
}

// RemoteConfigServiceTest.kt
@RunWith(AndroidJUnit4::class)
class RemoteConfigServiceTest {
    @get:Rule
    val serviceTestRule = ServiceTestRule()

    @Test
    fun condition1() = runBlocking {
        val context = ApplicationProvider.getApplicationContext<Context>()
        val intent = Intent(context, RemoteConfigService::class.java)
        val binder: IBinder = serviceTestRule.bindService(intent)

        val service: RemoteConfigService = (binder as RemoteConfigService.LocalBinder).getService()
        /* ... */
    }
}
Library สำหรับการเขียน Unit Test
Library บางตัวถูกเตรียมไว้ตั้งแต่สร้างโปรเจคแล้ว แต่นักพัฒนาก็สามารถหา Library อื่น ๆ มาใช้เพื่อทำให้การเขียน Integration Test หรือ UI Test ให้ง่ายขึ้นได้เช่นกัน
สรุป
เพื่อให้ครอบคลุมโค้ดและการทำงานสำหรับแอปบนแอนดรอยด์ นักพัฒนาควรเขียนทั้ง Unit Test และ Instrumented Test เพื่อให้ครอบคลุมกับการเขียนเทสในแต่ละรูปแบบ
อย่าลืมว่าการทำงานของ Instrumented Test จะใช้เวลานานกว่า Unit Test เนื่องจากต้องทำงานบนอุปกรณ์แอนดรอยด์ ซึ่งต่างจาก Unit Test ที่ใช้แค่ JVM ดังนั้นการเขียนเทสในบางกรณีการเปลี่ยนไปทำ Unit Test คู่กับ Robolectric ก็อาจจะเป็นทางเลือกที่ดีกว่า แต่ถ้าเป็นการทำงานที่เกี่ยวกับ Android Component หรือเขียน UI Test ก็ควรใช้ Instrumented Test เป็นหลัก เพราะเชื่อถือและทำงานได้ถูกต้องมากกว่า Robolectric ที่ทำมาเพื่อจำลองการทำงานของ Android Component ได้แค่บางส่วนเท่านั้น