อยู่ในระหว่างการปรับปรุงเนื้อหา
หลังจากเกริ่นเกี่ยวกับ Custom View กันไปในตอนที่ 1 แล้วว่ามันดียังไง ทำไมนักพัฒนาถึงควรใช้ คราวนี้ก็มาถึงขั้นตอนการสร้าง Custom View ไว้ใช้งานเองบ้างละ
บทความในซีรีย์เดียวกัน
การสร้าง Custom View สามารถทำได้ 3 วิธีด้วยกัน
* สร้าง Custom View โดยสืบทอดจาก View ที่ต้องการ
* สร้าง Custom View จาก Layout XML
* สร้าง Custom View จาก View/ViewGroup โดยตรง
ส่วนการใช้วิธีแบบไหนในการสร้าง Custom View ก็ต้องบอกเลยว่าขึ้นอยู่กับการนำไปใช้งานครับ เพราะแต่ละวิธีจะมีจุดประสงค์ที่แตกต่างกันออกไป ซึ่งในบทความนี้จะขออธิบายแค่ 2 วิธีแรกเท่านั้น เพราะวิธีที่ 3 จะมีเนื้อหาที่เยอะพอสมควร และใช้วิธีที่ 2 ทดแทนได้
Custom View ที่สืบทอดจาก View ที่มีอยู่แล้ว
จุดประสงค์คืออยากจะเพิ่มความสามารถบางอย่างเข้าไปใน View ตัวนั้นๆ โดยที่ไม่ต้องสร้างใหม่เองทั้งหมด
ยกตัวอย่างเช่น เจ้าของบล็อกอยากให้ TextView มีขีดเส้นใต้แบบไม่ต้องพิมพ์โค้ดเอง
เพราะการสั่งให้ TextView มีขีดเส้นใต้นั้น ไม่สามารถทำผ่าน XML ได้โดยตรง ต้องกำหนดผ่านโค้ด Java แบบนี้
TextView tvMobileNumber = ... tvMobileNumber.setPaintFlags(tvMobileNumber.getPaintFlags() | Paint.UNDERLINE_TEXT_FLAG);และมันก็ดูไม่โอเคเท่าไรถ้าต้องมานั่งพิมพ์คำสั่งขีดเส้นใต้แบบนี้ทุกครั้ง และถ้ามี TextView หลายๆตัวที่อยากให้มีขีดเส้นใต้ ก็จะทำให้โค้ดรกเกินจำเป็นอีก
เพื่อให้ TextView มีขีดเส้นใต้และเรียกใช้งานได้ง่ายที่สุด ก็จะต้องทำเป็น Custom View นั่นเอง
โดย Custom View ตัวดังกล่าวก็จะสืบทอดมาจาก TextView โดยตรงเลย สมมติว่าชื่อ UnderlineTextView
import android.content.Context; import android.os.Build; import android.support.annotation.RequiresApi; import android.util.AttributeSet; import android.widget.TextView; public class UnderlineTextView extends TextView { public UnderlineTextView(Context context) { super(context); } public UnderlineTextView(Context context, AttributeSet attrs) { super(context, attrs); } public UnderlineTextView(Context context, AttributeSet attrs, int defStyleAttr) { super(context, attrs, defStyleAttr); } @RequiresApi(api = Build.VERSION_CODES.LOLLIPOP) public UnderlineTextView(Context context, AttributeSet attrs, int defStyleAttr, int defStyleRes) { super(context, attrs, defStyleAttr, defStyleRes); } ... }คลาสใดๆก็ตามที่สืบทอดจาก View Class จะต้องประกาศ Constructor แบบนี้เสมอ และการกำหนดค่าเริ่มต้นใดๆให้กับ View ก็จะทำในนี้ด้วยเช่นกัน
ในการเพิ่มคำสั่งขีดเส้นใต้ให้กับ TextView เจ้าของบล็อกจึงสร้าง Method ชื่อว่า setup() ขึ้นมาโดยมีคำสั่งขีดเส้นใต้อยู่ในนั้น แล้วเรียก Method ตัวนี้ที่ Constructor ทุกๆตัว
import android.content.Context; import android.graphics.Paint; import android.os.Build; import android.support.annotation.RequiresApi; import android.util.AttributeSet; import android.widget.TextView; public class UnderlineTextView extends TextView { public UnderlineTextView(Context context) { super(context); setup(); } public UnderlineTextView(Context context, AttributeSet attrs) { super(context, attrs); setup(); } public UnderlineTextView(Context context, AttributeSet attrs, int defStyleAttr) { super(context, attrs, defStyleAttr); setup(); } @RequiresApi(api = Build.VERSION_CODES.LOLLIPOP) public UnderlineTextView(Context context, AttributeSet attrs, int defStyleAttr, int defStyleRes) { super(context, attrs, defStyleAttr, defStyleRes); setup(); } private void setup() { setPaintFlags(getPaintFlags() | Paint.UNDERLINE_TEXT_FLAG); } ... }เพียงเท่านี้เจ้าของบล็อกก็สามารถเอา UnderlineTextView ไปใช้งานใน XML ได้เลย
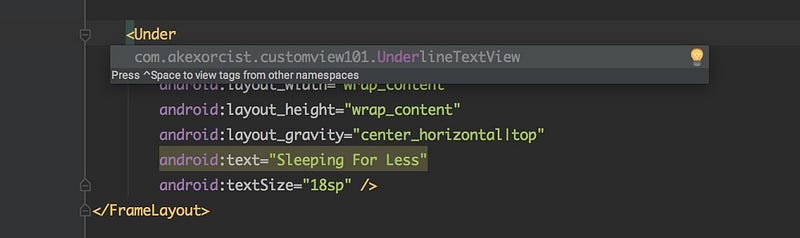
<?xml version="1.0" encoding="utf-8"?> <FrameLayout xmlns:android="http://schemas.android.com/apk/res/android" android:layout_width="match_parent" android:layout_height="match_parent" android:padding="16dp"> <com.akexorcist.customview101.UnderlineTextView android:layout_width="wrap_content" android:layout_height="wrap_content" android:layout_gravity="center_horizontal=top" android:text="Sleeping For Less" android:textSize="18sp" /> </FrameLayout>จะสังเกตเห็นว่าเวลาเอา Custom View ไปใช้งานจะต้องระบุ Package Name ให้ถูกต้องด้วย ดังนั้นในตัวอย่างจะเป็น <com.akexorcist.customview101.UnderlineTextView /> เพราะว่าคลาส UnderlineTextView ของเจ้าของบล็อกอยู่ใน com.akexorcist.customview101 นั่นเอง
แต่ไม่ต้องพิมพ์เองก็ได้นะ แค่พิมพ์ชื่อ Custom View ที่ต้องการ เดี๋ยว Android Studio ก็จะ Suggest มาให้เองทั้งหมดน่ะแหละ
หมายเหตุ — คำสั่ง Underline จะไม่แสดงผลใน Preview ต้องทดสอบด้วยการติดตั้งลงบนอุปกรณ์แอนดรอยด์เท่านั้น

จะเห็นว่าการสร้าง Custom View ด้วยวิธีแบบนี้ก็เพราะว่าแค่อยากจะเพิ่มความสามารถบางอย่างให้กับ TextView เท่านั้นเพื่อให้เรียกใช้งานได้สะดวก
Custom View จาก Layout XML
จุดประสงค์ของการทำ Custom View ด้วยวิธีนี้ก็คือต้องการสร้างเป็น Custom View ตัวใหม่ขึ้นมา โดยมี View อยู่ข้างในหลายๆตัว เพื่อให้ควบคุมสั่งงานจาก Custom View ตัวเดียวไปเลย แทนที่จะไปนั่งควบคุม View แต่ละตัวให้โค้ดมันวุ่นวาย
ยกตัวอย่างเช่น เจ้าของบล็อกอยากจะสร้างการ์ดแสดงข้อมูลบางอย่างขึ้นมา
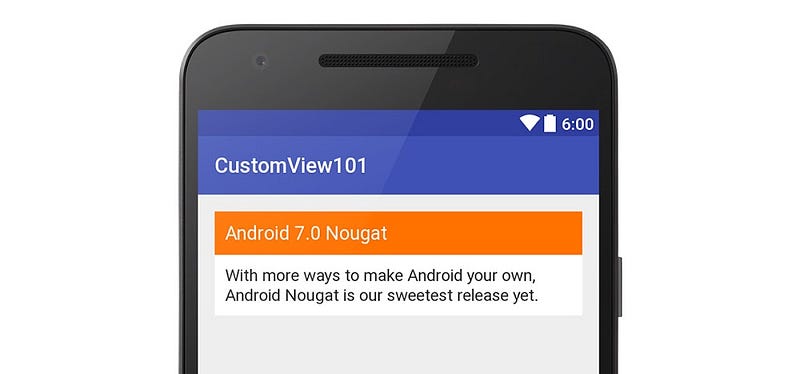
โดยปกติแล้วจะนิยมใช้วิธีเอา TextView 2 ตัวมาต่อกัน แต่สมมติว่าในแอปฯนี้มีการแสดงข้อมูลที่อยู่ในรูปแบบนี้อยู่หลายหน้าและเยอะมากๆ ถ้ามานั่งจัด TextView ให้เป็นแบบนี้ทุกๆหน้าก็คงไม่โอเคซักเท่าไร ดังนั้นการทำเป็น Custom View ไปเลยก็จะช่วยให้เรียกใช้งานได้สะดวกกว่ามาก
ในการสร้าง Custom View ด้วยวิธีนี้ จะมีขั้นตอนที่จะต้องทำทั้งหมดดังนี้
* สร้าง Layout XML
* สร้าง Custom View ที่สืบทอดจาก FrameLayout (หรือ ViewGroup ตัวอื่นๆ)
* Inflate Layout XML เข้าไปใน Custom View
* Bind View และใส่คำสั่งต่างๆตามต้องการ
* เพิ่ม Custom Attribute
* เพิ่มคำสั่งให้ดึงค่าจาก Custom Attribute ไปใช้งานใน Custom View
* ทำ Save/Restore Instance State
และสำหรับ Custom View ในตัวอย่างนี้ขอตั้งชื่อว่า InfoCardView นะครับ
สร้าง Layout XML สำหรับ InfoCardView
เพื่อไม่ให้ชื่อไฟล์ Layout XML ของ Custom View ไปปนกับไฟล์อื่นๆที่อยู่ในโปรเจค เจ้าของบล็อกจะมีรูปแบบการตั้งชื่อ Layout XML แบบนี้
* Layout สำหรับ Activity : activity_<name>.xml
* Layout สำหรับ Fragment : fragment_<name>.xml
* Layout สำหรับ Item ใน Recycler View หรือ List View : view_<name>.xml
* Layout สำหรับ Custom View : widget_<name>.xml
ดังนั้นในการสร้าง Layout สำหรับ InfoCardView ก็จะตั้งชื่อไฟล์ว่า widget_info_card.xml
<?xml version="1.0" encoding="utf-8"?> <LinearLayout xmlns:android="http://schemas.android.com/apk/res/android" android:layout_width="match_parent" android:layout_height="wrap_content" android:orientation="vertical"> <TextView android:id="@+id/tv_title" android:layout_width="match_parent" android:layout_height="wrap_content" android:background="#ff7200" android:padding="16dp" android:textColor="#ffffff" android:textSize="18sp" /> <TextView android:id="@+id/tv_content" android:layout_width="match_parent" android:layout_height="wrap_content" android:background="#ffffff" android:padding="16dp" android:textColor="#333333" android:textSize="16sp" /> </LinearLayout>สิ่งสำคัญในการสร้าง Custom View คือ Layout ที่สร้างขึ้นมานั้นจะต้องยืดหยุ่นต่อการนำไปใช้งาน ดังนั้นจึงสร้างให้ Layout มีความกว้างเป็น match_parent ไว้ก่อน ส่วนจะกว้างมากน้อยแค่ไหนก็ค่อยไปกำหนดตอนที่เรียกใช้งานอีกที
สร้าง Custom View สำหรับ InfoCardView
แนะนำว่าให้สืบทอดคลาสจาก FrameLayout เพราะว่าการสร้าง Custom View ด้วยวิธีนี้คือการสร้าง Layout XML ที่ต้องการแล้วเอามาแปะใน Custom View ดังนั้น FrameLayout จึงเหมาะสมที่สุด
import android.content.Context; import android.os.Build; import android.support.annotation.RequiresApi; import android.util.AttributeSet; import android.widget.FrameLayout; public class InfoCardView extends FrameLayout { public InfoCardView(Context context) { super(context); setup(null); } public InfoCardView(Context context, AttributeSet attrs) { super(context, attrs); setup(attrs); } public InfoCardView(Context context, AttributeSet attrs, int defStyleAttr) { super(context, attrs, defStyleAttr); setup(attrs); } @RequiresApi(api = Build.VERSION_CODES.LOLLIPOP) public InfoCardView(Context context, AttributeSet attrs, int defStyleAttr, int defStyleRes) { super(context, attrs, defStyleAttr, defStyleRes); setup(attrs); } private void setup(AttributeSet attrs) { ... } }จะเห็นว่ามีการประกาศคำสั่ง setup(AttributeSet attrs) เอาไว้ ซึ่งคล้ายกับการทำ Custom View ด้วยวิธีก่อนหน้านี้ แต่จะต่างกันตรงที่มีคลาส AttributeSet เพิ่มเข้ามา ซึ่งมีไว้สำหรับทำ Custom Attribute ที่จะพูดถึงทีหลัง
Inflate Layout XML เข้าไปใน Custom View
หลังจากที่สร้างคลาส InfoCardView ขึ้นมาแล้ว ก็ให้ Inflate Layout XML ที่สร้างไว้ ด้วยคำสั่ง
public class InfoCardView extends FrameLayout { ... private void setup(AttributeSet attrs) { inflate(getContext(), R.layout.widget_info_card, this); ... } }เท่านี้ widget_info_card.xml ก็จะถูกแปะลงใน InfoCardView แล้ว
เพิ่มเติม — Custom View ตัวนี้สืบทอดมาจาก FrameLayout ดังนั้นมันก็คือการแปะ Layout XML ลงไปใน FrameLayout นั่นเอง
Bind View และใส่คำสั่งต่างๆตามต้องการ
หลังจากที่ Inflate Layout XML เข้ามาแล้ว ก็ View Binding ให้ครบทุกตัวซะ
public class InfoCardView extends FrameLayout { private TextView tvTitle; private TextView tvContent; ... private void setup(AttributeSet attrs) { inflate(getContext(), R.layout.widget_info_card, this); bindView(); ... } private void bindView() { tvTitle = (TextView) findViewById(R.id.tv_title); tvContent = (TextView) findViewById(R.id.tv_content); } ... }เพื่อให้โค้ดดูไม่กระจัดกระจาย เจ้าของบล็อกจึงสร้าง Method ชื่อว่า bindView() ขึ้นมาเพื่อใส่คำสั่งสำหรับ View Binding ไว้ในนั้น
ใส่คำสั่งที่จำเป็นสำหรับการเอาไปเรียกใช้งาน
public class InfoCardView extends FrameLayout { ... public void setTitle(String title) { tvTitle.setText(title); } public String getTitle() { return tvTitle.getText().toString(); } public void setContent(String content) { tvContent.setText(content); } public String getContent() { return tvContent.getText().toString(); } }จะต้องมีคำสั่งอะไรบ้าง?
อันนี้แล้วแต่ผู้ที่หลงเข้ามาอ่านว่าจะนำไปใช้งานยังไงบ้าง ถ้าอยากให้ Custom View ตัวนี้เปลี่ยนสีตัวหนังสือหรือพื้นหลังได้ ก็เพิ่มคำสั่งเข้าไปตามใจชอบได้เลย
ส่วนการเพิ่ม Listener บางอย่างใน Custom View ก็แนะนำว่าให้สร้าง Listener ของตัวเองขึ้นมาเลย เพื่อที่ว่าเวลาเรียกใช้งานจะได้สื่อความหมายและเข้าใจได้ง่ายกว่า
ยกตัวอย่างเช่น อยากจะให้ TextView ใน InfoCardView สามารถกดได้ เจ้าของบล็อกก็จะทำแบบนี้
public class InfoCardView extends FrameLayout implements View.OnClickListener { ... private InfoClickListener infoClickListener; ... private void setup(AttributeSet attrs) { inflate(getContext(), R.layout.widget_info_card, this); bindView(); setupView(); } ... private void setupView() { tvTitle.setOnClickListener(this); tvContent.setOnClickListener(this); } ... public void setInfoClickListener(InfoClickListener listener) { this.infoClickListener = listener; } @Override public void onClick(View view) { if (view == tvTitle) { onTitleClick(); } else if (view == tvContent) { onContentClick(); } } private void onTitleClick() { if (infoClickListener != null) { infoClickListener.onTitleClick(); } } private void onContentClick() { if (infoClickListener != null) { infoClickListener.onContentClick(); } } public interface InfoClickListener { void onTitleClick(); void onContentClick(); } }จากตัวอย่างจะเห็นว่าถึงแม้ TextView ทั้ง 2 ตัวจะมี OnClickListener ให้ใช้งานอยู่แล้ว แต่การสร้าง Interface ขึ้นมาเพื่อไปครอบการทำงานของ OnClickListener อีกชั้น จะช่วยให้นำไปใช้งานได้สะดวกกว่า สามารถรู้ได้ทันทีว่าผู้ใช้กดเลือกที่ Title หรือ Content โดยไม่ต้องมานั่งเช็คทีหลังตอนนำไปใช้งาน
ลองเรียกใช้งานเพื่อดูผลลัพธ์การทำงาน
เอา Custom View ที่สร้างขึ้นมาไปแปะใน Layout XML ที่ต้องการได้เลยจ้า
<?xml version="1.0" encoding="utf-8"?> <LinearLayout xmlns:android="http://schemas.android.com/apk/res/android" android:layout_width="match_parent" android:layout_height="match_parent" android:background="#eeeeee" android:orientation="vertical" android:padding="16dp"> <com.akexorcist.customview101.InfoCardView android:id="@+id/icv_android_version" android:layout_width="match_parent" android:layout_height="wrap_content" /> </LinearLayout>หมายเหตุ — การตั้งชื่อ ID ให้กับ Custom View ขึ้นอยู่กับผู้ที่หลงเข้ามาอ่านเลย ในตัวอย่างนี้เจ้าของบล็อกจะย่อคำว่า InfoCardView เป็น icv_ เพื่อใช้ในการตั้งชื่อ ID
เวลาเรียกใช้งานในฝั่ง Java ก็สามารถเรียกใช้งานได้ปกติเหมือน View ทั่วไปเลย
public class MainActivity extends AppCompatActivity implements InfoCardView.InfoClickListener { private InfoCardView icvAndroidVersion; @Override protected void onCreate(Bundle savedInstanceState) { super.onCreate(savedInstanceState); setContentView(R.layout.activity_main); bindView(); setupView(); } private void bindView() { icvAndroidVersion = (InfoCardView) findViewById(R.id.icv_android_version); } private void setupView() { icvAndroidVersion.setTitle(getString(R.string.nougat_title)); icvAndroidVersion.setContent(getString(R.string.nougat_content)); icvAndroidVersion.setInfoClickListener(this); } @Override public void onTitleClick() { // Do something when title was clicked } @Override public void onContentClick() { // Do something when content was clicked } }เย้! ใช้งานได้แล้ว!
แต่ในความเป็นจริง Custom View ตัวนี้ยังไม่ค่อยสมบูรณ์มากนัก เพราะว่าเวลาจะใช้งานและกำหนดค่าต่างๆต้องมานั่งกำหนดผ่านโค้ด Java ซึ่งไม่ค่อยสะดวกซักเท่าไร
อยากจะกำหนดข้อความที่แสดงใน Title กับ Content ผ่าน Layout XML เลยก็ทำไม่ได้
เพื่อให้ InfoCardView เป็น Custom View ที่เหมาะสมกว่านี้ เจ้าของบล็อกก็จะต้องทำสิ่งที่เรียกว่า Custom Attribute เพื่อให้สามารถกำหนดค่าผ่าน Layout XML ได้เลย
เพิ่ม Custom Attribute ให้กับ InfoCardView
ไม่ว่าจะเป็น android:text, android:background หรือ android:layout_width พวกนี้มีชื่อเรียกว่า Attribute โดยเป็น System Attribute ที่ตัวแอนดรอยด์มีให้ใช้งานอยู่แล้ว
แต่สมมติว่าเจ้าของบล็อกอยากจะสร้าง Attribute ขึ้นมาเป็นของตัวเองเพื่อเรียกใช้งานใน Custom View ของตัวเอง ก็จะเรียกว่า Custom Attribute
การสร้าง Custom Attribute สามารถสร้างได้ผ่าน Resource XML เลย โดยแนะนำให้สร้างไฟล์ชื่อว่า attrs.xml ขึ้นมา เพื่อกำหนด Custom Attribute ที่ต้องการไว้ในนั้น

โดยคำสั่งที่ใช้เพื่อสร้าง Custom Attribute จะมีหน้าตาประมาณนี้
* Root Element ของ attrs.xml จะต้องเป็น <resources>…</resources>
* Custom Attribute ที่ต้องการสร้างให้ประกาศ <declare-styleable>…</declare-styleable> แล้วกำหนดชื่อให้ตรงกับชื่อคลาส
* อยากให้ Custom Attribute มีอะไรบ้างให้ประกาศ <attr>…</attrs> ไว้ข้างในได้เลย โดยกำหนดชื่อ Attribute กับ Format ตามต้องการ
จากตัวอย่าง InfoCardView จะมี Custom Attribute จำนวน 2 ตัวด้วยกันคือ icv_title และ icv_content โดยทั้ง 2 ตัวนั้นมี Format เป็น String
หมายเหตุ — การตั้งชื่อ Attribute ไม่ควรซ้ำกับชื่ออื่นๆที่มีอยู่แล้วในแอนดรอยด์หรือไลบรารีตัวอื่นๆ ดังนั้นนักพัฒนาส่วนใหญ่จึงนิยมเพิ่ม Prefix เข้าไปในชื่อ Attribute ด้วยตัวย่อของชื่อคลาส
เวลาที่สร้าง Custom Attribute แล้วต้องการเรียกใช้งาน ก็จะเรียกใช้งานในรูปแบบนี้
<?xml version="1.0" encoding="utf-8"?> <LinearLayout xmlns:android="http://schemas.android.com/apk/res/android" xmlns:app="http://schemas.android.com/apk/res-auto" ...> <com.akexorcist.customview101.InfoCardView android:id="@+id/icv_android_version" android:layout_width="match_parent" android:layout_height="wrap_content" app:icv_content="@string/nougat_content" app:icv_title="@string/nougat_title" /> </LinearLayout>การเรียกใช้งาน Custom Attribute ใน Layout XML จะต้องเรียกผ่าน Namespace ที่มีค่าเป็น http://schemas.android.com/apk/res-auto ซึ่งส่วนใหญ่แล้วมักจะกำหนดชื่อ Namespace ว่า app (ใน Android Studio สามารถพิมพ์ appNs สำหรับ Code Completion ได้เลย) ถึงแม้ว่านักพัฒนาบางคนจะกำหนด Namespace เป็นชื่ออื่นๆตามไบรารีตัวเอง สุดท้ายแล้วก็คือตัวเดียวกันนั่นแหละ ดังนั้นจะใช้ชื่อ Namespace ว่า app ไปเลยก็ได้
แต่ Custom Attribute ที่สร้างขึ้นมาในตอนนี้ยังทำงานไม่ได้นะ เพราะว่าเจ้าของบล็อกยังไม่ได้เพิ่มคำสั่งในฝั่ง Java เลย!!
เพิ่มคำสั่งให้ดึงค่าจาก Custom Attribute ไปใช้งานใน Custom View
ถ้ายังจำกันได้ ในคลาส InfoCardView เจ้าของบล็อกได้พูดถึงคลาสที่ชื่อว่า AttributeSet ไว้
นั่นแหละ คลาสที่จะช่วยให้ Custom Attibute ที่เจ้าของบล็อกสร้างขึ้นมาสามารถใช้งานกับ InfoCardView ได้
อ่ะ ย้อนอดีตกันอีกครั้ง จะได้ไม่ต้องเลื่อนกลับขึ้นไปดูให้เสียเวลา
public class InfoCardView extends FrameLayout implements View.OnClickListener { ... public InfoCardView(Context context) { super(context); setup(null); } public InfoCardView(Context context, AttributeSet attrs) { super(context, attrs); setup(attrs); } public InfoCardView(Context context, AttributeSet attrs, int defStyleAttr) { super(context, attrs, defStyleAttr); setup(attrs); } @RequiresApi(api = Build.VERSION_CODES.LOLLIPOP) public InfoCardView(Context context, AttributeSet attrs, int defStyleAttr, int defStyleRes) { super(context, attrs, defStyleAttr, defStyleRes); setup(attrs); } private void setup(AttributeSet attrs) { ... } ... }การทำให้ Custom Attribute สามารถใช้งานใน Custom View จะมีหลักการง่ายๆคือดึงค่าจาก Attribute ที่ต้องการแล้วเอาค่าที่ได้ไปใช้งาน
นั่นหมายความว่า เจ้าของบล็อกจะต้องดึงค่าจาก app:icv_title กับ app:icv_content เพื่อเอาไปกำหนดค่าให้กับ TextView นั้น
ดังนั้นเจ้าของบล็อกจึงสร้าง Method ที่ชื่อว่า setupStyleable(AttributeSet attrs) ขึ้นมา โดยเรียกใช้งานก่อน setupView()
public class InfoCardView extends FrameLayout implements View.OnClickListener { ... private void setup(AttributeSet attrs) { inflate(getContext(), R.layout.widget_info_card, this); bindView(); setupStyleable(attrs); setupView(); } private void setupStyleable(AttributeSet attrs) { } ... }สำหรับการดึงข้อมูลจาก Custom Attribute มาใช้งานจะต้องเรียกผ่านคลาสที่ชื่อว่า TypedArray ซึ่งคลาสดังกล่าวจะไปดึงค่า Custom Attribute มาอีกที
public class InfoCardView extends FrameLayout implements View.OnClickListener { ... private String title; private String content; ... private void setupStyleable(AttributeSet attrs) { if (attrs != null) { TypedArray typedArray = getContext().obtainStyledAttributes(attrs, R.styleable.InfoCardView); title = typedArray.getString(R.styleable.InfoCardView_icv_title); content = typedArray.getString(R.styleable.InfoCardView_icv_content); typedArray.recycle(); } } ... }อยากให้คลาส TypedArray ดึง Custom Attribute อันไหนมา ก็ให้กำหนดให้ถูกต้อง จากตัวอย่างกำหนดเป็น R.styleable.InfoCardView ตามที่สร้างไว้ใน attrs.xml นั่นเอง (จะเห็นว่ามี Context เป็นหัวใจสำคัญ)
ในคลาส TypedArray จะมีคำสั่ง getBoolean, getColor, getString, getDrawable, getDimension, getResourceId และอื่นๆอีกมากมาย เพื่อดึงข้อมูลที่กำหนดไว้ใน Layout XML มาใช้งาน (ถ้ามี) โดยคำสั่งที่เรียกใช้งานจะต้องตรงกับ Format ของ Attribute ตัวนั้นๆที่กำหนดไว้ใน attrs.xml ด้วยนะ
ส่วนชื่อ Attribute จะเห็นว่าเมื่อกำหนดค่าใน TypedArray จะต้องกำหนดชื่อ Attribute โดยมี InfoCardView_ เป็น Prefix ด้วย
ถ้าเจ้าของบล็อกไม่ได้กำหนดค่า Title และ Content ผ่าน Layout XML จะทำให้ค่าของตัวแปรทั้งสองมีค่าเป็น Null ทันที ดังนั้นเวลาเอาค่าไปใช้งานก็ควรเช็ค Null ด้วย (ส่วน Attribute ที่กำหนด Format แบบอื่นๆ จะสามารถกำหนดค่า Default ได้)
คำแนะนำ — ควรจะดึงข้อมูลจาก Custom Attribute มาเก็บไว้ให้ครบทุกตัวก่อนจะนำไปใช้งาน เพราะคลาส TypedArray เมื่อใช้งานเสร็จจะต้องเคลียร์ทิ้งด้วยคำสั่ง recycle() ทุกครั้ง
เมื่อดึงค่าต่างๆจาก Custom Attribute มาเก็บไว้เรียบร้อยแล้ว จากนั้นก็เอาค่าที่ได้ไปใช้งานได้เลย โดยเจ้าของบล็อกจะกำหนดค่าใน setupView() แบบนี้
public class InfoCardView extends FrameLayout implements View.OnClickListener { ... private String title; private String content; ... private void setupStyleable(AttributeSet attrs) { TypedArray typedArray = getContext().obtainStyledAttributes(attrs, R.styleable.InfoCardView); title = typedArray.getString(R.styleable.InfoCardView_icv_title); content = typedArray.getString(R.styleable.InfoCardView_icv_content); typedArray.recycle(); } private void setupView() { tvTitle.setOnClickListener(this); tvContent.setOnClickListener(this); setTitle(title); setContent(content); } public void setTitle(String title) { this.title = title; tvTitle.setText(title); } public String getTitle() { return this.title; } public void setContent(String content) { this.content = content; tvContent.setText(content); } public String getContent() { return this.content; } ... }จะเห็นว่านอกจากจะดึงค่าจาก Custom Attribute มาเก็บไว้ใช้งานแล้ว ในคำสั่ง setTitle(String title) กับ setContent(String content) เจ้าของบล็อกก็แก้ไขให้มีการรับค่ามาเก็บไว้ในตัวแปรก่อน แล้วค่อยกำหนดให้กับ TextView และเวลาเรียกใช้คำสั่ง getTitle() หรือ getContent() ก็จะโยนค่าจากตัวแปรไปให้โดยตรง
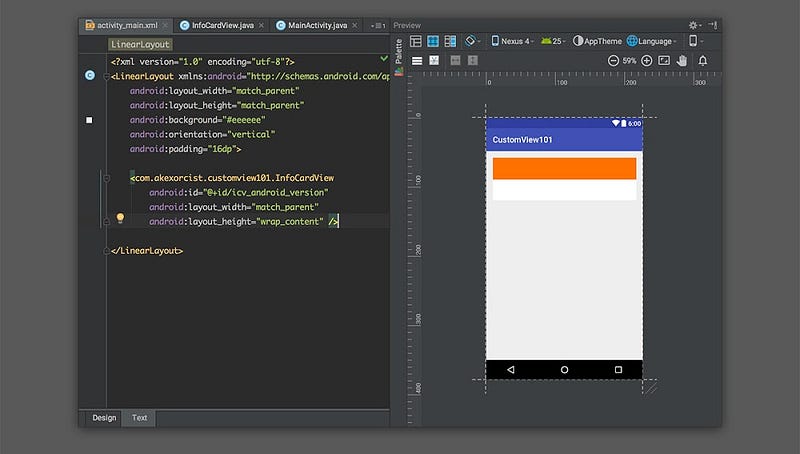
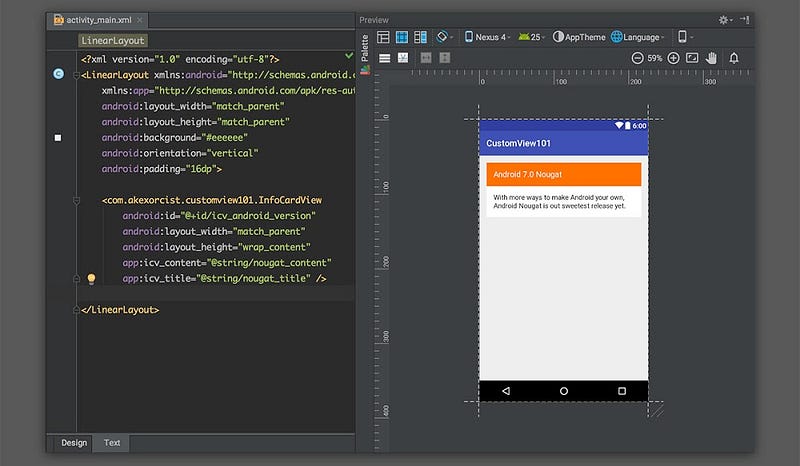
เพียงเท่านี้เจ้าของบล็อกก็สามารถกำหนดค่าต่างๆผ่าน XML ได้เลย และสามารถเห็นผลลัพธ์ในหน้าต่าง Preview ได้ทันที
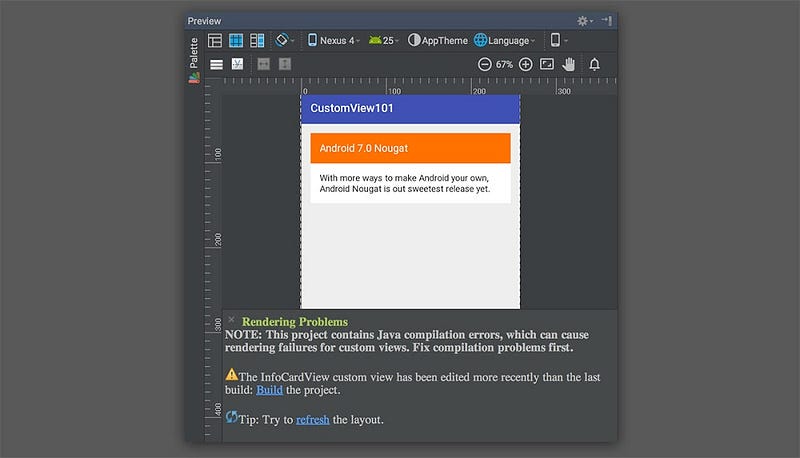
ในการ Preview Custom View ที่สร้างขึ้นมาเอง ถ้ามีการแก้ไขใดๆในคลาสดังกล่าวจะต้อง Build Project เพื่ออัปเดตผลลัพธ์ทุกครั้งด้วย ไม่เช่นนั้นที่หน้า Preview จะมีการแจ้งเตือนแบบนี้
เพิ่มเติม — สำหรับการแสดงผลบางอย่างอาจจะไม่สามารถแสดงใน Preview ได้ อย่างเช่นการวาด Canvas ลงบน Custom View เป็นต้น เพราะงั้นอย่าแปลกใจถ้าทำ Custom View แล้วไม่สามารถ Preview บางอย่างได้ถูกต้อง
อ๊ะๆ อาจจะดูเหมือนว่า Custom View เสร็จเรียบร้อยแล้ว แต่ยังขาดอีกขั้นตอนหนึ่งที่สำคัญมากกกกกก และเป็นขั้นตอนที่นักพัฒนาส่วนใหญ่มักจะมองข้ามกันไปโดยไม่รู้ตัว
นั่นก็คือ…
ทำ Save/Restore Instance State ให้กับ InfoCardView
ในการทำ Save/Restore Instance State นอกจากจะต้องทำใน Activity และ Fragment แล้ว ควรทำในระดับ View ด้วยเช่นกัน เพราะ View ทุกๆตัวก็มี State ต่างๆเป็นของตัวเอง ซึ่งโดยปกติแล้ว View ที่มีให้ใช้งานก็จัดการเรื่องนี้เรียบร้อยแล้ว แต่ในการสร้าง Custom View ขึ้นมาใช้งานเอง ก็ต้องจัดการเรื่องนี้เองด้วยนะ
โดย View ทุกตัวจะมี Override Method ที่ชื่อว่า onSaveInstanceState() กับ onRestoreInstanceState(Parcelable state) เพื่อให้นักพัฒนาจัดการกับเรื่องนี้
public class InfoCardView extends FrameLayout implements View.OnClickListener { ... private String title; private String content; ... @Override protected Parcelable onSaveInstanceState() { return super.onSaveInstanceState(); ... } @Override protected void onRestoreInstanceState(Parcelable state) { super.onRestoreInstanceState(state); ... } }แล้วจะต้องใส่คำสั่งอะไรเพิ่มเข้าไปบ้างล่ะ?
อย่างแรกสุดให้เริ่มจากดูก่อนว่าจะมี Instance State ตัวไหนที่จะต้องจัดการบ้าง ซึ่งใน InfoCardView ของเจ้าของบล็อกมี 2 ตัว คือตัวแปร title และ content ที่เป็น String นั่นเอง
ซึ่งการ Save/Restore Instance State จะใช้วิธีที่แตกต่างจาก Activity และ Fragment อยู่นิดหน่อย ตรงที่จะใช้คลาสที่ชื่อว่า BaseSavedState เข้ามาใช้
public class InfoCardView extends FrameLayout implements View.OnClickListener { ... @Override protected Parcelable onSaveInstanceState() { return super.onSaveInstanceState(); ... } @Override protected void onRestoreInstanceState(Parcelable state) { super.onRestoreInstanceState(state); ... } private static class SavedState extends BaseSavedState { ... SavedState(Parcelable superState) { super(superState); } private SavedState(Parcel in) { super(in); ... } @Override public void writeToParcel(Parcel out, int flags) { super.writeToParcel(out, flags); ... } public static final Creator<SavedState> CREATOR = new Creator<SavedState>() { public SavedState createFromParcel(Parcel in) { return new SavedState(in); } public SavedState[] newArray(int size) { return new SavedState[size]; } }; } }ให้สร้าง Inner Class ที่ชื่อว่า SavedState (หรือชื่ออื่นก็ได้) โดยสืบทอดมาจากคลาส BaseSavedState ซึ่งคลาสดังกล่าวนี้จะเป็น Boilerplate code ที่ต้องพิมพ์แบบนี้ทุกครั้งเมื่อจะทำ Save/Restore Instance State ใน Custom View และกำหนดให้คลาส SavedState เป็น Private ได้เลย เพราะจะไม่มีการ Reuse ใช้งานที่อื่น
เมื่อสร้างคลาส SavedState ขึ้นมาแล้ว ก็ให้เพิ่มตัวแปรที่ต้องการจะ Save/Restore เข้าไปซะ ยกตัวอย่างจากเจ้าของบล็อกก็คือ String ที่ชื่อ title กับ content ดังนั้นเจ้าของบล็อกก็เพิ่มคำสั่งสำหรับทั้งสองเข้าไปดังนี้
public class InfoCardView extends FrameLayout implements View.OnClickListener { ... private static class SavedState extends BaseSavedState { String title; String content; SavedState(Parcelable superState) { super(superState); } private SavedState(Parcel in) { super(in); this.title = in.readString(); this.content = in.readString(); } @Override public void writeToParcel(Parcel out, int flags) { super.writeToParcel(out, flags); out.writeString(this.title); out.writeString(this.content); } public static final Creator<SavedState> CREATOR = new Creator<SavedState>() { public SavedState createFromParcel(Parcel in) { return new SavedState(in); } public SavedState[] newArray(int size) { return new SavedState[size]; } }; } }จะเห็นว่าใน SavedState เจ้าของบล็อกก็ประกาศตัวแปรที่เหมือนกับที่ประกาศไว้ใน InfoCardView เลย แล้วใน SavedState(Parcel in) ก็มีการใช้คำสั่ง readString ให้กับตัวแปรทั้งสอง และใน writeToParce(Parcel out, int flags) ก็มีการใช้คำสั่ง writeString ให้กับตัวแปรทั้งสองเช่นกัน
เมื่อสร้างคลาส SavedState เสร็จเรียบร้อยแล้ว ก็เอาไปเรียกใช้งานใน onSaveInstanceState() กับ onRestoreInstanceState(Parcelable state) แบบนี้ได้เลย
public class InfoCardView extends FrameLayout implements View.OnClickListener { ... @Override protected Parcelable onSaveInstanceState() { Parcelable superState = super.onSaveInstanceState(); SavedState ss = new SavedState(superState); ss.title = this.title; ss.content = this.content; return ss; } @Override protected void onRestoreInstanceState(Parcelable state) { if (!(state instanceof SavedState)) { super.onRestoreInstanceState(state); return; } SavedState ss = (SavedState) state; super.onRestoreInstanceState(ss.getSuperState()); this.title = ss.title; this.content = ss.content; setTitle(title); setContent(content); } ... }ใน onSaveInstanceState() จะเห็นว่าเจ้าของบล็อกเก็บค่าตัวแปรลงในคลาส SavedState ด้วยคำสั่ง
ss.title = this.title; ss.content = this.content;และเวลา onRestoreInstanceState(Parcelable state) จะใช้คำสั่ง
this.title = ss.title; this.content = ss.content; setTitle(title); setContent(content);ซึ่งจะทำให้ Custom View ของผู้ที่หลงเข้ามาอ่านสามารถ Save/Restore Instance State ได้แล้ว
เพียงเท่านี้ InfoCardView ของเจ้าของบล็อกก็เสร็จสมบูรณ์และพร้อมที่จะนำไปใช้งานจริงแล้ว เย้! (/me ปาดเหงื่อ)
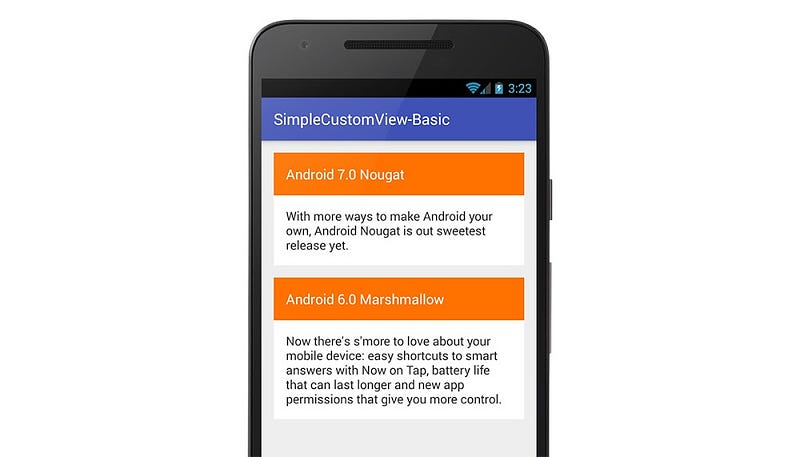
สำหรับตัวอย่างโค้ดที่ใช้อธิบาย เจ้าของบล็อกได้ทำเป็น Repository ใน GitHub ไว้เรียบร้อยแล้ว สามารถเข้าไป Clone หรือเข้าไปดูกันได้ที่ SimpleCustomView-Basic [GitHub]
เพิ่มเติม
การ Save/Restore Instance State ให้กับค่า Boolean
สำหรับตัวแปร Boolean จะพิเศษกว่าชาวบ้านหน่อยเพราะไม่มีคำสั่ง readBoolean หรือ writeBoolean ให้ใช้โดยตรง ซึ่งก็ไม่เข้าใจว่าทำไม ดังนั้นเวลาต้องการเก็บ Instance State ที่เป็น Boolean ก็จะเก็บเป็น Byte แบบนี้แทน
private static class SavedState extends BaseSavedState { boolean isEnabled; SavedState(Parcelable superState) { super(superState); } private SavedState(Parcel in) { super(in); this.isEnabled = in.readByte() != 0; } @Override public void writeToParcel(Parcel out, int flags) { super.writeToParcel(out, flags); out.writeByte((byte) (isEnabled ? 1 : 0)); } public static final Creator<SavedState> CREATOR = new Creator<SavedState>() { public SavedState createFromParcel(Parcel in) { return new SavedState(in); } public SavedState[] newArray(int size) { return new SavedState[size]; } }; }ก็คือเก็บให้อยู่ในรูป Byte เป็น 0 กับ 1 นั่นแหละ โดยให้ 0 มีค่าเป็น False และ 1 มีค่าเป็น True แทน
สรุป
ในบทความนี้ก็จะเป็นการสร้าง Custom View 2 วิธีด้วยกันคือการสืบทอดจากคลาสที่ต้องการโดยตรงแล้วเพิ่มคำสั่งที่ต้องการเข้าไปนิดหน่อย กับอีกแบบคือการสร้าง Layout แล้วทำให้มันกลายเป็น Custom View ซะ
สำหรับการทำ Save/Restore Instance State ให้กับ Custom View อาจจะฟังดูเหมือนวุ่นวายอยู่พอสมควร แต่ในความเป็นจริงแล้วถ้าผู้ที่หลงเข้ามาอ่านไม่จัดการ Instance State ใน Custom View สุดท้ายแล้วโค้ดเหล่านี้มันก็จะไปอยู่ใน Activity หรือ Fragment ที่เรียกใช้งาน Custom View ตัวนี้อยู่ดี ถึงแม้ว่า TextView ใน Custom View ตัวนี้จัดการเรื่อง Instance State ให้อยู่แล้ว แต่ผู้ที่หลงเข้าควรทำอยู่ดีเพื่อให้ตัวแปรที่เรียกใช้งานใน Custom View ยังคงอยู่เมื่อเกิด Configuration Change
ที่สำคัญ Custom View ทุกตัวควรกำหนดค่าผ่านโค้ด Java หรือ XML ก็ได้ เพื่อให้ยืดหยุ่นต่อการนำไปใช้งานจริง
สุดท้ายแล้ว ก็ยังเหลือการทำ Custom View แบบที่ 3 ที่เจ้าของบล็อกบอกไว้ว่าจะทำให้ Custom View มีประสิทธิภาพที่ดีกว่าสองวิธีแรกที่อธิบายไปในบทความนี้ แต่วิธีก็จะซับซ้อนมากตามด้วย ดังนั้นบทความนี้จึงขอจบลงเพียงเท่านี้ก่อนดีกว่า ส่วนตอนต่อไปจะว่างเขียนเมื่อไร จะลืมเขียนมั้ย ก็ต้องรอติดตามกันต่อไปนะจ๊ะ